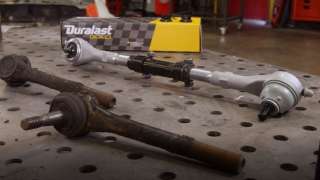
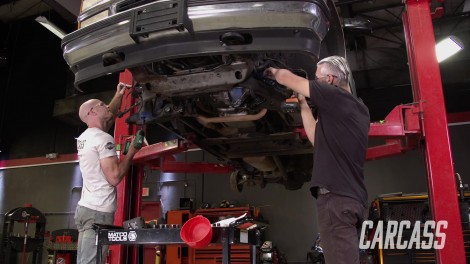
Carcass Featured Projects

Carcass Builds

Parts Used In This Episode

Episode Transcript

(Jeremy)>> You're watching Powernation!

(Jeremy)>> Today on Carcass we bring a tuckered out Tahoe into the shop that has seen some abuse. We'll give it a once over showing you some key wear items to look for when getting a high mileage project ready for its new lease on life.

(Jimmy)>> We'll diagnose failure points on the front suspension and how to replace them, keeping you safe and get your worn out ride back on the road for many years to come. [ Music ] [ engine revving ] [ Music ]

[ Music ] [ pressure washer humming ] [ Music ] [ pressure washer humming ] [ Music ]

(Jeremy)>> Hey guys, welcome to Carcass. We're starting a new project today. This is our 1996 two door Tahoe and the thing's pretty tuckered out. It's got a pile of miles on it, and with a pile of miles comes a lot of maintenance.

(Jimmy)>> And what we're gonna do with this thing is actually convert it to two wheel drive. I'm joking, we're not gonna do that because that would hurt way too many feelings. What we're actually gonna do is just show you guys how you can maintain a vehicle like this that's pretty old and beat up. We're gonna throw some parts at it and get it back on the road, but first we still have a lot of cleaning to do. [ pressure washer humming ]

(Jimmy)>> The Chevy Tahoe was introduced in 1995 when GM decided to drop the Blazer moniker. Although the two door GMC Yukon came out in '92 Chevy waited a few years to introduce the Tahoe. You could get these in two wheel drive or four wheel drive models.

(Jeremy)>> The Tahoe came with your choice of two different power plants. A 5.7 250-horsepower Vortec engine or a torquey 6.5-liter 180 horsepower V-8 turbo diesel, but that was only offered in the two door four wheel drive models. The interior was designed for comfort with four different trim levels allowing up to six passengers depending on what you wanted. It shares the GMT-400 platform, which is the same as the o-b-s trucks of that time, and the last year of production for the two door model like ours was '99-2000. Our Tahoe is a 1996. It's got 252,000 miles on it, and where we're gonna be focusing most of our attention is up here in the front. Now as far as the maintenance side of things goes this is where it's been lacking the most. We're gonna be working on the steering, the suspension, and the brakes. Pretty much everything that gets us going straight down the road and let's us stop, and really what we're gonna start on is try to remove the torsion bars. What that's gonna do is relieve some of the stress up here in the suspension. It's gonna make it a little easier for us to work on it. Jimmy's got some tools. So we'll get this unloaded and see if we can get the torsion bar keys and torsion bars out of the way. [ Music ] Using our two jaw puller, we're gonna put a bit of tension on the keys so we can remove the adjustors. Then we'll loosen the puller and hammer the torsion bar out of the way so we can get the keys out of the way. It's about ready to fall out of there. [ Music ] [ ratchet clicking ]

(Jimmy)>> The torsion bar suspension system is a design that has come and gone over the years in GM trucks. Instead of using a coil spring that compresses with wheel travel it uses a long bar that twists to provide the spring force. All GMT-400 trucks like our Tahoe use this suspension design, and even some new pickups from GM still use it today. [ Music ] [ ratchet clicking ] [ Music ]

[ ratchet clicking ] [ Music ] [ hammer tapping ] [ Music ]

(Jeremy)>> Now I'm stuck! There we go! [ hammer banging ]

(Jeremy)>> So the torsion bars and the keys came out awesome, which is normally not the case, especially me being from Minnesota and the rust belt, that just doesn't happen. So I've already got a really good feeling that this truck is gonna come apart really easy.

(Jimmy)>> Now something to consider when you've bought a used car or in the process of buying one is just check out all the parts and pieces that are consumable items just to see what kind of condition they're in. On ours for example this rotor is completely shot. It's got a bunch of grooves in it. It's got a big lip on the edge. These pads have almost no friction material left. So there's just a lot of stuff that we need to replace. We're just gonna get this old stuff off and get some new parts on it. We'll start by taking the calipers and the rotors off, followed by the c/v axle nut. [ Music ]

[ drillS humming ] [ Music ]

(Jeremy)>> That fell! Gravity every time!

(Jimmy)>> Then we'll remove the hubs and start disassembling the suspension components from the knuckle. [ Music ] [ hammer tapping ]

(Jeremy)>> That's been in there a long time.

(Jimmy)>> There we go! [ drill humming ]

(Jeremy)>> Are you kidding me? Never happens! [ drill humming ] [ Music ]

[ hammers banging ]

(Jimmy)>> Some of these components can be pretty stuck. So it helps to hit the knuckle with a hammer and release the ball joint studs. [ Music ]

(Jeremy)>> So this is what we found so far on the Tahoe. We've got four major issues going on here. We've got a lower ball joint that's completely toast. Same with the upper ball joint. Got a c/v axle boot that's torn. Really doesn't have any grease left in it. Plus the sway bar end link is missing its bushing. So that's a big problem. Now this is a reason why you should really look a used vehicle over before you take it on any type of drive. We've got a couple of more pieces to get off of the truck. So we'll get those out of the way. Then we'll work on putting some new parts on this thing. [ drill humming ] [ Music ] [ drill humming ]

(Jeremy)>> We'll remove the six bolts that hold in the c/v axle and follow that up by removing the tie rod. [ Music ] [ hammer banging ] [ Music ]

(Jeremy)>> We've got the worn out suspension out of the way. Now we start the process of freshening up our front end, getting our Tahoe traveling down the road for many years to come.

[ table casters rattling ]

(Jeremy)>> So we've got most of the suspension parts out from underneath the Tahoe here and it's time to start reassembling this thing. Now we already went ahead and knocked out the lower ball joint and the upper one as well. The lower one came out with a couple of swings of the hammer. The upper ball joint we just had to grind off a couple of rivets. We got that one out of the way as well. Now we went ahead and cleaned this area up the best we could. So it's time to start reassembling. Now as far as the parts that are gonna be going on our two door Tahoe we're gonna be using Duralast Gold chassis and suspension parts. The first place we're gonna start is right here with the lower ball joint. [ Music ] Easiest way to install your ball joints is with a ball joint press. Now if you don't have one of these in your arsenal of tools you can rent one of these at a local auto parts store. Tapping on the lower ball joint with a hammer helps to seat the ball joint into position. [ Music ]

[ drill humming ] [ Music ] [ drill humming ]

(Jeremy)>> Once the ball joints are in we'll ditch the worn out factory shock and install a new one. [ Music ] We'll go ahead and put a new shock in here, and then we'll work on putting the spindle and everything on it. [ Music ] [ drill humming ] [ Music ] [ drill humming ]

(Jeremy)>> We'll get this c/v axle in. Getting closer and closer! [ Music ]

[ drill humming ]

(Jeremy)>> Before installing any new parts we cleaned up all the surfaces. This just makes for easy installation. Plus makes everything run true and straight. [ Music ]

[ Music ] Before we tighten down the upper ball joint we did notice something. The original ball joint here was held in with a set of rivets. Now this ball joint actually gets bolted into place. Those bolts are little bit longer and they're gonna end up contacting the top of the knuckle here when we turn left and right. So now's the time to fix that. What we're gonna end up doing here is just taking the pressure off. We'll release it from the upper control arm here. Then we can just flip these two around and we'll keep moving forward. [ drill humming ] [ Music ] [ drill humming ] [ Music ]

(Jeremy)>> A couple of things to note before we put this hub assembly on. We have cleaned the mounting surface here on the knuckle. We add a little bit of grease to the c/v axle. A big thing with this hub assembly is it does come with the speed sensor, which is good because we do have an a-b-s light on on the dash. So hopefully this takes care of it. One thing to remember, don't forget to put on this little shield for the brakes. [ Music ] [ drill humming ] [ Music ]

(Jeremy)>> It's a good idea to torque all of this stuff down. Now for this giant axle nut I can't do that yet because as we apply pressure with the wrench it's gonna end up turning the hub and the axle shaft itself. So I'm gonna have to wait until the brakes are on it, but I can torque down the three bolts that hold the big hub on. It's 133-foot pounds. So we'll go ahead, torque those down. Then we'll move on to some steering.

(Jimmy)>> Coming up, with the suspension nice and tight we'll address the sloppy steering, giving it all new components to make handling our '96 Tahoe a lot safer.

(Jeremy)>> Well we have the suspension basically buttoned up. So we're gonna move a little further inboard and start working on the steering.

(Jimmy)>> So we're gonna get the pitman arm and the idler arm replaced. They both have joints on them that are pretty loose, and there's a lot of play in them. So we have to get the steering box out of the way so we can get a pitman arm puller up there. And then we'll also take off the bracket for the idler arm. [ drill humming ] [ Music ] [ drill humming ] [ Music ]

(Jimmy)>> To get the center link detached from the pitman arm and the idler arm we had to use a pickle fork and a hammer. [ Music ] The only way to get the pitman arm off is to shift the steering box towards the rear of the truck where we can access the nut, and then put the puller on the pitman arm. [ drill humming ] [ Music ]

[ drill humming ] [ Music ]

(Jimmy)>> Then we'll get the steering box reinstalled on the frame rail and remove the idler arm on the other side. [ drill humming ] [ Music ] [ drill humming ] [ Music ]

(Jimmy)>> The idler arm must be bolted and torqued to the bracket before reinstalling on the frame rail because you cannot get a wrench up there once it's installed. [ Music ]

[ Music ] [ drill humming ] [ Music ]

(Jimmy)>> After a quick clean I'll reinstall the center link, making sure to add the cotter pins. [ drill humming ] [ Music ]

(Jimmy)>> To finish up our steering we're gonna be putting on our Duralast Gold inner and outer tie rod ends. These heavy duty tie rod ends are built using advanced processes and unique engineering to maximize their durability. Induction hardened studs and integrated metal on metal bearings help eliminate failure points. They have a larger ball that has a greater surface area, which helps to distribute the load across the suspension, and bigger grease channels increase the flow throughout the joint. Superior corrosion resistant coatings enhance rust protection and the life of the parts. They are backed by Duralast Gold's limited lifetime warranty, and we got our Duralast Gold tie rod ends from the AutoZone Pro website. [ Music ]

So that'll finish up the steering, and the last thing on the front end is these sway bar links and then we'll move on to the brakes.

(Jeremy)>> Up next, if your brakes sound like a bad day at the dentist you have a serious problem. We'll show you what to look for and the potential causes that could be affecting your stopping ability.

(Jeremy)>> We're getting close to buttoning up the two door Tahoe, but as we were taking the front suspension apart we noticed a big issue on the braking system on the passenger side. Look at the rotor here. The face of the rotor is very grooved up, and it's got a very tall lip on it, and there's a specific reason for that. The way that these GM calipers work is there is a bolt that slides in and out of a metal slide that's supposed to slide in and out of the casting of the caliper itself. In the casting inside here there are two seals and there's of grease in there, or there's supposed to be a bunch grease in there. What happens is that grease can dry up or leak out somehow, allowing these slides to get stuck. What that means is that your caliper can't float over the top of your rotor creating an even pad wear. What that looks like is on the outside pad here we only have about an eighth inch of material left and it's in pretty bad shape, versus the inside pad has actually got quite a bit of material and it looks brand new. Now that transitions over here to the rotor, and again it's all grooved up and it's got a solid eighth inch of a lip. That means that we're actually taking some of the material away from this face of the rotor, versus if you look on the inside face it's nice, smooth, and straight, and it actually looks pretty new. To cure all of these issues we're just gonna go ahead and replace these parts. We've got a Duralast remanufactured caliper. This has got a new piston, new seals. It comes with new bolts and new slides that are already pre-greased. Plus it comes with the bolt to hold the brake line on. So it's very easy to assemble. We're gonna pair that with a set of Duralast Gold brake pads and rotors. We're gonna start with the rotor here. We'll go put that on the truck. Then we'll go ahead and grab the caliper, and we'll get this whole thing wrapped up. [ Music ]

[ metal clanging ] [ Music ] [ ratchet clicking ] [ Music ]

(Jeremy)>> Alright guys, I was always taught to replace things in pairs. So if this caliper has gone to work for a certain amount of days the driver's side has gone to work for that same amount of days. Now since this side has had an issue the driver's side is not far behind it. So we're gonna replace both sides. One thing to be very mindful of is that the calipers look almost identical. So you could switch them from left to right. So pay attention. You want your brake bleeder screw to be facing upward. That way as the brake fluid enters into the caliper here it can push all of the air out on the top. That way you can have a nice, firm pedal when you bleed your brakes. Since we got ours on the right side we'll go ahead and connect the brake line, and then we'll be really close to wrapping this thing up. [ Music ]

[ Music ] Alright, well that buttons up the brake side of things. So we've got good brakes in it, good steering, and the suspension's in better shape. So this tuckered out Tahoe isn't so tired. We do have to bleed the brakes yet. So I'll go ahead and lower this down, and Jimmy can hop inside.

(Jimmy)>> And we do have a few more things to do before this thing is road worthy, but for right now we'll call it a day. [ Music ]
Show Full Transcript