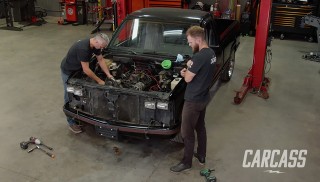
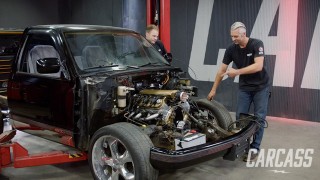
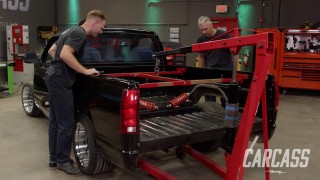
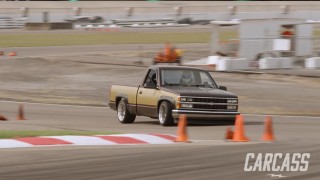
More Pro Touring OBS Episodes

Carcass Featured Projects

Carcass Builds

Parts Used In This Episode

Summit Racing
RideTech Chassis & Suspension
Matco Tools
MATCO Tools are the Official Tool Supplier to Carcass
Premier Plasma
Premier Plasma Table
Speedway Motors
Axle Housing, Axle Shafts, Third Member
The Industrial Depot
Tools, Hardware, Shop Supplies

Episode Transcript

(Jeremy)>> You're watching Powernation.

(Jeremy)>> Today on Carcass... our o-b-s Chevy makes a transformation from a daily driver to a track competitor. We beef up the suspension with a high-performance front end with coil over shocks.

(Jimmy)>> Plus... we show you how to build a custom suspension setup that pays homage to oval track racing. ♪ [tires squealing] ♪

(Jeremy)>> Hey guys! Welcome to Carcass. Well, our nineteen eighty-nine chevy pro touring truck is really coming along nicely. We've managed to remove the entire front clip and the box out back and we pulled out the entire drivetrain.

(Jimmy)>> And then we dropped in this four hundred six inch stroked LS that we got from the guys at Engine Power and backed it up with a t fifty-six Magnum six speed manual transmission and now we're at the point where we're really getting into the parts that will really make this truck a pro touring vehicle.

(Jeremy)>> So today we're going to be working on suspension. Up front, we're going to be bolting on some pretty trick parts but out back is going to be something of our own creation and at the end, we're going to bolt on a big set of brakes.

(Jimmy)>> Alright! Well, let's go up with thing and we'll get it torn apart.

(Jeremy)>> Sounds good. [lift humming}

(Jeremy)>> Now we've had these caps off before because we torqued the wheels down before we hit the dyno. Somebody's put the wrong lug nuts on these wheels. You can't get to them with an impact socket, so that's why we're using a chrome socket on the three-eights impact. I know you're not suppose to be doing that, but that's the only way we can get the lug nuts off right now. [drill popping] Ugh! That was heavy. Now before we tear our suspension down, we're going to make our whole lives easier and spray down our nuts and bolts with Berryman Products EZ Doz-It Professional Lubricant. Now this is powerful, penetrating oil that instantly goes to work to free up loose and corroded nuts and bolts. It's got three different ways to spray. Using the supplied straw, you can use the drip function. Or you can use the stream. Or if you take the straw out, you can use the spray. Now you guys can use this basically anywhere, from automotive use, you can use it around the farm, personal watercrafts. You can use it on bicycles, you can even use it on firearms. Or, anywhere rust and corrosion has bonded two metal parts together. [can spraying] [drill popping] The suspension comes apart pretty easy. I'll start with the tie rod end, loosen up the sway bar... ♪ Now let's get this brake caliper off here. [socket cranking] We'll take the caliper out of the way... [drill popping] Get rid of the old, worn out shocks... [hammer pounding] Release the lower ball joint... that should do it. ♪ And pull the spindles out of the way. [lift humming] ♪ Now we can pull off the coil springs. [metal rattling] [drill humming] Remove the upper control arm, followed by the lower control arm. [drill humming] [metal rattling] [drill humming] And the last thing, we'll get rid of the sway bar. With the front suspension out from underneath our truck, it's to start installing some really good parts that we got from RideTech. Now you guys can buy all of these as just individual pieces or you can buy them as a kit. And what we got was their two-inch drop spindles, we have their big inch and a half sway bar, and we have their strong arm upper and lower control arms. Now these have a relocated lower ball joint and upper ball joint socket to prevent some binding. But, really the heart of this whole system is right hear in their H Q Series shocks. Now this is really going to allows us to adjust and dial in out truck when were out on the track. They're twenty-four way adjustable. They have an inch and seven eights piston and they have a five eights inch shaft. Now, before we get all of this installed, we have to do a couple mods to the chassis and that involves a little bit of cutting. ♪ Up inside the frame, we have to trim off a couple ears with the cutoff wheel, so we can get our new strut assembly installed. Alright! Let's do a test fit here. Make sure these holes line up. Yeah! That will work. So, the next step here, I have to drill the shock hole out to about three quarters of an inch. [drill popping] Ok, now we can install the entire coil over assembly. ♪ [drill popping] After our coil over assembly is installed, we'll install all of our new suspension parts. ♪ All, of the RideTech suspension, utilizes the factory mounting points. Besides for the little bit of trimming we had to do inside the chassis to mount the coil overs, everything else just bolts right in. ♪ [drill popping] Alright! Well, that wraps up the front. From here, Jimmy and I are going to tackle the brakes and then we're headed on to the back. Fronts done! Now, we have to make room in the rear for our custom suspension setup.

(Jeremy)>> Hey guys welcome back! Well, we've got the complete front suspension underneath our o-b-s and Jimmy and I even tackled the brakes. We got this setup from Little Shop Manufacturing and it came with machine hubs and brake rotor hats to fit our RideTech spindles. We've even got massive fourteen-inch rotors and six piston calipers.

(Jimmy)>> And now it's time to move on to the back, where Jeremy and I have a few tricks up our sleeves, doing stuff we've never seen done to a truck like this, and that all starts with getting all the old stuff out, so let's get the axle out of it.

(Jeremy)>> Sound good! [drill popping]

(Jimmy)>> First thing we'll do is remove the rear bumper... And get rid of the spare tire. ♪ After lowering the truck down, we'll get rid of the shocks... [drill popping] ♪ And remove the leaf spring hangars, unbolt the shackles and the rear end can come right out. [hammer slam] ♪ [blade cutting] With rear end out of the way, we'll cut a few rivets and remove the shackle mounts. [blade cutting] [hammer pounding]

(Jeremy)>> Alright! Now that Jimmy has the rear of our o-b-s stripped down to just two frame rails, it's time to start designing our rear suspension. But we're not going to be using the stock ten bolt, we're actually going to be using a Ford nine-inch housing, because it's quite a bit stronger.

(Jimmy)>> And for the suspension side of things, we could go back to a leaf spring setup. We could do a four-link setup. We're actually going to be using a three-link set up with a panhard bar. And it's going to be a little bit modified from what you'd normally see and that's something you'd be more likely to find on an asphalt oval track car. A three- link is relatively simple. There are two lower links and one top link to control the fore and aft location and the rotation of the rear axle. And a panhard bar locates its' side to side. In most cases for street driven vehicles, the top is solid. This is fine for overall performance and axle control. But here's where ours will differ. Taking a page out of the circle track world, out top link will be a torque link. When power is applied through the drivetrain, torque will be absorbed through bushings or springs to help soften the power applied to the ground, providing more forward bite. An before we actually put the suspension under this truck, I have to go design it in our cad program to make sure the geometry and everything is going to work out and in the meantime, Jeremy is going to take care of one more thing that we need to do to take care of the back half of this truck.

(Jeremy)>> And that's going to be adding a c-notch to the chassis. Now RideTech does make all the brackets to do this, but with this being a one of custom setup that Jimmy and I are going to do, we were unsure is if we really did have to c-notch. But now that we see how close the axle is to the frame, we definitely know that's going to have to happen. So, Jimmy already went ahead, whipped out some brackets on our c and c plasma, so now all I have to do... is get to work and start cutting. ♪ I'll trace our line out on the chassis... and then just cut the lower section end off the frame. Get this axle housing out of the way, I'm going start cutting. [blade cutting] [grinder rubbing] Alright! So now, we'll fit this c-notch plate on the outside here... and then we're just going to tack it in for now... and we'll keep building this thing out. [welder popping] Ok! So now that I have all of our c-notch brackets on the chassis, I'm going to knock the tabs off and take this assembly over to the bench and weld it up completely. And then we'll come back, put it back on the chassis and we'll finish it off with the top piece. [blade cutting] Alright! So, I'm going to share with you guys a little tech tip. As we start welding this, the heat is going to drive these two pieces of the plates together. It's going to compress it. So, if we just use two sockets that are the right size, they kind of match the chassis with, as we weld. That's going to keep it apart and make it so we can slide it right back on the chassis. [welder popping] [blade cutting] [hammer pounding] [welder pooping] Alright! Let's get this in here and I'll throw on a couple tacks. [welder popping] Add the top plate here. Tack this on. And we'll weld the whole thing up. [welder popping] Alright! With this side buttoned up, we'll move on to the driver side and then we can move on to suspension. ♪

(Jimmy)>> Coming up... We start fabricating our custom rear suspension with a racing theme in mind.

(Jimmy)>> Now that Jeremy's got the notch all finished up, I've been designing some of the suspension components and now we just have to cut them out and weld them up. [plasma cutting]

(Jimmy)>> We're using our Premier Plasma four by four table, to make a cross member, chassis brackets and some axle brackets. [plasma cutting] That's just nice. ♪ [plasma cutting] When welding parts that have outside corner joints, it's helpful to tack them together, flat on the table, and then bend them to the desired angle. ♪ We've got some of our suspension brackets cut out and welded now, so at this point, we got to get everything tacked in and mocked up to make sure the suspension is going to work like it's suppose to. And that all starts with cutting up this cross member here to make room for some third link brackets. [blade cutting] [welder popping] Once we get that tacked in place, we'll move on to the cross member... and the link brackets. [welder popping] Alright! We've got all the brackets that we need on the chassis, now I just need to weld the actual brackets. ♪ Just line that guy up and tack it in. ♪ I've got some of the brackets tacked on the axle so, we can keep moving forward.

(Jeremy)>> I also took care of these lower links. They're all mocked up so we can put these in as well.

(Jimmy)>> Oh sweet! You want to help me get this thing up here?

(Jeremy)>> Yeah! Get you side up there. There you go.

(Jimmy)>> Cool! ♪ [metal clanking] ♪ Alright! You want to level that out?

(Jeremy)>> Yeah! ♪

(Jimmy)>> Tell me when.

(Jeremy)>> When! [welder popping] Ok Jimmy. Here's the panhard bar.

(Jimmy)>> Alright! [metal clanking] ♪

(Jimmy)>> With everything mocked up, we can tack in the rocker arm brackets... ♪ Throw in the coil overs and install the push rods. Oh yeah, we've gotcha. ♪

(Jeremy)>> Dude! This thing looks so amazing and I can't wait to take it out for a rip. And I tried to design everything with adjustability in mind so we can kind of change everything and get it to handle the best that it can. Even like these rocker arms, we can make new ones with different ratios to adjust wheel travel or shock travel. Stuff like that.

(Jeremy)>> And I know that there's one thing that you did want to take care of and that's a sway bar, but you have measurements for that?

(Jimmy)>> Yep! All taken care of.

(Jeremy)>> Cool! Well, we're going to get closer and closer to getting this thing on the road, there is one thing I have to do now and that's build out the whole rear axle. So, you want to help me get this out of here? And then you can just weld everything up?

(Jimmy)>> Yep! Sounds good. Don't' go away. We set up our rear axle to get it ready for the track.

(Jeremy)>> Alright guys! Well, we're getting super close to wrapping up our pro touring truck, but while Jimmy's been building the entire rear suspension, he's been basing it off of this Ford nine-inch axle housing. Now we got this one from Speedway Motors and we ordered it to a very specific width because we want to run a wider set of wheels and tires. Now to go along with our axle, we also picked up this third member from Speedway and it came complete with four eleven gears and a clutch style locker. And we ordered it for thirty-one spline axle shafts. Now these are cut to length axle shafts. So, what I have to do is set the third member in the housing, we'll take a measurement, cut these things to length and then we'll finish it off with a big set of brakes. ♪ [drill popping] Ok! So, now that we have the third member installed, we'll go ahead and slide in an axle shaft here, we'll take a measurement and that way I know how much we got to cut off. Take a measurement here from the face over to where the seal sits. That's about two inches. We'll take two and an eighth to give us a little bit of wiggle room. ♪ Then we'll mark the spline end of the shaft here. Two and an eighth, now let's go grab the cutoff tool. [saw cutting] [sander grinding] Alright! Now, we'll slide this side in. Make sure it engages right. And then we'll move on and do the other side. Perfect! That will work. [saw cutting] [sander grinding] Alright! This side fits perfectly as well, but I do have to pull them back out. Because we're going to move onto the brakes and I gotta put the backing plate on here first. [metal clicking] We'll go ahead and throw our spacers on for the caliper. Slide our caliper in here. Tighten it down. ♪ Put the pads in. ♪ Alright Jimmy. Well, the complete suspension is in it and I built out the whole rear axle, but we get the big daunting task now of taking it completely apart cause we have to paint the whole thing.

(Jimmy)>> It's going to look good though.

(Jeremy)>> It should.

(Jimmy)>> Well, if you guys like anything you've seen on today's show, go to powernation t-v dot com.

(Jeremy)>> And don't forget to check out our project pages, where you can see our completed builds, like project Junk Mail and our little Honda Civic rally car.

(Jimmy)>> Alright! Let's do it again.

(Jeremy)>> Take it apart.
Show Full Transcript