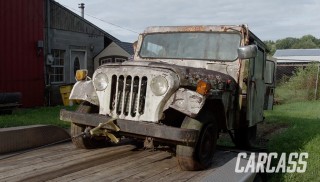
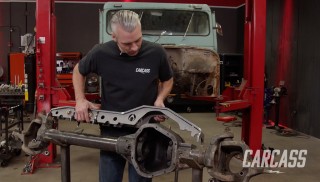
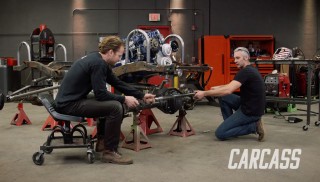
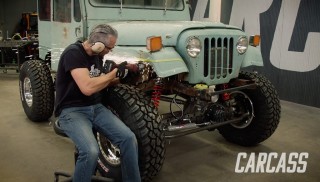
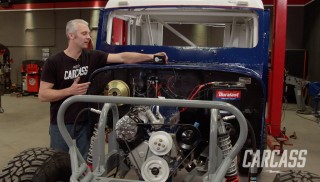
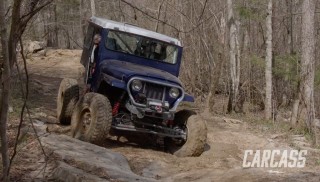
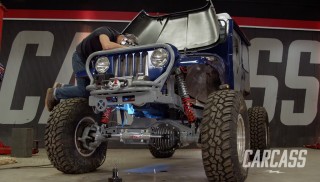
More Junk Mail DJ5 Episodes

Carcass Featured Projects

Carcass Builds

Parts Used In This Episode

Summit Racing
LizardSkin Original Ceramic Insulation
Summit Racing
Single Stage Paint Royal Blue Pearl
Summit Racing
Single Stage Paint White
Summit Racing
Summit Primer Sealers
Matco Tools
MATCO Tools are the Official Tool Supplier to PowerNation
The Industrial Depot
Tools, Hardware, Shop Supplies

Episode Transcript

(Jimmy)>> You're watching Powernation!

(Jeremy)>> Today on Carcass Junk Mail gets a few body modifications to make room for some bigger wheels and tires.

(Jimmy)>> Plus we address some safety issues on our interior by adding a roll cage. Then tear it all apart to add some color. [ MUSIC ] [ tires squealing ] [ MUSIC ]

(Jimmy)>> Hey guys, welcome to Carcass. We still have a lot of work to do before we can take our '78 DJ-5 Jeep out on the trails, but it's made quite a transformation from the two wheel drive postal Jeep that first rolled in the shop. Our 1978 DJ-5 postal Jeep has been a blast to work on. We cleaned up the frame and prepped it for new suspension. We picked up a set of one ton axles and added bombproof goodies to help us handle anything the trail could throw at us. Then we slid them underneath our chassis, mounted up our four link suspension and coil over shocks. Next we dropped in the drivetrain and added a four to one transfer case, taking it from two wheel drive to four. We put the body back on and made some modifications to give us some room for all of our additions.

(Jeremy)>> We have a mailbag of stuff that we need to do. We need to fab up some bumpers front and rear and add a winch. We've got to make some body mods cause we have some clearance issues. We're gonna get inside the cab, strip out the interior, and add a roll bar. Then we're gonna come back out and throw on a fresh coat of paint, but the big question is where do we even start?

(Jimmy)>> I think I'm gonna take care of the winch and the front and rear bumpers.

(Jeremy)>> Cool I'm gonna do the body mods.

On the front fender it's gonna be pretty basic. All we're gonna do is follow the line from the side of the fender across the front, and then we'll arc it over here on the end, give it just a little bit of design. [ MUSIC ] [ saw buzzing ]

(Jeremy)>> Using the tape as a guide we'll use a cutoff wheel to make our modifications. Cutting them out this much should give us plenty of room for our 37 inch tall tires. [ saw buzzing ]

(Jeremy)>> Simple as that.

(Jimmy)>> While Jeremy was cutting out the fenders I took a few measurements for our winch plate and I've already transferred it to the computer. So now we can cut it on the c-n-c plasma table along with a few other brackets, and then once we get it assembled I'll be ready to start on the bumpers. [ torch hissing ] [ MUSIC ]

(Jimmy)>> With the winch plate cut out we can tack and weld in our riser brackets. These will lift our mounting plate up to match the contour of the frame making everything level. [ welder crackling ] [ MUSIC ]

(Jimmy)>> Then I'll drop on the winch plate. That's gonna be nice. And fully weld it in. [ welder crackling ]

(Jimmy)>> With that in place I can install our winch. Alright time to move on to the bumper.

(Jeremy)>> With the clearance issues taken care of in the front of the Jeep it's time to move to the back. Now you guys can pretty much see that these big tires are gonna contact the body as the suspension flexes out but the simple solution to that is to just come in here and cut a big chunk out of the rear quarter. We also plan on running the stock doors because we love the look of them, but there's an issue there as well. As you slide the door open the corner of the door contacts the tire. Now I have a fix for that but we'll get to that a little bit later. To get down to the quarter and get this whole thing started I've got to slide the door out of the way. [ MUSIC ] Now that our door is out of the way I'll loosen a few bolts and remove the track. Just like in the front I'll lay down our cut line using some masking tape. [ MUSIC ] Now we can start cutting out our quarter making sure to follow our line as close as possible. [ saw buzzing ]

(Jimmy)>> With our winch plate in place it's time to start on the front bumper setup. I kinda have a unique design in my head that starts with a hoop that goes around the grille and then it'll tie into the front bumper. So right now I just have to cut this tube, put a couple of bends in it, and then we'll be ready to put it on the truck. Alright it's 74. [ saw buzzing ]

(Jimmy)>> With our tube cut to length I'll head over to the tubing bender. With the design I'm going for the tube will need to be bent to 120 degrees on each side. [ MUSIC ] With that done I'll head over to the Jeep. Can you hold this while I tack it?

(Jeremy)>> Sure! [ MUSIC ] I'm good. [ welder crackling ] [ MUSIC ]

(Jimmy)>> Now that our main grille hoop is in place I'll head back over to the bender and start the main part of our front bumper. We have to bend it past 90 degrees in order to account for the spring back. Once bent I'll use a grinder to notch the ends, set it in place, and drop in a few tacks. Alright it's time to tack it. [ welder crackling ]

(Jimmy)>> Then building off of the main hoop I'll finish out the front bumper and add a plate to the front to give it a clean look. [ welder crackling ]

(Jimmy)>> Now that I have the front plate tacked in the front bumper setup is pretty much done. There's a couple of things I want to do still, like add some tube caps here, and also run a bar on either side to connect the hoop and the front bumper, but once we're done with all that we can move on to the back.

(Jeremy)>> Now there's one more thing we have to take care of before we jump inside and tackle the interior. We plan on running the stock doors because we like the look of them and they're functional, but when you open the door the corner hits the tire. Well we came up with a solution on how to make this line so we can cut the corner off of it. if we just use the old piece of the quarter panel, set it up here on the door. I'll just trace this line and we'll get to cutting. [ MUSIC ] [ saw buzzing ]

(Jeremy)>> Alright, now all I've got to do is cap the edge of this door off here, take care of the sharp fender lip, and we're good to go. We tear into our interior, adding some support and safety measures with a few custom touches.

(Jimmy)>> We made a lot of progress on the exterior of our Jeep. I finish welded the front bumper setup and I also re-installed the winch just to make sure everything fits, and it's all looking really good.

(Jeremy)>> We took care of some clearance issues on the front fenders and the rear quarters. We notched out the door to fit around our bigger tires, and I even finished off the edge for a nice, clean look.

(Jimmy)>> I also fabricated the rear bumper, which was a lot simpler than the front but kinda kept it the same style with the two tubes stacked on top of one another.

(Jeremy)>> And now it's time to get to work on the inside. Inside we've got a little bit of work to do. We've got to get rid of the seat and the package tray, and then move on to bending up our roll bar. [ MUSIC ] [ drill buzzing ]

(Jeremy)>> We'll start by taking out a few bolts that hold in our seat... [ MUSIC ] ...followed by the mail tray. [ MUSIC ]

(Jimmy)>> Alright! [ drill buzzing ]

(Jimmy)>> Alright! [ MUSIC ]

(Jeremy)>> Yeah that ain't gonna work. With the seat out of the Jeep we started cleaning up and we found something. The floor inside's basically shot and the plan is to tie our down bar in up here, and that's just not gonna work with the shape that this thing is in. So what I want to do is just quickly cut this out and replace it with a brand new one. That way when the down bar comes in we've got something nice and strong to weld to.

(Jimmy)>> While Jeremy's working on the floor I'm gonna start in the back on the roll cage, and the first thing I've got to do is cut out some base plates on the band saw. For our plates we're using some eighth inch steel cut into three by five rectangles. This will give us plenty of room for our roll cage to mount to. Once they're cut out I'll back over to the Jeep, grind off some of the old paint... [ grinder buzzing ] [ welder crackling ]

(Jimmy)>> ...add few tacks to our mounting plates to hold them into place. [ welder crackling ]

(Jimmy)>> Then go back and finish welding them to the body. [ welder crackling ]

(Jimmy)>> We've got our base plates welded in now. So we can start to measure for our main hoop, and Jeremy's gonna hold up a cheater tube that we have so we can figure out the length of the tube.

20 and a half, measure vertical. That's 27 and a quarter plus whatever the bend is. If we add up the measurements we took plus the amount of tube it takes for the bend we got 60 inches, but that's only half the hoop. So we multiply it by two to get 120 and we'll add a couple of inches for a little bit of wiggle room. So I'll mark it at 122. [ MUSIC ] Once marked I'll take our tube over to the chop saw to make our cut. [ MUSIC ] Then it's back to the tube bender. I'll make our first bend at 90 degrees. [ mechanical humming ] [ MUSIC ]

(Jimmy)>> On a piece this big I like to flip the machine vertically and check before bending the other side making sure our bends are on the same plane. Perfect! [ mechanical humming ]

(Jimmy)>> Let's see how it fits. [ MUSIC ] Alright this thing is fitting perfectly. It fits really tight to the body. So we can tack it in now, and then we can start working on the down bars. [ MUSIC ] [ welder crackling ] [ MUSIC ]

(Jimmy)>> Looks like 42! With the measurement of our down bars I'll just cut, notch... [ MUSIC ] ...and tack them into place as well. [ welder crackling ]

(Jimmy)>> Then we can repeat the same process with our cross bar and get it installed. [ MUSIC ]

(Jimmy)>> You want to hold this up there and I'll tack it?

(Jeremy)>> So tight to that side, this side. Whenever you're ready. [ welder crackling ]

(Jeremy)>> With the floor in Jimmy can now come up front and finish out our cage, and I'm gonna transfer to the back, tie in our down bars to our chassis, and build a cover for our shock hoops. Using the plates that Jimmy made for our roll cage I'll drill out a few holes... [ drill buzzing ]

(Jeremy)>> ...bolt in the bottom plate... [ MUSIC ] ...and weld in our support tubes that attach to our frame. [ welder crackling ]

(Jeremy)>> Doing this will help strengthen our down bars on our cage. Once this is done I can head over to the slip roller and start making our cover for our shock hoops. [ MUSIC ] [ saw buzzing ]

(Jeremy)>> I need to cut out some of the old floor so we can come back later and install our shock hoop braces. Let's see how this thing fits. [ metal clanging ]

(Jeremy)>> That's pretty good. Let's weld it up. [ welder crackling ]

(Jeremy)>> Well with our cover and our cage in place that pretty much wraps up the interior. Now we've got to start prepping for some paint. [ welder crackling ]

(Jimmy)>> We tear everything apart so we can finish up our chassis getting it ready for paint.

(Jeremy)>> With everything wrapped up on the inside of Junk Mail it's time to rip the body off of this thing so I can take it down and start prepping for paint.

(Jimmy)>> And I also have to take the chassis and suspension completely apart so I can finish weld it, add some gussets and supports where it needs it, and I'm gonna clean the chassis and paint it too.

(Jeremy)>> Jimmy you want to put your eyes on the front I'm gonna pick the body up. [ MUSIC ] Good! [ MUSIC ]

(Jimmy)>> With everything blown apart it's time to final weld the chassis. With the body out of the way welding up all of our brackets and tabs is super easy. [ welder crackling ]

(Jimmy)>> When welding this much you want to make sure you don't stay in one area for too long. I like to bounce back and forth to let the metal cool. [ welder crackling ] [ MUSIC ]

(Jimmy)>> I finished welding all the brackets on the chassis but I did find a crack up on the frame rail that I need to take care of. I'll start by cleaning up the area using a Benchmark Abrasives zirconia flap disc. They're manufactured using uniform particle size and a premium blend of ingredients that exceed other flap discs by packing up to 50 percent more abrasives on each flap. Benchmark's products are made to exact specifications to provide reliable quality products. [ grinder buzzing ]

(Jimmy)>> Now that it's prepped I'll weld up our crack, go back, and grind it smooth. [ grinder buzzing ]

(Jimmy)>> With that taken care of we can start cleaning up our chassis. I'll be using a wire cup that we also got from Benchmark Abrasives. These stainless steel cups are great for cleaning up rust and removing paint on ferrous metal, aluminum, and other non-ferrous metals. Using a carbon brush on stainless creates contamination, which leads to rust. The knotted wire style we're using is best suited for heavy material removal like we have on our old Jeep frame. With our chassis prepped it's finally time for some new paint. I did wipe everything down with a little bit of acetone to give us good base for our new spray paint and this stuff is gonna protect it from the elements. On our first coat I'm just giving it light coverage to give us a tacky surface to give our other coats something to adhere to. You want to make sure you're in a well ventilated area when spraying. We have a huge shop with an exhaust fan, but I put on my mask once I start applying heavier coats. [ spray can hissing ] [ MUSIC ]

(Jimmy)>> That wraps up the paint for the chassis but I still have to paint the four link bars and the axles a matching color. So once those are done we can start putting this thing back together.

(Jeremy)>> Body work is done! Now it's time to give Junk Mail a facelift with a fresh coat of paint.

(Jeremy)>> While Jimmy's been down in the shop thrashing on the chassis I've got the Jeep body in the booth and we're ready to lay down some paint. Now we're gonna be paying homage to the old postal Jeep theme. So our colors are gonna be red, white, and blue. What I'm gonna do is paint the top of the Jeep white. So what I have to do now is mask the bottom of the Jeep off. Then we'll spray the top with some sealer and move on to some color. [ MUSIC ] Alright with everything masked off we'll go ahead and mix some sealer and start spraying. We'll be using a primer sealer that we got from Summit Racing mixed to a five to one ratio with a hardener. This is gonna help fill in some of our sand scratches and seal the surface so we have a good base to lay down some color. We'll be applying two medium coats, letting it dry for up to 30 minutes between each application. [ spray gun hissing ] [ MUSIC ]

(Jeremy)>> Once our sealer is dry we'll mix up our single stage white that we're using for our top. [ MUSIC ] And I'll lay down two coats allowing it to flash about 10 minutes between each coat. [ spray gun hissing ]

(Jeremy)>> With our top sprayed we're gonna move on to our second color. So I'm gonna mask the roof off so I can start laying down some paint. Now we know the body work is pretty crude but we'd also know that this thing is an off road rig and it's gonna get beat up and scratched up when it's out on the trails. All we're looking to do here is change color and give it a completely different look. [ MUSIC ] I'll mask and cover the white we just sprayed. [ MUSIC ] Using a tack cloth I'll clean one last time making sure to get rid of any dust or dirt that may have been kicked up while we sprayed our top. With it clean we'll spray the sealer on our body and our panels just like we did for our roof. [ MUSIC ] Now that the sealer has had time to dry it's time to move on to some color, and just like the top we're gonna be spraying some single stage paint that we got from Summit Racing, and the color of choice is royal blue pearl. This is mixed in a four to one ratio just like our white. Summit's single stage paints offer a premium finish with exceptional durability. It's resistant to yellowing and doesn't need to be top coated for u/v protection. Since our paint is a pearl we'll be laying it down with a 75 percent overlap to achieve maximum coverage. Spraying three medium wet coats, allowing for five minute dry times between each coat. For the final application I'll be applying a drop coat to give us a uniformed look. [ MUSIC ]

(Jimmy)>> You know this thing turned out really good, and I didn't realize it had metallic in it.

(Jeremy)>> Yeah it actually laid down really nice. How did the chassis turn out?

(Jimmy)>> It turned out pretty good. I mean it's spray paint, but it's gray. Otherwise we've got plumbing, wiring, got to get it running, and then we can hit the trail.

(Jeremy)>> I actually still have one more thing that I want to do on the paint side. We're gonna lay down a red pinstripe on the top of the Jeep. That pretty much wraps it up for us today. So if you guys like anything you've seen on the show why don't you go to Powernation TV dot com. Jimmy and I will see you next time. Let's go take a look at this chassis.

(Jimmy)>> Spray cans man! I went through like a dozen.

(Jeremy)>> Is that way quicker than spray paint?
Show Full Transcript