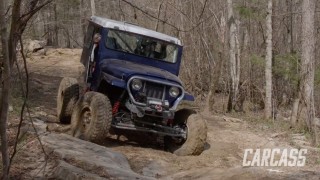
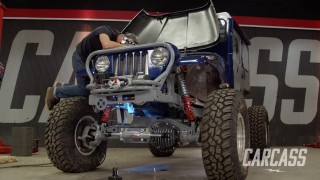
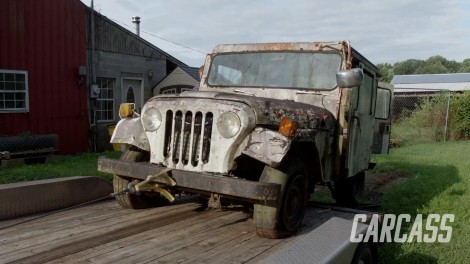
More Junk Mail DJ5 Episodes

Carcass Featured Projects

Carcass Builds

Parts Used In This Episode

CRC Industries
CRC Power Lube
Matco Tools
MATCO Tools are the Official Tool Supplier to PowerNation
The Industrial Depot
Tools, Hardware, Shop Supplies

Episode Transcript

(Jeremy)>> You're watching Powernation!

(Jeremy)>> Today on Carcass we have a special delivery in the shop as we start a new project with a specific purpose.

(Jimmy)>> We'll pull the body off and strip down the frame to prepare for upgraded suspension.

(Jeremy)>> Then head out to a salvage yard in search for some heavy duty axles.

(Jimmy)>> And show you what to look for when selecting a set of one tons for your next project. [ MUSIC ] [ tires squealing ] [ MUSIC ]

(Jeremy)>> You guys are probably wondering why do we have three vehicles in the shop today. You're probably more curious why we have three retired US postal Jeeps in the shop today? Well there's a big story behind these trucks and that all started when Jimmy and I were looking for a right hand drive vehicle. We thought to ourselves what's the most readily available right hand drive vehicle in America? Well that's the US postal Jeep.

(Jimmy)>> The lady we bought these Jeeps from is a retired postal worker and she drove each of these things into the ground.

(Jeremy)>> But the only way we could get one Jeep was to buy all three. So we shook hands and started loading them up. The white one has seen better days but maybe we could scavenge a couple of parts off of it.

(Jimmy)>> The seafoam one is in pretty good shape but it wouldn't run. So we had to pull it to the trailer.

(Jeremy)>> The yellow one seem to be our best candidate. It was in decent shape and it fired right up. This thing runs really good, and it's the weirdest thing to be on this side.

(Jimmy)>> We managed to get all three of these Jeeps loaded up and back to the shop in one day, and now that they're all here we need to talk about what the end goal is with one of them.

(Jeremy)>> And that first starts with us trying to decide which one of these we're gonna build. My vote's on the yellow one because that one runs.

(Jimmy)>> See I think the seafoam green one because I think the chassis and body are a little better, and even though the four cylinder is in this one we should be able to put the six cylinder in it.

(Jeremy)>> That's a good point. Well that pretty much decides it then, but what are we gonna do to the green Jeep. We're dumping the wheels, the axles, and the leaf spring suspension. We'll be replacing that with a four link setup all the way around. We'll swap out the stock transmission for a setup out of a TJ, and when we're done with that we'll slap on a bigger set of wheels and tires, bringing Project Junk Mail to life. Now you've probably gathered by now that we're gonna be building a four wheel drive off road rig. Now Jeeps are known for their off road capabilities, and to keep with that Jeep tradition we're gonna be taking our two wheel drive Jeep and converting it to four wheel drive.

(Jimmy)>> And the seafoam green Jeep is going to be the Jeep of choice for this build because it has the least amount of rust, dents, and we're hoping it's gonna come apart the easiest but we're gonna keep the yellow Jeep around just in case we need some extra parts, and the white Jeep is probably gonna end up going to the scrapyard because the body has a lot of rust holes in it. There aren't too many good panels on it, and we really just don't need any of that.

(Jeremy)>> And we got a killer deal on all three of these Jeeps. We basically got all three of them for the price of one. So with this build we're gonna spend some money where it makes sense but we're also gonna build and fabricate what we can.

(Jimmy)>> And that makes a lot of sense in our shop because we have a ton of capability here, which gives us the opportunity to show you guys how to build things like a four link suspension, but as you said we're gonna spend the money where it really matters, like on a really good set of coil overs.

(Jeremy)>> And we're also going to go out and get a set of junkyard axles, but we're gonna spend some money on the internals of those axles because we're gonna show you guys how to make them handle a bigger set of tires. But before we can get started on the green Jeep we've got to get the other two out of the shop. [ MUSIC ]

(Jimmy)>> We'll pull the six cylinder from the yellow Jeep so it can go down to Engine Power for some upgrades, and that means a little more power to help us out on the trail.

(Jeremy)>> You know Jimmy the meat and potatoes of this build are all the way down at the chassis, but before we get there we have to get rid of this body.

(Jimmy)>> Yeah let's drill the radiator so we can get the grille off and everything, and also take the whole front clip off.

(Jeremy)>> But I think first the hood goes.

(Jimmy)>> I'll get some tools. [ MUSIC ] [ drill buzzing ] [ MUSIC ]

(Jeremy)>> Holy cow, that's green. You can probably reuse that. Well not the end there though. A random thing when I take part cars and trucks I keep the hose clamps.

(Jimmy)>> Yeah I do to. Unless you break them they're not really going bad.

(Jeremy)>> Just stash them away for a rainy day. [ drill buzzing ]

(Jimmy)>> It's a good thing we're keeping those other Jeeps because this thing's kinda falling apart.

(Jeremy)>> Junk. [ MUSIC ] This literally is going to break apart before I can get it out of here, or I may have to break it apart. [ MUSIC ] And it's hooked up. Yeah we don't need that. Push back in here. Wait maybe I can just pull it straight. Oh don't take the whole fender. [ drill buzzing ] [ MUSIC ]

(Jimmy)>> You all good?

(Jeremy)>> Yeah I'm good. [ drill buzzing ]

(Jeremy)>> Well now that we have the front clip out of the way it's time to remove the rest of the body from the chassis, and as I pulled the fender out I noticed something. Deep down inside here somebody has welded the steering shaft to the U-joint that connects to the column. Now normally this piece is something that just slides out but somebody welded it. So for us to get the body off the chassis we're just gonna cut because we're not using any of this stuff anyways. [ saw buzzing ] [ drill buzzing ]

(Jimmy)>> You all loose over there?

(Jeremy)>> Yeah I'm free, you free?

(Jimmy)>> Start pushing.

(Jeremy)>> Get it onto the hoist. Make that thing do all the heavy lifting.

(Jimmy)>> You know it's about to go down.

(Jeremy)>> No it's gonna go up Jimmy.

(Jimmy)>> Well the project is about to go down. It may have been good for delivering the mail but for our plans it all has to go.

(Jeremy)>> We start tearing into Junk Mail's chassis getting rid of the old leaf springs and making room for some upgraded suspension.

[ mechanical humming ]

(Jimmy)>> You all clear?

(Jeremy)>> Yeah that's plenty high right there. Now the body came off of the frame pretty easy but we've still got a bunch of stuff that we have to do before we can start having some fun.

(Jimmy)>> We have to tear out the engine and we have to get the chassis completely stripped of the old suspension to get ready for the new stuff.

(Jeremy)>> Yeah and we're not gonna do that here. So we're gonna roll this thing out of the way, get it out into the open, and start cutting it up. Two horsepower Jimmy. Two horsepower now. [ MUSIC ] This is hands down the easiest way to pull this. Just like that.

(Jimmy)>> That's state of the art.

(Jeremy)>> That's the easy way. [ MUSIC ]

(Jimmy)>> Now that we have the engine and transmission out of the way it's time to get rid of the old suspension too.

(Jeremy)>> There's many different ways we could go about doing that. If we were gonna keep the suspension we could grab wrenches and unbolt everything, or if we were being a little less cautious we could grab a cutoff wheel and cut that way, but we're not interested in keeping any of this stuff and we just want it out from underneath here as fast as possible. So the torch is gonna be our choice.

(Jimmy)>> Don't take too long.

(Jeremy)>> It won't, trust me. [ torch hissing ]

(Jeremy)>> With our trusty torch we can throw caution to the wind and start cutting some metal. The plan here is to keep most of the suspension intact. So when we get ready to get rid of it we can just roll it right out of the way. [ torch hissing ]

(Jeremy)>> We'll also cut through the drag link and unbolt our shocks. There it goes, yeah! Now the front, well that came out pretty easy but here in the back we're gonna take a little different approach. The bracket that holds on the leaf spring is riveted on versus in the front it was welded. So what I'm gonna do is take the torch and I'm gonna knock the tops of the rivets off, and then I'll come back with a hammer and just drive them out. We've got to clean the chassis up anyways and get rid of all the brackets. So this is just gonna save us a bunch of time.

(Jimmy)>> While he's finishing up in the back I'm gonna get started removing the front bumper starting with a few rivets, and the rest will just unbolt. [ MUSIC ]

(Jeremy)>> Ta-da!

(Jimmy)>> Awesome!

(Jeremy)>> Now while I was using the torch to get rid of the rivets I noticed one thing. On the corner of the brackets they also welded these to the chassis. So I'm gonna use a cutoff wheel, score a little line right down here on the edge. Then hopefully we'll be able to pound those brackets off. [ saw buzzing ]

(Jeremy)>> With our welds cut our air hammer makes quick work of our brackets. [ air hammer buzzing ]

(Jeremy)>> Woo! While we're at it we'll go ahead and take care of the rivets that hold on the rear bumper. There it goes. [ MUSIC ]

(Jimmy)>> This chassis is a really good place to start but we're about to be missing something.

(Jeremy)>> What's that?

(Jimmy)>> A set of axles.

(Jeremy)>> You know what? I know a guy but it's gonna requires us getting out of the shop. With the advancements in cordless tools these days more and more people are filling their tool boxes with battery powered equipment. Well Matco Tools has a full line of 20 volt products to help the job go quicker and easier. Take their half inch 20 volt drill driver kit. It's got a half inch keyless chuck with a spindle lock for great bit retention, a trigger activated l-e-d so you can light up your work surface, and it's also compatible with their 18 volt batteries. So if you guys are in the market for professional high quality tools why don't you take a look at Matco Tools full line of Infinium products. We take a road trip in search of some heavy duty axles that can handle the trails.

(Jimmy)>> Plus give you some tips and tricks on what to look for when picking up a set of one tons.

[ MUSIC ]

(Jimmy)>> Today is the day that we're going to find a set of axles for Project Junk Mail and we've narrowed it down to basically two options. Dana 60's from either a Ford or Dodge pickup, but there's one major issue with the Dana 60's from the Dodge pickups. They have this thing called a CAD or center axle disconnect. What this means is the axle shaft is in two pieces and there's a big hole in the axle housing itself, which can cause the axle to be weaker. We don't really want to deal with potential issues when we're out on the trail. So we're gonna go with Ford axles.

(Jeremy)>> So we were talking to our friend next door, mister Tommy Boshers, and he gave us a lead on a Ford picker's paradise. So we're heading down to Butler's Garage. Now Ford came out with a couple different axles underneath their Superduties over the years. So we're gonna help show you guys the differences between those axles, and we just want to come home with the right set of axles for Project Junk Mail. The reason why we're doing a 60 versus a 44 is basically on tire size. So we can run a Dana 44 all the way up to like the 37 inch tall tire mark and that's gonna be pretty much the extent of what you can put on that 44 just from all the internals, and the axle shafts, and stuff like that. So if we go with a Dana 60 we're obviously there already. So we can go with a 37 and you can just go up from there. Project Junk Mail really isn't going to be this extreme rock crawler, or rock bouncer by any means, or thrashing the hills. What it's really gonna be is just a good all-around trail truck. We will probably get into a little bit of rock but not much. It's basically just gonna be a good truck to get us up and down the trails. You could probably even use it on a farm if you want to haul stuff with it. There's not a ton of room, but I think it'll be an all-around good build, and Dana 60's are absolutely perfect to put underneath there.

(Jimmy)>> Yeah I feel like you could start off with something really good. So you can build from there instead of if you decide to go bigger tires or this or that you kinda have to start all over.

(Jeremy)>> Right, so we might as well go to a certain point. Start at that point with Dana 60's, and from there we can always go up versus if we start with like a Dana 44, which would be fine. If we ever wanted to go with a taller tire you would have to reinvent the wheel to throw other set of axles underneath that truck. I think Dana 60's are a good starting point.

(Jimmy)>> I feel like Dana 60's are like no one's gonna give you grief over that.

(Jeremy)>> Yeah, a Dana 60 is an all-around good axle. I mean they came underneath so many different things. Chevy ran Dana 60's in their one tons. Ford runs them in their one tons, Dodge runs them in their one tons. It's just a good all-around builder. Parts are extremely available for them. We could just take the one out of that truck. Now here in the row of axles you've got many different options, and underneath the Superduty you had two. You either had the Dana 50 or the Dana 60. They both look very similar and we're gonna show you the difference between the two. So I'm gonna go look for a Dana 50.

(Jimmy)>> And I'll try to sort through this and find us a Dana 60.

(Jeremy)>> Now there's a couple of visual ways you can tell that you're looking at a Dana 50. First is there's a very abrupt kick up in the casting. On the Dana 60 it's a little more gradual, and the second is right here on the pinion. This one's got a little bit smaller nut than the Dana 60. That measures in at an inch and an eighth.

(Jimmy)>> Like Jeremy said, on the Dana 60's the slope in the casting is a little bit more gradual and the pinion nut is a little bit bigger at an inch and five-sixteenths, and throughout the years Ford used a couple different styles of suspension. On their newer trucks they used the radius arm style suspension where they had the bracketry on one side cast into the housing and on the other side it was welded to the axle tube. That's gonna take a lot of time and effort on our end to cut it off and get it ready for our four link suspension, but on the older trucks all they had was a couple of spring perches that are easy to cut off and get ready for our new suspension.

(Jeremy)>> And another thing to pay attention to on the rear axle of these trucks is the way that they attach the driveshaft. On the newer series trucks they ran a pinion flange and on the older models they ran a pinion yoke, and that's what we're after.

(Jimmy)>> Looks like you found us a rear axle?

(Jeremy)>> Yeah I think we're gonna take one of these two for the rear and I'm pretty sure he's got a front one waiting for us.

(Jimmy)>> I'll check these out, see which one's a little bit cleaner, and I'll meet you up there.

(Jeremy)>> Sounds good. [ MUSIC ] Now one more plus side to running a Superduty axle versus a Dodge axle is that the Superduty axles have a set of lock outs. That means we can either disconnect one or both sides of the axle shafts. Now all we've got to do is get this one loaded in the truck.

(Jimmy)>> We've talked about the external differences of a Dana 50 versus a Dana 60 but here's an internal difference. On the Dana 50 axle shafts you can see it kinda tapers down versus on the Dana 60 the overall shaft diameter is a lot bigger, which means it's stronger, and the aftermarket support for a Dana 60 is way better. [ MUSIC ]

(Jeremy)>> What do you say we get these things back to the shop because I want to tear into these things?

(Jimmy)>> Yeah I've got to finish cleaning the rest of the chassis too.

(Jeremy)>> Our Jeep's getting a set of one tons. [ MUSIC ] We have a little more cleaning up to do. We finish prepping our frame and stripping down our heavy duty axles, getting them ready for our new suspension.

(Jeremy)>> With our axles out of the yard and in the shop we've got a lot of work ahead of us. Now we're gonna end up stripping down both of our axles to just bare housings and we're gonna do that for two reasons. One, we're gonna end up rebuilding both axles pretty much from hub to hub and two, we're gonna use just the bare housings to set up the suspension underneath our Jeep. It's a whole lot easier to move around just a housing than it is a few hundred pound axle assembly.

(Jimmy)>> And while he's finishing up the axles I'm gonna be finishing taking off all the unnecessary brackets on the chassis. We already did it on the top side. So we flipped it over and there's a few things left, like the leaf spring hangers and the bump stops, but that's nothing that an air chisel can't fix. First I'll remove these bump stops by taking out a few bolts. [ MUSIC ] Now these leaf spring hanger brackets are riveted in. So here's a little trick that I like to use. Using a cutoff wheel I make an "X" in the head, which makes it weaker and that makes quick work for my air chisel. [ air chisel buzzing ]

(Jimmy)>> With the brackets out of the way I'll grind the rivets down and punch the rest out with my air hammer.

(Jeremy)>> While Jimmy's been working on our chassis I got to take a good look at our front axle and I noticed a lot of rusted nuts and bolts. So I've been spraying it down with some CRC Power Lube. This stuff is fast acting, it loosens frozen parts, and should make disassembly go a whole lot quicker. [ MUSIC ] With our caliper out of the way we can take off our rotor. [ MUSIC ] Followed by the steering. [ MUSIC ] Then we'll pull off the hub, followed by the C-clips and the washers that hold in the axle. Alright let's see what we've got back here. It should be pretty easy. [ MUSIC ] Yeah it's moving. With our hub assemblies and our axle shafts out of the way it's time to move on and make a little bit of a mess. We're gonna go ahead and pop this diff cover and I'm gonna pull out the gear set and the pinion. Then we'll move on to cleaning up the rest of this axle. [ drill buzzing ] [ MUSIC ]

(Jeremy)>> It's a good idea to mark your bearing caps cause when we go back to reassemble we don't want to make any mistakes. So we're gonna mark the left side with one mark and the right side with two. [ MUSIC ] With our bearing caps out of the way now we can yank out our diff. [ MUSIC ] And with a little persuasion the pinion comes right out. With the gears out of the way there's still a couple of things I've got to take care of. I've got to cut off the big bracket that held some of the steering on and I've got to get rid of this spring perch too. Getting rid of these are pretty simple. Just follow the contour of the axle. I like to leave a little bit of the weld and the bracket so I don't score the axle tube. Then I'll just come back with a grinder and grind it flush. Same principle applies with the perch, and we can easily knock it off with a hammer. [ MUSIC ]

(Jimmy)>> Dude you made a ton of progress on this today.

(Jeremy)>> I got the front axle completely tore down. Still got some grinding to do. I haven't even touched the rear yet but I'll get to that. How'd the chassis go?

(Jimmy)>> Pretty good. I got everything ground down and it just needs a little bit of a wash, but I can't wait until you're done with this so we can start designing the suspension.

(Jeremy)>> Oh yeah, that'll be a whole lot of fun, but we'll get to that later. If you guys like anything you've seen on the show today why don't you check us out at Powernation TV dot com and we'll see you next time.

(Jimmy)>> You probably need this more than I do.

(Jeremy)>> Yeah but safety glasses first Jimmy. [ grinder buzzing ]
Show Full Transcript