Carcass Featured Projects

Carcass Builds

Parts Used In This Episode

Summit Racing
Assualt Radius Rods
Summit Racing
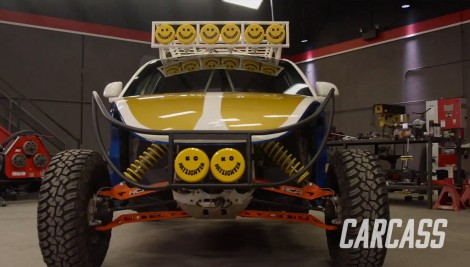
KC HiLiTES Daylighters
Summit Racing
Summit Racing Sway Bar
Adrenaline Cycles
Can Am Maverick X3 XRC SmartLok Front Axle
Continental Tire
Genearal Tire Grabber X3 Tires
EBC Brakes
SXR Brake Pads & Precision Rotors
Matco Tools
MATCO Tools are the Official Tool Supplier to PowerNation
Mobile Environmental Solutions
Mobile Paint Booth
The Industrial Depot
Tools, Hardware, Shop Supplies
Episode Transcript

(Jeremy)>> You're watching Powernation!

(Jimmy)>> Today on Carcass we got bit by a bug.

(Jeremy)>> But don't fear we have the Baja medicine.

(Narrator)>> When you want to build something different you turn to Carcass. They transform cars and trucks into one of a kind builds. From street to mud if you dream it they can build it. This is Carcass, a non-traditional speed shop.

(Jeremy)>> Today on Carcass we're in search of a brand new project vehicle.

(Jimmy)>> This is a 2000 Volkswagen Beetle. In its prime it got 49 miles to the gallon, but what's important to us is the wheel base, which is just under 99 inches. [ horn honking ]

(Jimmy)>> While we figure out what to do with our Volkswagen bug we decided to take an inspirational drive. [ MUSIC ] This is our CanAm Maverick X-3 turbo and this thing is awesome. It's got a 900cc three cylinder turbo engine that makes 120 horsepower. On top of that it's got Fox shocks on all four corners that allow up to 18 inches of suspension travel. And I'll tell you I've driven this thing and it rips. [ MUSIC ] [ engine revving ]

(Jeremy)>> Yeah I think this is gonna work. I've been waiting to see these two things next to each other for a very long time.

(Jimmy)>> Yeah this is gonna be absolutely awesome.

(Jeremy)>> This is crazy. These things are basically the same size.

(Jimmy)>> I think that body's gonna fit perfectly on this and give it a lot of personality.

(Jeremy)>> It's gonna have so much attitude. This is gonna be amazing. That's right you heard us. We're gonna take our used and slightly abused Volkswagen Beetle and put it on top of our CanAm X-3. Now we're not the first one to do this but Jimmy and I are gonna put our own little spin on it.

(Jimmy)>> It's gonna be a Baja bug.

(Jeremy)>> This is one of our favorite parts of the build because we love seeing how big of a junk pile we can make.

(Jimmy)>> In reality this teardown took us about 5 hours. [ MUSIC ] Come on strong guy! [ MUSIC ]

(Jeremy)>> Alright Jimmy I think we ready to start cutting this thing apart.

(Jimmy)>> Me too but there's one thing we've got to watch out for. The fuel lines are on my side somewhere in here. So I'm gonna find those and mark them, and the fuel tank is still full of gas. So we've got to be careful.

(Jeremy)>> Yeah that sounds good. We obviously can't use the torch. So we've got a couple of different tools we can use, and if you want to mark that side out I'm gonna get to cutting on my side.

(Jimmy)>> Alright I'll mark it out.

(Jeremy)>> We're gonna cut holes in the floor with a cutoff wheel to get the reciprocating saw in place. Then we're just gonna run the whole length of the floor and cut this thing apart. [ saw buzzing ]

(Jimmy)>> Alright I think that's the last cut Jeremy.

(Jeremy)>> Man it took us long enough. There's probably only one way to really pick this up. Let's move it on to the hoist and use the hoist to pick the thing up. [ MUSIC ]

(Jimmy)>> Kick it.

(Jeremy)>> Rahh, and it actually rolls right out from underneath. [ MUSIC ] [ drill humming ]

(Jeremy)>> Panel after panel we're trying to get our eyes on all of that metal that's hiding underneath all of this plastic.

(Jimmy)>> Anything outside the roll cage needs to go. That means sliders, body panels, and even the lights out front.

(Jeremy)>> That looks completely different than when it came in here.

(Jimmy)>> It doesn't look like a plastic toy car anymore. You know Jeremy there's only one thing left we've got to do before we can slide this guy under the bug, we've got to cut the cage off.

(Jeremy)>> I saw you taking some measurements. Where do you think you're gonna end up cutting?

(Jimmy)>> I think about 15 inches from the base plate on the front and on the back we'll just cut it right at the base plate.

(Jeremy)>> Sounds good, we'll get the cage off, slide it underneath there, and then we'll actually be able to see if this thing fits.

(Jimmy)>> You've got tools so let's get started. [ saw buzzing ] [ MUSIC ]

(Jeremy)>> There you go. [ MUSIC ]

(Jimmy)>> Oh my god! [ MUSIC ]

(Jeremy)>> That's the weirdest feeling in the world.

(Jimmy)>> This is incredible. I can see us now just sending it off some jumps.

(Jeremy)>> We got handles, we've got door handles.

(Jimmy)>> There's tons of room to put the cage in here.

(Jeremy)>> The door works. Look at that, like the door works. Our transformation of this Baja bug continues. We add a roof rack, a whole mess of lights, and some shiny exhaust. You're watching Carcass.

(Jeremy)>> You know Jimmy there is so much more head room in here now that we cut the top off the side by side.

(Jimmy)>> And you know with the new cage if we use the tube roller and contour the body really well there's gonna be more room everything, and I think it's only gonna take us a day to build. [ MUSIC ] That's about the center.

(Jeremy)>> Before we started the cage work we found the center of the Beetle body, and then we grabbed the cheater and we found the bend angle of the rear hoop. [ saw buzzing ]

(Jimmy)>> The first bend is pretty easy. You just throw the proper length of tubing in the bender and hit the desired angle. It's the second bend that takes a little more experience to get right. Both ends of the rear hoop need to be parallel. So using an angle finder can make that happen.

(Jeremy)>> Now we want to make sure this fits absolutely perfect because this is gonna make the rest of the cage build go smoothly.

(Jimmy)>> Our side hoops will match the curves of the bug body, giving us more room on the inside. We'll use the tube roller to make that happen. [ saw buzzing ] [ grinder buzzing ] [ MUSIC ]

(Jimmy)>> Yours fit?

(Jeremy)>> Mine fits. Yours fit?

(Jimmy)>> Mine fits.

(Jeremy)>> With everything out of the way it was time to strike an arc. Tig welding is two handed by nature. So it makes it a heck of a lot easier to do it without the body in the way.

(Jimmy)>> With the rear and side hoops burned in we have a couple of small pieces we have to add in for strength.

(Jeremy)>> Perfect! [ MUSIC ] Man did we accomplish exactly what we set out to do. Not only did we build a cage that's specific to this body swap. It also looks good and it's gonna keep the both of us protected.

(Jimmy)>> We tied it into the strongest points on the frame. We added extra bracing, extra gussets. While the body's still off let's do the exhaust swap. [ MUSIC ] Out with the old. I didn't even know this thing had O-2 sensors. [ MUSIC ] We have to take off the stock exhaust in sections all the way back to that tiny little turbo. Swapping out the exhaust is pretty straight forward. The V-band clamps and the worm gear clamps get reused along with the stock heat shield. Let's see how this thing sounds. [ engine revving ]

(Jeremy)>> Man that sounds good. I can even hear the turbo.

(Jimmy)>> You like it?

(Jeremy)>> Yeah! [ MUSIC ] So ever since I carefully took the glass out of the back of the car I've been trying to figure out what to do with the opening. Well I think I got a pretty dynamite idea and I cannot wait to show Jimmy. Hey Jimmy come and check this out. So I've been trying to figure out what to do with the opening back here, and these were sitting down by Detroit Muscle. I think we can pull this off.

(Jimmy)>> We could just make our own. [ MUSIC ] All the bends in our louvres are about 45 degrees but there's a little trick to it. After we complete the first bend we have to take it out of the break, flip it over, and bend it the opposite direction.

(Jeremy)>> Oh yeah! [ MUSIC ] You know these things really did turn out amazing. For the little bit of work in the break and the bender they fit great and they follow the contour of the body.

(Jimmy)>> I 100 percent agree and to me this thing just looks fast now, and I love it. I unpacked our roof rack and it is perfect for this build. So I'm gonna get right to making the brackets to mount this thing to the roof. I cut one inch flat strap and rounded the corners at the belt sander. With two bolt holes punched in them I can lay them out on the roof using the roof rack as a guide. That way I know exactly where they're gonna go. Half inch square tubing will be plenty strong for this application, and with them cut to length our roof rack can be a permanent addition to our Baja bug.

(Jeremy)>> While Jimmy finishes up the roof rack I'm gonna go ahead and get started on the scoops that we're gonna add to the window deletes. [ MUSIC ] Our scoops are gonna fit in right along with our bug body, which means they're gonna have some curves. Once I get the two dimensional shape I'll add the third dimension using the slip roller. Using the newly made scoop as a template we can cut a hole in the window delete to make room for our new scoop. [ MUSIC ] [ welder crackling ]

(Jeremy)>> Alright one more. [ welder crackling ]

(Jimmy)>> With our scoops in place it's time to tackle the bracket for our light bar. We'll notch several pieces of one inch tubing, lay them out, and weld them in place. [ MUSIC ] With a few simple brackets we mounted the lights we got from Summit Racing dot com with the hardware that came in the box. Oh baby we got a light bar.

(Jeremy)>> And this apparatus. [ MUSIC ] Man that's exactly what I was thinking.

(Jimmy)>> Is that enough Baja for you? Well let's try the lights out.

(Jeremy)>> Let's light'em up. [ MUSIC ]

(Jimmy)>> Coming up we've got some serious suspension upgrades and more stopping power.

(Jimmy)>> Hey man we just got our HCR Racing long travel kit back from the powder coater and it's gonna make this thing look a whole lot more aggressive and it should handle way better.

(Jeremy)>> I am completely digging the orange. Did you pick that out?

(Jimmy)>> I figured this color kinda pays homage to classic Baja style.

(Jeremy)>> Well that's a great start. I can't wait to see those things on this rig. We'll need to pull out the old suspension, which means we'll make the stock wheels and tires disappear.

(Jimmy)>> This is followed by the coil over, hub assembly, and the upper control arm.

(Jeremy)>> The axle shaft can then be pulled out and the lower control arm can be unbolted, which hold the front bumper and winch assembly in place. Woo, that's heavy.

(Jimmy)>> We can then remove the last piece of the puzzle, the lower control arms.

(Jeremy)>> Our new HCR control arms go on in the same order but in reverse. We'll start with the lower control arms. Then we'll install our stock bumper and winch.

(Jimmy)>> The upper control arms go on next, connecting the sway bar with some links from Summit Racing.

(Jeremy)>> Hey Jimmy is this helping you hook up the sway bar?

(Jimmy)>> We'll slip in the axles after that. These didn't come with the kit but our friends at Adrenaline Cycles were really excited about this build. So they offered to send us a set. With these lined up in the hub assembly the lower control arm can be raised into position and snugged up. The upper control arm is secured in a similar fashion.

(Jeremy)>> The tie rods are next. We'll install these at a base measurement and come back and adjust the toe later.

(Jimmy)>> This long travel kit comes with a coil over relocation bracket and it bolts into the original shock mount.

(Jeremy)>> With the brackets in place we can drop in our original coil overs, connect them to the suspension, and snug everything down.

(Jimmy)>> We'll torque the axle nuts down to 184 pound feet. Then finish it off with a cotter pin.

(Jeremy)>> Now that the front long travel is installed we can move on to the rear of the vehicle. The design of the suspension out back is different than what we're dealing with in the front. Instead of having an upper and lower control arm we have a huge swing arm and attached to that are three radius rods. That controls the wheel's movement as the suspension travels.

(Jimmy)>> Like the kit in the front all we're keeping from the stock setup are the hub assemblies, sway bar, and the coil overs.

(Jeremy)>> That's right, we'll remove the huge swing arm and the axles. Then we'll disassemble the retaining plate out back that holds the radius rods in place.

(Jimmy)>> With all the stock components out of the way it's time to get some of these new fancy parts installed. We'll bring in the new swing arm, which attaches to the stock location.

(Jeremy)>> Then the axles can be installed. This is where all the parts and pieces merge. The new radius rods from Summit Racing are set into place and secured with a retaining plate. The spindle assembly is slipped onto the axle and the three radius rods are added to the mix.

(Jimmy)>> We started with the bottom and top radius rods securing them first, followed by lining up the center rod and snugging it up tight.

(Jeremy)>> The second to last item is the shock, which is relocated with the provided bracket and held in place with a couple of bolts.

(Jimmy)>> Finally we just have to add the provided sway bar linkage.

(Jeremy)>> Before we can see the new stance of our Baja bug we're gonna do a quick brake upgrade with some SXR brake pads and precision rotors from EBC Brakes. These pads are specifically formulated for our side by side. They're resistant to mud, sand, and any trail abrasives we can throw at it. The SXR pad and UTVX rotor are a direct replacement for our CanAm. We'll slap the pads in the calipers and then just bolt everything back together.

(Jimmy)>> Then we'll slap on a set of General Grabber X-3's and finally see the new stance of Bajawesome! Coming up our Baja bug earns its name with a new paint job.

(Jeremy)>> Next on Carcass!

[ MUSIC ]

(Jimmy)>> Hey Jeremy, what is this?

(Jeremy)>> Oh hey, I'm just prepping for our paint job.

(Jimmy)>> So this is a paint booth?

(Jeremy)>> This is a paint booth.

(Jimmy)>> It kinda just looks like a big bouncy house. Did you bring your kids to work today?

(Jeremy)>> Nope we called up our friends at Mobile Environmental Solutions so we could try out one of their mobile paint booths. The first coat we put down isn't a color at all. It's actually a sealer that's gonna act like a glue for the other color coats. Now since our Volkswagen was clear coated we scuff sanded that and that's gonna help in our mechanical bond, and for the sealer that's gonna provide a uniform coverage and it's also gonna help with the chemical bond. [ MUSIC ] The last color we're gonna spray is blue sky metallic. Now that's gonna cover the whole rear of the car and wrap up this paint job. After the clear dried overnight we were able to take it out of the booth, bring it back in the shop, and get a good look at our finished paint job.

(Jimmy)>> This thing is so rad. We're heading to Dirty Turtle in Bedford, Kentucky. They've got a u-t-v short course that'll blow your socks off, and believe me when I tell you we're gonna thrash on our Baja bug. We didn't really build this thing with the purpose of trail riding. We intended it to go fast and hit some curves hard. So Jeremy and I are gonna have a little friendly competition.

(Jeremy)>> So we're gonna lay some simple ground rules down. We're gonna start here, we're gonna stop here, and whoever gets here the fastest is the winner. Ready, set, go!

(Jimmy)>> I had a strong start in this friendly competition between Jeremy and I. Smashing the pedal to the floor I hit the turn at roughly 30 miles an hour and I made sure to gun it as I pulled out of the corner because I was excited to hit the table top for the first time. I hit the throttle out of this one hard because this is where I knew I could make up any lost time. With hitting turns three, four, and five back to back it opened to a straight. [ MUSIC ] You can throttle it into turn six but a downhill approach leads you to turn seven that requires some heavy braking, which was no problem for our EBC brakes, followed by a hill climb into turn eight, and from here you can pin the throttle all the way through the finish line. [ engine revving ] [ MUSIC ]

(Jeremy)>> That wasn't that bad.

(Jimmy)>> What's my time?

(Jeremy)>> 1:39:20 seconds.

(Jimmy)>> Alright not bad. I want to see if you can beat me. Ready, set, go!

(Jeremy)>> Right off the line I gunned it because these General Grabber X-3 tires grip the ground so well. That's one thing I picked up from Jimmy's run. Coming through the first turn I felt confident that the table top wasn't gonna be a problem. [ engine revving ]

(Jeremy)>> I rounded the second turn gassing it but this is where I realized that I wasn't doing quite as well as Jimmy did. As I rounded turn five I came to the straightaway that leads to the whoops. I was super excited to hit these things hard. Just watch the long travel suspension as it soaks up these large whoops. I made a mad dash for the finish line rounding turn eight as fast as I could. Hitting the downhill straight leading to the final turn before the checkered flag. I gunned it hoping this little patch of time would help me catch up to Jimmy. [ engine revving ] [ MUSIC ]

(Jimmy)>> My time was 1:39 and Jeremy's was 1:43 but that all doesn't matter because I came here for one reason. To see how far that we can jump Bajawesome. [ MUSIC ] [ engine revving ] [ MUSIC ]

(Jeremy)>> Are you ready for this?

(Jimmy)>> Give her the berries man.

(Jeremy)>> Let's go!

(Jimmy)>> Now this table top is nothing new. Both Jeremy and I have jumped it once already in our timed runs but this go around we're gonna hit it at nearly 55 miles an hour. [ engine revving ] [ MUSIC ] [ engine revving ]

(Jimmy)>> That was the most fun I've had in a long time.

(Jeremy)>> Yeah it was but you know what? This was a race and you won. So that means you've got to load up.

(Jimmy)>> That just means I get to drive it again. [ engine revving ]

(Jimmy)>> Awesome! This was one exciting build for us and we hope it was for you too.

(Jeremy)>> And if you want to find out more on anything you've seen today just head on over to Powernation TV dot com.
Show Full Transcript