XOR - Xtreme Off-Road Builds

Parts Used In This Episode

Summit Racing
Ford Performance Parts 5.0L Coyote Aluminator SC Long Block Crate Engine
Summit Racing
Ford Performance Parts Starter Index Plate
Summit Racing
Performance Automatic Flexplate Bolt Kit
Summit Racing
Performance Automatic Platinum Xtreme Series Flexplate
Edwards Ironworkers
55 Ton Ironworker
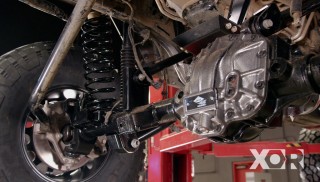
Gearstar Performance Transmissions
AOD - Level 4 - Small Block or Big Block Engines Transmission with Torque Converter
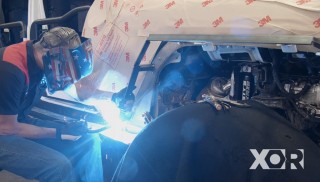
Lincoln Electric
Lincoln Electric is the official welding supplier to XOR
Matco Tools
MATCO Tools are the Official Tool Supplier to XOR
The Industrial Depot
Tools, Hardware, and Shop Supplies

Episode Transcript

(Narrator)>> Today on XOR what do you get when you cross a tranny with a coyote? The answer a drivetrain for the Pre-Runner Ranger. Then Jeremy finds a unique way to keep it all cool. Eliza and Jeremy start hosing around with the fitment and install of fuel lines, and a look back at the history of the arc welder. That's today on XOR. ♪ ♪

(Eliza)>> Hey welcome to XOR. You love dirt, we love dirt, but what do we love more than dirt, going fast in the dirt.

(Jeremy)>> And one of the easiest ways to go fast in the dirt is to make your truck as light as possible. [ engine revving ]

(Jeremy)>> So we took our 2002 Ford Ranger and well pretty much took the truck completely apart. Then we thought about safety and put a whole bunch of tubing back in it and a kicking suspension setup.

(Eliza)>> Yep, we're getting 17 inches of travel and a whole lot of track width from the LSK suspension we've installed. Man I can't wait to see it fully sagged out when we send it.

(Jeremy)>> And how are we gonna send it? With a whole bunch of fuel injected horsepower and a killer automatic transmission setup, and we're gonna set those in between these frame rails for the last time. Now just like you guys at home you've probably got a lot of engines laying around the shop. Well here in the studio it's the same thing, but we don't have to guess at our numbers because this bad boy was down in Engine Power and they ran it on the dyno. Long before this thing was intended for our Ranger it put down 451 horsepower at 6,500 r-p-m, and it made a whopping 421 foot pounds of torque at 4,300 r-p-m. Now our Ranger never came with a coyote in it but that's definitely not gonna stop us. One thing we noticed is this must have had a manual transmission behind it because it has a pilot bushing. Well we're gonna have to get rid of this because we're gonna be running an automatic. You're gonna have to find something that's close to the size of the opening, and a little black tape just helps to seal it up. Now I filled the cavity up with grease to create a pressure to drive the bushing out. And now you're gonna have to repeat that process a couple times. ♪ ♪ And with a little bit of elbow grease it comes right out. ♪ ♪ Now for those of you guys that are not Ford guys this is called the mid plate. What this does is it gives you the proper clearance between your torque converter and your flex plate so you don't hurt the pump on your transmission. ♪ ♪ Now here's a little tip. The bolt pattern on the flywheel is not symmetrical. So you've got to line this little dimple up with the bolt pattern on the crankshaft before you put the bolts in. We used genuine Ford bolts for the flywheel, and I ran down to Engine Power to borrow one of their flywheel holders. Torque's 177 inch pounds. Now this will be the 60 degrees after the torque. ♪ ♪ There we go. ♪ ♪ With this up and in there we'll use a block of wood to kind of shim ourselves up, and then just slowly bring everybody forward until you find the two dowel bits. ♪ ♪ For our bell housing bolts we use ARP bolts. With the torque converter lined up we'll just bolt the two of them together. Again I know it takes a while but it's easier than going back and trying to loosen up the first one because you can't get in the rest. Last time Eliza. ♪ ♪

(Eliza)>> I think we should clear there.

(Jeremy)>> Okay now down slightly.

(Eliza)>> Woo! ♪ ♪

(Jeremy)>> Okay now you have to go down again. We're tight but with the cage built around the engine when the engine was installed I knew it was gonna be a little close, but that's why you build the cage around it. Go down, right there, right there! That's perfect! Just enough. She rubs a little bit but she'll go in.

(Eliza)>> Alright you need to go down just a bit. Ready?

(Jeremy)>> Yep, it's the little things. We actually had the strap caught on the brace for the engine cage. We got it now.

(Eliza)>> Pushing in just a little bit. Getting close to the motor mount on the passenger's side.

(Jeremy)>> So now we actually have to put the header in because I built the header around the driver's side motor mount for clearance for the steering. The header and the motor mount are next. Pieces of the puzzle. I highly doubt I'm the first person to do this. I don't know how many people have shoved a coyote in a Pre-Runner, well at least in a Ranger. Oh right there.

(Eliza)>> Right there. [ hammer banging metal ]

(Eliza)>> There it is. Okay just a smidge more and you should be good.

(Jeremy)>> Success and in! Finally we got it. Last time, last time!

(Eliza)>> Good game of Tetris.

(Narrator)>> Next Eliza gears up and shifts into our plug and play transmission, and Jeremy keeps it all cool with a rear mounted trans cooler, stay tuned!

(Eliza)>> Hey gang, now that we've got the engine and transmission stabbed in here I'm gonna bolt in this cross member that Jeremy has modified to fit up with our Gear Star transmission.

(Jeremy)>> During the dyno testing process Gear Star simulates speeds up to 130 miles an hour to check for leaks, noises, vibrations, shift timing, and quality, and proper overall operation. After it's finished the transmission has the equivalent of about 100 road miles.

(Eliza)>> We've picked up Ford's four-R-seven-DW from our buddies over at Gear Star. Now this is their updated version of the AOD. The reason why we chose this transmission is because it has a lower first and second gear that will make it easier for us to take off on sand and gravel, and it'll handle everything that we throw at it because it is rated for up to 750 horsepower. Now that our transmission is completely installed we can begin to work on its t-c-m, or rather transmission control module. Just like our coyote is run off its e-c-m, engine control module, this module here sets shift fields, lock up, as well as when the transmission goes into overdrive. Now the cool thing about this is that it talks directly to our race pack dash. So now all we've got to do is get it installed, get it clipped in, and get it powered up. Getting the shift module connector installed. Okay now this clip gets connected to our speedo sensor. ♪ ♪

(Jeremy)>> The final step in our transmission install is to put in the transmission cooler. Well our cooling system is in the back of the truck anyway. So this is where we're gonna put our cooler to keep it clean and dust free. It's also got its own special little fan, and transmission from Gear Star comes with special fittings. So we're gonna be running special hose. We're using our trusty Edwards iron worker to make the mounts. That makes short work of cutting flat strap. Now all I've got to do is put the trans cooler on here, center it in here, mark some holes. Then we'll drill them out on the drill press. I've got five and an eighth inch on each side. And we're just gonna drill one hole. We're not gonna worry about slotting them like those are. Fire up the drill press. ♪ ♪ And the flakes aren't burnt looking. They're the same color as steel. So I know I have the right pressure. And now that we have the flat strap cut we'll find center of the chassis so I can put the cooler in the center. So 29's the width, half of that's 14 and a half. Alright now we will do a little test fit to make sure I'm in the center before I put some tacks on it. ♪ ♪ Time to weld. ♪ ♪ Using our tig welder we're gonna weld these on for a nice, clean look. ♪ ♪ You guys are probably wondering why I left the flat strap so long. Well I'm gonna end up wrapping this around the tube. So I've got more surface area to weld and it'll be a lot stronger. ♪ ♪ Now we're running a-n lines up here on the cooler because Gear Star puts AN fittings on their transmissions. Now all I've got to do is figure out how to get out of the truck and go down and wrap this thing up.

(Narrator)>> When we come back Jeremy and Eliza hose around with fuel lines and the Pre-Runner Ranger is finally plumbed for life.

(Jeremy)>> Alright I think it's got to come my way.

(Eliza)>> Okay, hey welcome back. We're getting ready to plumb this fuel system in so we can feet all those ponies up front but first we've got to take this out of the way.

(Jeremy)>> Woo, that's good designing right there. That comes out.

(Eliza)>> It was perfect.

(Jeremy)>> Now that's out. I'm gonna try to get me out of here too.

(Eliza)>> Now with the fuel tank out of the way it is time to route our fuel system. Now I know some of use get a bit nervous when it comes to talking about fuel injection but don't be cause Summit's got you covered. They sent us this kit that has your fuel pump, fuel regulator, fuel filters, hoses, and all the fittings that you need to make your install a success. Now all we need to do is get the creeper and get to working. Our first filter catches any contaminants before it gets to our fuel pump. With our filter in now we can get this guy in so we can get the fuel hose made. There we go.

(Jeremy)>> Now the fuel system on our Ranger is different than a carbureted system, and you can't just run your standard hose because it won't hold up to the p-s-i. You have to run a special type of hose. So with a special type of hose comes special types of fittings. These are called a-n style fittings, and we have to install those fittings on this hose, and this is how you do it. Putting it in the vice just makes it a whole lot easier. Now light twisting pressure will help you seat the hose into the first end of the fitting. ♪ ♪ With it flipped around use a little assembly lube to put it all together. Install it into the other end and tighten it down and that's gonna lock the two sides together. Well this doesn't have to be bottomed out. It's just got to be good and snug. So we'll stop right about there, and Eliza can go put it in. ♪ ♪

(Eliza)>> Once our line was made I was able to get the fuel tank in and all hooked up. ♪ ♪ We're done here. Moving on down the line we've got to get our hose hooked up to our filter. Okay so we chose to put our fuel pump here because we want to have it below our fuel tank itself so that it is pushing fuel rather than pulling fuel. With our hard parts in place it is time just to plumb it all through. ♪ ♪ Okay and here's our second filter. Now our first filter protects our pump and the second filter protects our injectors. We've decided to run all vital fluids alongside the frame because that is where they are most protected. ♪ ♪ Alright right we are done. [ grinding metal ]

(Eliza)>> I made a bracket to mount our fuel pressure regulator to our cowl. [ welder crackling ] ♪ ♪

(Eliza)>> I'm mounting the fuel pressure regulator bracket here in the cowl so that that way it's protected from direct heat as well as any kind of suspension travel. The kit came with the fuel pressure regulator bracket that we have mounted to the plate we made. Fuel pressure regulator here. Alright all that's left to do is get the hose made from filter to regulator, regulator to fuel rail, get our return line put in, as well as connect our vacuum and we're done.

(Narrator)>> When we come back we step back in time for a history lesson on the Lincoln arc welder, stick around!

(Eliza)>> Welcome back. We have spent a lot of time welding on our Pre-Runner Ranger and it has been easy and a breeze thanks to our Lincoln Electric equipment, but welding hasn't always been as easy as flipping a switch. ♪ ♪

(Carl)>> Lincoln Electric's company started in 1895 by John C Lincoln. He worked for the brush company in Cleveland, Ohio, and got laid off, and he said that will never happen again. And so he went out and collected $200 dollars from family members and wound a motor for Mister Dow from Dow Chemical who was going to Case Western University, and that's how he started the company in 1895. ♪ ♪ And then he got enamored with welding in the early 1900's and shifted more and more of his efforts to the welding industry. And sold part of his motor business off to his cousin, mister Hitchcock, and that became the Reliance Electric Corporation. ♪ ♪ The welding machine that you see behind me is a rotating motor generator. Again it's very similar to an electric motor but what we're doing is we're using electrical energy in to mechanically turn a rotor inside a stator and get electrical energy out for welding. ♪ ♪ A welding machine, or a rotating welding machine is an energy converter but you can put mechanical energy in, get electrical energy out, and use that electrical energy to melt steel and weld with. A welder and a motor are very similar in manufacturing, completely different in their usage. So that was one of the first developed welding machines for Lincoln Electric Company, which was the motor generator. The powering of this one would have been 230 volt three phase electrical power. The patent on this machine was actually developed in 1917 and this machine was manufactured in 1923 based upon that patent. ♪ ♪ From what I understand on the history of this machine, of course it was manufactured in Cleveland, Ohio. Then it was purchased by Acme Boiler and Tank Company in Cleveland, Ohio, and then the individual we bought this machine from, Rob Holt, his grandfather purchased it from that company, and he had a repair and fabrication business in Cleveland, Ohio, and he used this on some of the major structure you still see today. ♪ ♪ These machines were heavy, and yet if you're doing manufacturing, or construction, or maintenance you had to move these things around, and being so heavy you had to have a good undercarriage under it. So if you look at this undercarriage it looks almost like a Model-T. It would be very nice to be able to pull this thing around to the different construction sites and make the machine more usable. I remember the conversation 35 years ago. People said what are we gonna do when welding goes away, and welding is bigger today than it was 35 years ago and continuing to grow.

(Jeremy)>> For more information on anything on today's show go to Powernation TV dot com. ♪ ♪

(Jeremy)>> Now we need to install some exhaust on our Pre-Runner Ranger, and since we're running a fuel injected coyote motor there's a couple of things we've got to be concerned about, and that's well two oxygen sensors. We're gonna show you guys the correct location and how to install an OTwo sensor bung hole. We're also gonna be moving on to the rest of the exhaust. We've got Magnaflow's three inch builder kit that we're gonna be using. We also went to Summit Racing dot com and got some sanctioned mufflers. We're gonna show you guys a little trick on how to weld two pieces of pipe together seamlessly. [ saw cutting metal ]

(Jeremy)>> And here's a little tip. Picture yourself underneath your truck and you've got to hold two pieces of exhaust pipe perfectly together. Well grab a piece of angle iron, slide on two hose clamps, and just tighten them down. They will hole it perfectly straight. And by keeping the exhaust tube perfectly aligned it makes welding a whole lot easier. This works great when you're working on the bench or under your rig, and the larger the angle iron the more surface area it covers. This technique works really good on any size pipe or tube. The rule of thumb, as the pipe size goes up so should the size of your angle iron. And with that joint that seamless makes it perfectly easy to tig weld. Now moving back onto the oxygen sensors. Well I need to put the bung down here in the collector cause that takes the reading from all four of the exhaust tubes, and I already went ahead and marked the location of where I need to drill. So well the next step is to just simply drill it out. Now I'm using a step drill that we got from Matco Tools because frankly it's just a whole lot quicker, and the final size of it is three quarters of an inch, which just happens to be the size of the bung that we're gonna install. [ welder crackling ]

(Jeremy)>> Now it's really important that you weld around this 100 percent and that it seals because if there's any leaks here it's gonna throw off the reading of your oxygen sensor. [ welder crackling ]

(Jeremy)>> It's really important that you have anti-seize on the threads and that you torque this down to the recommended torque spec. Now with this oxygen sensor in I've still got to do the one on the passenger's side, but this is gonna send real time information into the computer. The computer's gonna look at how much air and fuel is coming through the exhaust and adjust from there to make sure it runs perfectly. I've still got all this to put underneath the truck, but before I get to this I've got to put this sensor on the passenger's side.
Show Full Transcript