More Project HRT Episodes

Trucks! Builds

Parts Used In This Episode

Anest-Iwata Usa Inc.
LPH80 Miniature center post spray gun, Kustom Micron series airbrushes, Hi-line series airbrushes.
Bay One Customs
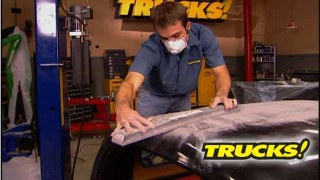
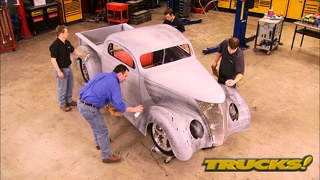
Frame sanding, prepping and painting.
Col-Met Spray Booths
Downdraft spray booth.
Dupli-Color
Aerosol Truck Bed Coatings.
DuPont Custom Finishes
Hot Hues custom blended paints, urethane clear.
Karajen Corp.
Karajen Corp is the creator of many unique and innovative products for the Automotive and Industrial Painting Industries. Magnetic tool boxes and hanger assemblies for hoses and painting equipment.
Sanderson
Block Hugger Headers with angled reducers.

Video Transcript

Today we're painting project H RT first, we're planning out what makes for a great looking and timeless paint job for our hot rod truck. Then it's off to the booth to spray more than a dozen different layers of paint.

And after all that, we'll put it all together to check out the coolest paint job to ever roll out of the truck shop. It's all today here on trucks.

Hey, welcome to trucks. Well, check out project hr team. Now it's looking like a truck again and it's getting closer and closer to being ready for one of you. Lucky viewers to take it home and add it to your collection.

And just in case you haven't entered, the contest is still open and you can't win if you don't enter. Now, the body is finally ready for paint, but it took a ton of work and we've kept pretty good track. We figure we have almost 300 hours to get it in the shape it's in. Now

while our buddies at Bay one customs smoothed and painted the frame for us. We got to work on the fiberglass and blocked

and blocked and fit and blocked some more because that's what it takes to get a true high end custom paint job on your vehicle.

After we set the engine down into its new home, we then mated the body panels back to the frame for a final mock up and test it

and then proceeded to prime

and blocked

and blocked some more,

which brings us to a very important place in any project planning, the overall look and appearance of your vehicle, the paint job, which takes a lot of preparation. Something you just can't wing in the paint booth

and having a plan will save you time, money and disappointment.

Now you can't build a house without blueprints and you can't do a full on custom paint job without knowing what your end goals are.

So we assembled a team of automotive designers and started with a blank slate.

I like the idea of a two tone

because we've got a perfect style line right here to break it up

on the back.

Yeah. Yeah, the bed, it's not really in the same line, but that would give it nice proportion too.

Steve Longacre our in house graphic artist, Tommy Boser

Ryan and myself all have some pretty strong opinions when it comes to our projects and having the chance to toss around some ideas really helps get a perspective.

Now, nothing says hot rod like flames,

but there are so many styles to draw from and we want this paint job to be perfect for H RT.

There you go.

The grill is a great launch point right up here off the grill into that division. I think that's nice.

Flames are a must and a two tone would look great too if the colors are right

color sometimes dates a design.

I

mean, you remember in the late eighties it was all the pastel. Exactly. Exactly. Even the style of the flames too, we can get to that later. But color, I don't know. II, I wanna grab something universal so that in 20 years, this thing still still looks good.

And you also want to stay away from a lot of metallics and

can those kind of candies that'll be hard to match

any touch,

touch it up later.

If you've ever seen a 10 year old candy job, you know that they fade out in the sun if it gets any kind of street use at all. We're hoping somebody drives this thing,

you know, it'll be sitting at a few car shows here and there.

It's going to see the sunlight.

So we want it to be a matchable color. We want it to be easy to repair if they have to.

And so we're leaning towards a solid color too, right? Solid colors.

Just a

basic primary color.

Nothing

crazy,

not traditional.

So to really visualize our paint scheme, we pulled out the crayons and one of the great things about planning on paper first is that you can truly see and judge all the different opinions. The two tone looks right.

But the colors just don't pop,

the solid colors are cool,

but we're trying to make more of a statement.

Ryan was definitely thinking out of the box with purple and gray, but it still wasn't totally Hot Rod.

Tommy had a great idea with black and gold,

but that combo has already been done with a certain Lamon.

We all agreed that Steve hit the nail on the head with a solid red on the bottom and the black on the top. To us, that color combination screamed Hot Rod Truck.

Yeah. If we're gonna do a two tone, I think that's it.

Yeah.

And then there's a question of what style of flame. Yeah. I think we keep it kind of timeless and go with like a classic flame,

nice long stretched out,

you know, to really show off the fender lines and

the, uh, the style of the truck,

something like that.

I like them. I'm sure we'll maybe follow the style line a little bit more. It needs to follow the lines of the body more.

I

think about something like that.

A

little heavy in there.

Just a little, just a little big.

What do you think? Real simple?

It's not bad. It's nice and clean but it's almost too simple for a truck. It's kind of over the top. It

begs for more, doesn't it? But I like how it follows the style line.

In the end, Steve's rendering. Borrowing from everybody's ideas gave us a flame design that worked for everybody.

What do you wanna do for like colors on the flame?

I'd say more of a white to orange traditional with

the purple uh tips. Just a nice color fade throughout

almost following the spectrum of color white into maybe purple at the tips.

Steve had one more suggestion to really make this paint job come to life. If we're gonna do the red and black, do a extreme delineation between the two colors.

Just something subtle, right? Nothing.

Yeah, nothing in your face but that is right. It'll make it pop it

pop.

I like that long sweeping flames coming off of the grill dividing the two colors.

That's perfect.

Pretty clear why we work on cars and you do the creative art thing.

Nice to have

so armed with a pretty accurate rendering of what we all wanted to see. We had a plan

and we definitely had our work cut out for us starting with one final round of hand sanding and blocking with the final Urethane primer surface. You're using 400 grip paper

and when you're final sanding, it's your last chance to make sure that everything is straight. So it's time well spent

up next. The paint is gonna start flying as the base colors hit the glass. And later all the pieces come together to make metal fiberglass and paint become project H RT. Don't go anywhere.

Hey, welcome back to trucks while the guys are in the booth, prepping for paint. I'm in here taking care of a few things on the chassis like these headers that we got from Sanderson.

These make for a nice clean installation on a street rod. They've got a patented leak proof flange, nice durable ceramic coating. Plus Sanderson hooked us up with these angled reducers to help us keep the exhaust tucked up in the frame rails.

Now, you've seen this guy around helping us today on project H RT. This is Brian Barker from Legend Motors, the people that make these bodies. Now, Brian's an award winning custom painter. So check out some of the work that he's done. It's been featured in calendars and magazines.

Now that is some nice looking work. And since Brian has had his hands on his fair share of these trucks, he's a handy guy to have around right now.

Now we're getting these panels ready to apply some color. They've already been final Sandy with 400 grip.

We're wiping them with some alcohol to get rid of the static electricity.

So

you're gonna see us use these gun hangers and booth boxes. They're made by the carriage and Corp and they're designed by a painter for painters.

They feature strong magnetic attachments. So you don't have to drill holes in your booth to mount them.

They offer storage for tape tweezers, tack racks all the things you need to reach for while you're in the middle of a paint job that you don't want to have covered in over spray.

Now, the panels we've got in the booth only require one of the colors of our two tones, so we're gonna get them colored and cleared and out of the way so we can focus on the cool part of our custom paint job.

Another good thing about painting any pre-war fat fender vehicle apart is that you can reach every corner and every angle of the panels. If you were to try and paint the front and rear fenders with the vehicle assembled, you'd never get an even coating of color and especially not clear and you'd end up with a lot of dry spray.

It takes longer this way, but it's worth it

with the color and clear laid down these parts get set in a corner to dry

and the main canvas of our custom job gets rolled in, namely the cab and hood sides.

Now, Dupont paint has been around for decades, but Dupont's Hot Hues line is a relative newcomer in the custom painting scene.

They've got a great array of factory packaged colors as well as a nice line of candies that allow you to build your own custom colors. Hot hues is user friendly. It's easy to spray and it's a high quality coding system. So it's what we're gonna be spraying all the way through this custom paint job.

The cab has been prepped just like the rest of the body. 400 grit wet and wiped down with alcohol to lose the static charge.

But we've used the braces to mock up the hood sides. Exactly like they sit when the truck is fully assembled.

This makes sure our flames will line up when we reassemble the body. After final clear cuts,

then the cab gets coated in hot hue firecracker red factory packaged color

following a rendering as a guide, the two tone gets established right below the style.

This allows us to be able to focus the flame job below the hood.

The hot hues black that we're laying down on top gives us the bold two tone we want and breaking the color below the style line keeps the graphic off the hood, making it a simple but very effective layout.

After the break, we're burning down the tech center spraying more flames than a flame thrower. Stick around.

Yes.

Hey, welcome back. While H RT is in the booth getting a fresh coat of custom paint. I'm in here putting some finishing touches on the chassis and drive train. Now with our headers on, I went ahead and installed the shift linkage so we can measure for exhaust clearance and figure out how the heck we're going to get the exhaust tubing to the back of the truck.

What do you think? Pretty cool? Huh?

If you think this looks cool. Just wait till you see what's coming. Now, you saw us lay down both of these colors before the break. But what I did is come back with a 6222 protective clear coat to act as a barrier between our ground coat and our custom work that way if we decide to change your mind

or make a mistake and have to do a repair. We don't interfere with our two ground coat colors

armed with a rendering as a guide, we still have the freedom of laying out flames that look good on the vehicle and not just on paper,

quarter inch fine line tape gives us a nice bold line to visualize and is easy to turn corners with

all three of us have laid out flames before but being able to work together without ego and work off each other's talent made the job a lot easier

with a collective effort and a few adult beverages, we settle on this design. Everybody's happy with it. So now it's just a matter of transferring this over to the other side and there's an easy way to do that

using the two tone brake as a guide. We're using the time tested method of tracing the graphic onto paper, using a pencil,

perforating it on the floor with a pin wheel that punches tiny holes in the paper

tape, the trace side of the perforated paper towards the panels on the other side

and using a pounce pad filled with drywall chalk

and what you'll end up with is a perfect mirror image of the driver's side to lay your tape on

for masking. We're using frisk film which is basically wide clear plastic masking tape to mask the flames off.

The rest of the truck hits mass off to protect it from overspray,

which gets us ready to lay down a ground coat of white that'll start our color fade and really make the other colors pop.

We're using an LP H 80 from IWATA to lay down the larger colors. These guns allow maximum coverage without a lot of build up. So our graphic won't be hard to bury and clear. Later.

The next color is sun kiss orange, which is

yellow and it's faded from the white and carried back almost to the end of the flame. Las

next is red and it gets loaded into an iwata Highline th which is an airbrush with a trigger. So you get the trigger control you're familiar with as well as the precision of an airbrush.

Tommy's mixed red and yellow to get an orange color to fade into.

And since all the hot Hu's base colors have no hardener, they're safe to use with a charcoal mask

with flame lifts that cross over or under each other, just use masking tape to mask the direction

and then spray against the tape to give it a two dimensional look.

Amazing grape goes on the tips of the licks. And we're using a micron plus from a water for a bit finer detail

with the white ground coat. It takes very little color to cover and we get the effect we want fast.

Even the most experienced airbrush artists use two hands to study the brush. This just gives you maximum control over your work

with the colors laid out and checked by the Peanut gallery. The masking comes off and we get the first glimpse of what the finished product will look like

with the graphic laid out. The body comes apart for the door jams and backsides to be painted,

the parts get cleaned and the graphic gets masked for protection.

Following the graphic into the door jams is one thing that separates a regular paint job from a true custom job.

The time investment is huge, but the payoff is work that's on par with the big boys.

The fine line tape creates a nice clean edge to the graph

and we'll take a back tape this

when we fill this in with red, peel this off. It's a nice finished edge.

When we come back, we're putting the puzzle back together for the last time. You don't want to miss this.

Hey, welcome back to trucks. As you can see H RT is finally under pink and ready to go back together.

And since we can't possibly show you in real time, all the hours that it took to get us finished up.

Well, these are the basic steps.

Once the jams were painted and after the first two coats of clear where sand and flat was 600 grid.

Muscle car's Rick Bacon was nice enough to pull some lines for us and outline the flames and the Midori sour green accent stripe as well

as a final touch. We followed that with a candy purple drop shadow to give us a two D effect and lift the flames off the panel.

Then everything was buried in another four coats of hot hues 5100 hot clear and four stride after a ton of sanding and buffing every single painted surface, the bottom of the cab, as well as the fenders and running boards were coated in dup the colored bed liner for some added protection.

If you're doing a paint job, this elaborate, it's worth a couple of six packs to get your buddies to help, put it back together

carefully.

Just don't crack the drinks open until you're all done.

Well, here it is finally after hundreds of hours of labor, thousands of dollars worth of filler primer, sandpaper paint and polish.

Yeah, not to mention quite a few bucks for the parts thrown in.

This is project H RT.

Now, this truck is not the work of just one guy. There are plenty of people that have poured their heart into making this truck a stunning one of a kind hot rod.

Tommy Boser's

has 100 hours into blocking alone. And Ryan and I, well, we've got tons of time invested as well.

Very few high end street rods are the product of just one person. And H RT is the result of some great and talented people jumping on board to make this the coolest truck ever to come out of our shop.

And now that you've finally gotten to see what our vision has been for this truck,

everything that follows the interior and all the finishing touches are going to be just as cool as the paint.

So now is the time to enter to win it,

it costs you nothing to enter and you can enter as many times as you want.

So go to Power Block tv.com, click on watch and win on the home page and sign up to win this one of a kind hot rod truck.
Show Full Transcript