MuscleCar Builds

Parts Used In This Episode

Afco Racing Products
AFCO RACING PRODUCTS.
Tiger Quick Change Rearends
Quick change rearend, axles, and gears.

Video Transcript

Now, I'm no photographer, but I'm getting plenty of practice. Every step of building this road racer has to be documented for tech inspection at the track. The SCCA requires it and they have volumes of rules and regulations. You have to follow when doing that. Unless you plan on going to N ASA outlaw class, which is what we plan to do.

It's the closest thing to run what you bring. No engine limitations, wheelbase, tire size drive train. Hey, make it as fast as you can.

Our frame was built with common sense and safety in mind.

Not many rules here. Our engine is a 351 Windsor punched out in a 408. Our body a stripped out 65 fast back.

Now it's time to put in a roll cage and that's where the leeway stops. Safety regulations are a top priority for all sanctioning bodies. So after studying the books, talking to some friends, talking to the experts and showing my ignorance,

I think I'm ready to start

roll cages are based on points. A point is where the tubing secures to the chassis.

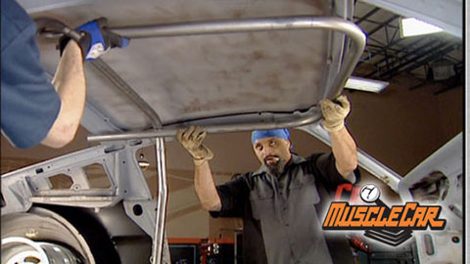
This car is gonna get a 14 point cage we're gonna start in the back. Our first two just behind the rear end. Our next two will be just in front of it.

Two more for the main hoop that gives us 68 pillar bars, eight engine compartment for a total of 10. Then we move back to the main

hoop for two side impact bars then helping support the rear suspension. We'll have two more in the middle of the car for a total of 14. That's not counting door bars or any other support bars.

We'll start with the main hoop as close to the body as possible. Our protractor tells me a 68 degree bend will do just that

along with another bend at the top of the door. Then down to the floor.

The rules require ancient five eights 120 wall dom tubing

and this portable Irvin and Smith Bender is plenty strong enough for it.

How's that

looks good

and is standard for every roll cage anywhere.

The main hoop must be one section of tubing.

Oh, yeah, that's tight here. We'll put the other one like right in here. Right.

Yeah.

There's a ton of different ways and theories on how to bend tubing, right or wrong. I'm going to show you how we do it.

It all starts with the bender and how much tube it eats up to make that bend.

Every bender is different. Even the same size dyes have some variances. So this step is crucial.

With a 90 degree bend,

measure the inside from each end of the bend,

then the outside. So you can determine the length of the center of the tube.

And that's how much steel it takes to make a 90 degree bend.

We know it was 12 inches from end to end. So the center of that is six. If you want to do a 45 come in three inches. This is a theory we use to do all of our bends. All you got to do is practice, go out and get a tubing bender. Who knows you might make some extra do

doing cages for your friends.

21 and a quarter. We're not 0.90.

Even though our theory is simple, you may want a calculator as well. That's our first bend, multiple bends

at different degrees on a single tube

can get complicated.

Oh, we're geniuses. You know that, right. You know that

outstanding

and we got enough room to get the stinger up there.

Weed it now

slide urine back a little bit right,

right there. Hold what you got.

Alright,

here we go. Watch your eyes.

The entire cage is only tacked in place for now. When it's all put together, it needs to be inspected and stamped by a certified SCCA inspector.

Our next bar is our halo. It attaches the main hoop runs forward, makes a 90 across another 90 in back. So that's gonna be two nineties. We gotta pull So that's gonna be how many inches from the bend. That's right. Six.

Never cut your stock to the exact length.

I don't know anybody that good. And if you do, they're lying,

it's cheaper to waste the trimmings than to start over with a new piece of stock.

Yes, there are plenty of tools that will not too.

But this for me is a great mental enema.

Write down a little

what your eyes.

This is not a speaker hole.

The eight pillar bars are next.

They mount from the frame

up to the halo.

These six bars at a hearty roll cage

because all the rest play off.

If you don't get these right, you're jeopardizing your survival.

Four points down

10 to go after the break.

Yeah,

glad to see you stayed with us because we got a long way to go. We're in the middle of building our 14 point roll cage for a mustang road racer to this point. We've got the main hoop done the halo and the a pillar bars. Remember this entire cage has to meet the safety specs set out by the SCCA. They're so serious about it that they're going to have somebody come in and inspect it and stamp it before I can weld it up while you were gone. We tied the eight pillows together with some tubing

and we ran it behind the dash

that also gives us a good mounting point for our pedals and our steering column and these, and it'll go from the bar to the front frame. One,

they limit the twisting caused by engine torque, the G forces from racing and keep the front end off your lap in case you start playing bumper cars.

Now it's time to start working on the back portion in this roll cage and it all centers on the rear end. I just got in Tiger rear ends built this base on the dimensions that we gave them. Now, if you're into racing, you've seen a quick change before. But if you haven't, here you go.

This center section is the heart of it. All your drive shaft attaches to your yoke which spins this shaft which turns two interchangeable gears in here which spins your opinion, which makes contact with your ring gear. Now, let me show you why they call this a quick change.

These two gears determine your final ratio. You're at the track. You want to swap them out, simply slide them out, slide in a new set. Something else that's really cool. We ordered 628. All we got to do is flip flop them and we got a set of 260 nines. So let's do the math. They offer 24 sets of gears, each one of them giving you two ratios. That's 48 options you have to choose from. If you can't compete with that, you got a problem.

Now, for this application, we're going to run a spool. Unlike a posse, both wheels will turn the same speed all the time. Everything's been polished but less friction, which means less drag and all the excess weight has been taken out.

The axle tubes that steel, the Bells are aluminum and you can get them in magnesium.

Putting it together is just too simple. The whole unit was designed to tear down quickly.

Now, we already know exactly where the rear end is gonna go. So it's time to extend the frame rails to the rear of the body.

But first, I need to show you something. The rulebook even has a specific way to do a butt weld. They require that both ends of the tube be beveled. But if you're building a Mercedes, it would be called a

chunk. Pa,

a 30 to 45 degree angle is what you're after.

The reason

it gives you more surface to weld on

and you're not removing it when you grind it down.

I'm gonna add some diamonds for additional strength

rules are not,

this is how it should be done anyway,

maybe it's just me. But the first major part I put on a project, it's better than donuts

clamp it.

This brace will mimic the ground

and the axle will be 13 inches from it.

So what we made is this

to hold the rear end where it needs to be

and position it to the correct wheelbase length.

Little more, little more.

Then center it side to side, going,

going.

Oh,

and lock it in.

All right. I've got six points down. I'm gonna do four more before I start my rear suspension. I'm gonna do two off the main hoop as far back as I can get them off of those. I'm gonna drop two straight down right behind the rear end and then two in front of the rear end,

the long bars are roof supports and your best friends in case of a rear end collision

and to add support to their length,

these down bars are a must

and now we'll tie the two together.

This X is protection from side impact

and two more bars for extra insurance.

Now, that's a fair piece of business. Now, later on in the show, we're going to tackle that rear suspension.

The early Mustang has got to be one of the most popular platforms for the pursuit of speed with style and nobody ever achieved that. Like Carol Shelby did

this week's muscle car flashback. The GT 500 Cobra

Mustang happened to Henry

Ford, put more than a million first generation Mustangs on the road from 64 to 66 everything from Tame Little six cylinders to Shelby race car.

They did a total redesign in 67 with room for a big block up front.

That's about 100 and 80 footer right there. Business as usual for Joe Grogan's 68 GT 500.

It's packing a police interceptor 428 and enough torque to spin those E 70 by 15 good years. Lean out of sight.

The interceptor was Ford's fe big block with a hot cam and a Holly four barrel beefed up rods and aluminum intake manifold. Ford claims 360 horses. But we know they weren't telling us.

I like, you know how torque it is and

I like four speed and

it just,

it's fun to drive.

The second generation Mustang looked just like the first,

but they were a complete redesign, bigger, stronger and meaner

and they were even more masculine when Shelby got a hold of them

with the front end that looked like he'd bite your leg off. Maybe it would.

And 65 Thunderbird tail lights for that stylish sequential flash.

The lights aren't the only t bird parts on this beast. A tilt away steering wheel has to be centered and both doors have to be closed before you can start it

inside.

There's a built in roll bar, a full down back seat

for those long nights to drive in

and a pass through trunk so you can reach some refreshments. The side scoops open up on some of the GT 500 but not all of them

and look at this road racing seat belt perfectly safe if you can just get in it

comfortable.

Muscle car guys know a Shelby when they see one

but the GT 500 is rare enough. Some of you younger car guys might think it's just another Hot rod mustang.

That would be a mistake.

You know, we don't race but if somebody pulls up beside us on the street, you know, at a stoplight, you know, we might play with them a little bit,

you know, we'll go stop like stop light and we usually come out on top.

Ford made just over 3000 GT 568 half of them with the police intercept the big block. The rest with the 428 Cobra Jet.

This will cost about 4600 new today. It's worth about 100 and 50,000.

And Joe says he wouldn't trade it for one of Ford's New Shelby GTs.

But if they give him two

and a GT 40 he might think about it.

It's amazing that after 40 years, we're still chasing Carol's accomplishments. We'll be back,

we're back and we've got just enough time to start our rear suspension. Now, I've showed you how to do four links for drag cars, but today I'm going to do a three link for road racing. Now, there's different designs between dirt and asphalt so you better do your homework because it can get confusing.

Here's our choice.

A

fo came through with all the parts we ordered to give us the handling we need and the attraction to get us there

and this is what we're gonna build with them. We're gonna start with some coil over shocks on each side.

And then our first two links are gonna mount underneath the rear end as close to the rear tires as possible for more stability.

And then we're gonna take our third link mounted on top of the rear end and it's gonna absorb the torque from the engine and transmission, which wants to make your rear end rock forwards and backwards and minimize it giving you traction going into the turns and come out of the turns.

The wheel needs to be in place to position our brackets,

which means some quarter panel removal is necessary

with 18 inch wheels and a low ride height.

The bracket should be mounted above the rim.

After setting the pin angle at zero,

I can tack in the lower bracket

with the arm parallel to the ground. I'll tack in the front brackets and box them in later.

We made sure our X bar left room for this adjustable rear end mount.

Now it's time to install our torque link. It controls movement of the rear end forwards and backwards by this spring. If you need to adjust it, all you do is take this bushing off and there's a nut you can loosen it or tighten.

I've seen guys carry several of these at different adjustments to save time at the track.

There's a lot of push and pull from the third link.

So the main hoop will be the anchor

with the Tor

L parallel to the ground as well.

We'll add some more tubing and triangulate it, which gives it more strength

and to mount the adjustable bracket

and two more bars to the back of the frame.

There you have it a three link rear end. Now how to set it up and adjust it as a whole show in itself as far as the roll cage goes short of the door bars and some extra breaking that I want to put in, it's ready for the inspector and he'll be here next week. So, until then later.
Show Full Transcript