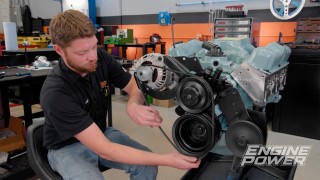
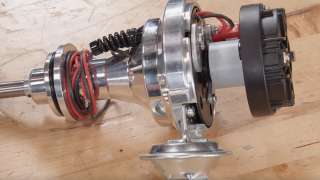
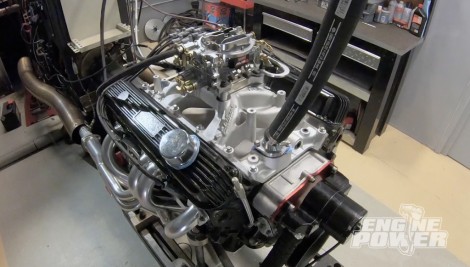
Engine Power Featured Projects

Engine Power Builds

Parts Used In This Episode

Summit Racing
Edelbrock AVS2 Series Carburetor
Summit Racing
Edelbrock Performance RPM Air-Gap Intake Manifold
Summit Racing
King Engine Bearings
Summit Racing
MSD Pro-Billet Distributor
Summit Racing
Total Seal Piston Rings
ARP
ARP Bolts
E3 Spark Plugs
E3 Spark Plugs
The Industrial Depot
Tools, Hardware, Shop Supplies

Episode Transcript

(Pat)>> You're watching Powernation!

(Frankie)>> Today on Engine Power we've got two words for you, Mopar Magnum. [ engine revving ] [ MUSIC ]

(Pat)>> Hey everyone, welcome to Engine Power. You may have noticed lately we have been dragging a lot of things out of the mothballs, spiffing them up, and running them on the dyno, which I think is pretty fun, and today is going to be no different but it's gonna be all Mopar this time. This is a 360 Magnum. They came in full and mid-size trucks, and they are very popular in the hot-rodding community, and for good reason. They have a strong block, a decent flowing stock cylinder head, and this 1994 vintage that we have even has a factory hydraulic roller cam. We thought it would be fun to get it up on the cart, make a few base line runs before we start doing any mods, but as you've probably figured out it needs a few more parts to get it running. So, I have to go digging for some more stuff.

(Frankie)>> Now we are going to do a full engine build on this Mopar, but we had an interesting thought when we were planning it out. Normally when you do incremental changes to upgrade your engine or give it little hot roddy status it means changing a cam shaft, or maybe adding some better valvetrain, doing an intake swap, or even adding new cylinder heads, but what would happen if you just added a stroker kit, and that is what we're going to do to our five-nine. We're gonna roll it into to the dyno, get some base line numbers, and then pull it completely down and add 420 thousandths into stroke with a forged rotating assembly, and then add all the stock components back on. That means stock cam shaft, stock cylinder heads, stock valvetrain, and the intake that we started with. It'll be interesting to see how it affects power. Now this seems a little bit backwards but that's okay because we are going to upgrade the induction later and we'll have a solid foundation for when we do that. So once he gets those parts here, we can get this sucker running and see what she makes. [ MUSIC ]

(Pat)>> Start with this.

(Frankie)>> Oh, nah, I'm just kidding.

(Pat)>> I got to get more stuff.

(Frankie)>> These are a set of one and three-quarter inch primary tube dyno headers we had in the shop. As I demonstrated they are a two-piece design that fits around the steering shaft of several vehicles.

(Pat)>> Alright I cleaned this stuff up. Not sure if those are gonna fit because...

(Frankie)>> The stock valve covers use 10 bolts, but these only have 5. No worries though because they fit, and they seal up just fine. Even though the heads are cast iron we'll put some anti-seize on these E-3 spark plugs to protect the threads. Since we've got easy access to the crank case with the intake manifold off, we'll pour some 10-W-30 synthetic oil into the lifter valley. After dropping on the intake gaskets silicone gets applied to the China walls and the corners. The one thing we did not have in stock was the correct intake manifold. So, we got this Edelbrock Performer RPM Air Gap from Summit Racing Equipment. It's a dual plane design that will pair nicely with our stock cylinder heads. We'll use a one-inch dual plane spacer and top it off with an 800 c-f-m Edelbrock AVS-2 carburetor. The next component we're gonna install on our engine is a locked-out distributor, and that gives us the chance to talk about the types of distributors available, and we're gonna be using a couple of examples we have here from Summit Racing Equipment. There's basically three ways that you can control ignition timing inside of the distributor. Vacuum advance, mechanical advance, or a locked-out distributor. Vacuum advance has a vacuum solenoid mounted to it and has a rod that is connected directly to the magnetic pickup. When it sees more vacuum, the magnetic pickup will move and add advance into the engine. This was originally designed to make engines more efficient at low load operation like cruising. Another kind of advance is mechanical advance, and that's directly related to engine r-p-m. Inside the distributor there's a set of weights, springs, and bushings. The weights are constantly being forced out with centrifugal force, and that is what actually makes the distributor add ignition timing. The springs are trying to hold it back and the bushings underneath these pins limit how much timing is actually added. Each of these components can be changed, and that will affect the way the ignition curve looks, and usually the instructions will come with a couple of different graphs to show you what each change does. Mechanical advance allows an engine to have less ignition timing at low r-p-m for things like hot starts, and more ignition timing at higher r-p-m during normal operation. The last kind of distributor is a locked-out distributor, and normally you can buy them that way or get kits to lock them out yourselves. This means that the rotor and the shaft move together. This is really common in racing applications where you don't want the ignition timing moving around at higher r-p-m, and you don't want it being a variable in engine performance. It's also used when an e-c-u is controlling the ignition timing cause the e-c-u needs to see a certain value, and then it will retard ignition timing from there. Hopefully this will give you a better understanding of how distributors work. For our engine we chose an MSD Pro Billet locked out distributor. We usually prefer locked out timing on the dyno since it's one less variable to worry about, and it makes the engine load in better. This is the best choice for our application but if you need help choosing the best distributor for your engine talk to the experts at Summit Racing Equipment. When we got the engine, it had a neutral balance harmonic damper. 360 Magnums are externally balanced on the front and rear. So, we swapped it out for an o-e style replacement. See what she does.

(Pat)>> Dialed in. These things only make 240's for stock. [ engine revving ]

(Pat)>> That's pretty decent right there. I think it's up from the stock.

(Frankie)>> A lot!

(Pat)>> 305.7 horsepower.

(Frankie)>> And 414.8 at 3,400, that's nice!

(Pat)>> Had good oil pressure and everything worked great.

(Frankie)>> Just have to get it off now.

(Pat)>> That was the easy part. Now we have to tear it apart.

(Frankie)>> Coming up, there's no replacement for displacement. Our Mopar gets stroked.

(Frankie)>> Alright, oil's already drained, oil filter is off, cut it apart, looked pretty good. So, start tearing her down.

(Pat)>> I'm impressed with how nice the exhaust ports looked. This ran nice.

(Frankie)>> It is a stock engine but really smooth. [ MUSIC ]

(Pat)>> Nice!

(Frankie)>> Of course to put in our stroker rotating assembly we've got to tear everything down. So, we'll get started. [ MUSIC ]

(Pat)>> Got her? [ MUSIC ]

(Pat)>> Got it just as you let go of it.

(Frankie)>> It slipped out, I think. [ drill humming ] [ MUSIC ]

(Frankie)>> Cool, heck yeah!

(Pat)>> Got the valvetrain tray so we can keep everything in order.

(Frankie)>> This is essential since we will be reusing all of the stock valvetrain. [ MUSIC ] Our Magnum has a factory hydraulic roller cam setup, which we can reuse when we upgrade the cam shaft later on. [ MUSIC ]

(Pat)>> Stop moving the engine.

(Frankie)>> Well hold your side. [ MUSIC ]

(Pat)>> Ha, ha, ha! You didn't drain that side remember?

(Frankie)>> No, I don't remember, but I guess we didn't drain this side, did we?

(Pat)>> You pulled the plug on this side.

(Frankie)>> Cause the headers and the cart blocked this side.

(Pat)>> You said, I'll get that one later. Usually that's me that does that.

(Frankie)>> I was wondering why you gave me this side. Now we know why. Oil pan studs make removing the oil pan a little easier, but the intense amount of silicone around the front of the pan definitely put up a fight. We had to cut it off with a knife. So, we will not be reusing this seal. [ MUSIC ] Even though it's new oil with only a few dyno pulls on it the fact that it's clean is a good sign. [ MUSIC ] The slightly loose timing chain definitely indicates the block has been align honed. We measured and degreed the stock cam shaft during teardown. At 50 thousandths lift it has measured durations of 192 degrees on the intake and 198 degrees on the exhaust. Lobe lift is 284 thousandths on the intake and 279 thousandths on the exhaust. It has a lobe separation angle of 111 degrees, and the intake center line is at 115 degrees, which is four degrees retarded.

(Pat)>> Look at that gloriousness.

(Frankie)>> Hey it's almost brand new. [ MUSIC ]

(Pat)>> Now that we have our Magnum all apart, we can tell why it ran so well. This is a recent remanufactured engine that has a 40 thousandths overbore, which looks really great. The bearings all look perfect, but they are a 20 under main and a 10 under rod, but that doesn't matter because we're not reusing any of those parts.

(Frankie)>> We are gonna keep them around though just in case we need any 360 Magnum stock components. What we're gonna do next is get the block cleaned up as best we can, clean up the cylinder bores, and then we can get our stroker kit mocked up to make sure that the block doesn't need to be clearanced. Sometimes we need to, sometimes we don't. Fingers crossed but we're gonna check. Then we'll get it fully installed and start putting our stock parts back on. How much more does our stroker make on the dyno? We'll find out.

(Frankie)>> Before mockup we'll measure the vertical oil clearances. We'll install our new standard size main bearings and torque the caps to 110-pound feet. Using our Sunnen dial bore gauge we confirmed that all the clearances are within spec. After installing some King narrow bearings we chose from Summit Racing Equipment we'll repeat the process on the rods. On these Scat connecting rods, the bolts are torqued to 64-pound feet following their specifications. The oil clearances check out fine. So, we can drop in the Scat four-inch stroke forged crankshaft for mockup. We'll put together the rod and piston assemblies, including the wrist pin locks since the assemblies will not be coming apart after mockup. Each piston is installed without the rings, and then we rotate the crank to make sure there's proper clearance between the rods and the block. We're looking for at least 60 thousandths of clearance. We finished mocking up our rotating assembly in our block and we didn't have to clearance anything, which is great. So, we've moved on to final assembly. That means all of our components are completely clean and we've gone ahead and cleaned up the cylinder bores very well for our new piston rings. For that we're gonna be using a set of Total Seal piston rings that are gas ported. So, they have notches that allow gas to go behind the ring and help force out against the wall. They're a one millimeter, one millimeter, two-millimeter pack to match our Mahle pistons, and all we have to do now is get them gapped. So, we're gonna gap the top one to 22 thousandths and the second ring to 22 thousandths for our application. [ MUSIC ] After setting the ring into place with a Summit Racing ring squaring tool the gap is checked. We'll gap and thoroughly clean the rest of the rings and install them on the pistons. It's always important to make sure the rings are installed with the correct orientation, especially on specialty rings like Napier second and gas ported top. Now the crank goes in for real with the ARP main bolts torqued in three steps to 110-pound feet. The piston assemblies are lubed. Then gently tapped into the block. Just like before all the rod bolts are torqued to 64-pound feet. We'll reuse the stock timing set since we used it when degreeing the cam before. Because we are using a new crank shaft, we'll degree the cam once more. It should not have moved but you should always double check if you've changed any components. Our setup did advance the intake center line by one half degree. Now it is 3.5 degrees retarded, which will still help our engine carry power a little higher in the r-p-m range. We'll measure piston deck height, which is four thousandths of an inch above the deck. We'll install the neutral balance harmonic balancer before tightening down the stock timing cover. So far our stroker upgrade is going very, very well. Everything's gone together nicely, and we haven't had to clearance the block, which is awesome. There is one component we have to clearance however, and that's the oil pump. We've gone ahead and upgraded our engine with ARP main bolts. These are going to be much, much stronger than the stock ones but it does add a teeny bit of work. ARP explains in their instructions that this main bolt does not have to have a washer, and that's to help give extra clearance. However, you may also have to clearance the oil pump housing itself, and we've gone ahead and done that here. You can see that we don't have to take much material off. Just enough to clear the head of the bolt. If you don't do this the oil pump housing will not sit flush on its mating surface, and if you try and torque it down you could possibly crack the housing or break it. This is a great example of why it's always important to read the instructions first. It can keep you out of trouble and save you a lot of time and hassle. Once the oil pump and pick up assembly is torqued down you can see we have enough clearance, so the pump does not touch the head of the bolt. With silicone on the corners and parting lines we'll drop on a new one-piece oil pan gasket and seal up the bottom end. We'll use a stock replacement Fel Pro head gasket, and with our stock cylinder heads we now have a 10.73 to one compression ratio, up from 9.97 to one on the stock setup. The stock head bolts are torqued to 105-pound feet. All of the stock valvetrain is reinstalled. The rockers are torqued to 25-pound feet. The Edelbrock dual plane intake manifold is gently set into place and then bolted down. [ MUSIC ] Finally, we'll reinstall our carburetor setup, which is an 800 c-f-m Edelbrock AVS-2 and a one-inch dual plane spacer. Up next, it takes a Mopar man to understand a Mopar man.

(Frankie)>> The time has come to finally see what our stroker Magnum puts out on the dyno. [ MUSIC ] Alright we've got our 410 running on the dyno. Obviously, Pat is not here. He's coming back but he's at the machine shop getting some work done. So, we have another big Mopar fan in the house and that is Tommy Boshers from Detroit Muscle. Tommy, so basically what we've got going on here. This is a 360 Magnum and we put a stroker kit in it. So now it's 410 cubic inches. Just added a good 420 thousandths worth of stroke. So, a good amount of stroke. This is not normal. Normally you would do a cam upgrade, or an intake upgrade, or something like that, but this is kinda interesting cause we don't get to do this a lot and I think it's gonna be cool to see how it affects power throughout the range.

(Tommy)>> I can't wait to see what this thing makes. What do you think it's gonna make, or what do you hope for it to make?

(Frankie)>> With a small cam in it I know it's gonna crank the torque up but I'm hoping it makes more everywhere. I think that's the goal here is that it makes more throughout the r-p-m range. We're not turning it a bunch. We only turned it about 5,000 r-p-m last time. It peaked before that. So that's where we're gonna turn it up to, about two to five. [ engine revving ]

(Tommy)>> Sounds good!

(Frankie)>> I'll show you the overlay cause that made very good power. So, 490.2 and 334 horsepower.

(Tommy)>> It sounded killer man.

(Frankie)>> So that's the difference right there. You can see, down low it is just pumping out.

(Tommy)>> Considerable more.

(Frankie)>> What's the peak there? 82 more at peak, and you can see it's just making more everywhere, and I think that it's interesting that it did take the peak and move it down a few hundred r-p-m, which when you're adding more cubic inches and then choking it off with a head and cam that's probably a little too small that's kinda what you get, but you also get these really nice curves like. Just super smooth you know? We wanted to remove the one-inch dual plane spacer. Depending on the manifold sometimes spacers improve performance and sometimes they don't. Let's find out. [ engine revving ]

(Frankie)>> Removing the spacer had little affect on torque, which peaked at 490.8-pound feet. Horsepower dropped slightly to 331.5. However, the air/fuel ratios evened out nicely from the left to right sides of the engine. So, we're keeping it off.

(Tommy)>> I really think you should wring it out one more time, not necessarily for the numbers. Just to hear that thing sing.

(Frankie)>> Well we do have a bigger carburetor. We did add 50 cubic inches, and we do have a bigger carburetor we could put on.

(Tommy)>> I just enjoy hearing the sound of it. Whatever it takes brother.

(Frankie)>> With the intake manifold vacuum rising to 1.6 inches of mercury during the pulls, we decided to swap our 800 c-f-m carburetor for a 950. [ engine revving ]

(Frankie)>> I think it squeaked out a little bit more there.

(Tommy)>> Numbers don't like.

(Frankie)>> 498.3-pound feet and 339 horsepower.

(Tommy)>> 331 horse earlier wasn't it?

(Frankie)>> Yeah, for torque just picked it up everywhere. Horsepower really started to be noticeable around 3,000 where it picked up. That's pretty good. That's almost 500-pound feet on a stock cylinder head, which to me that's crazy. It'd be interesting to see what it comes up in. Like if you guys find a project for it or something that'd be pretty cool.

(Tommy)>> That's the easy part, finding something to put it in.

(Frankie)>> Hard part's getting it in!

(Tommy)>> It's the follow through is what'll kick your butt all the time.

(Frankie)>> I think that's cool. 498-pound feet, 339 horse, we're not turning it a bunch and the cam's kinda small. So, horsepower is not a remarkable number but it's up a ton from where we were.

(Tommy)>> That big torque number, that's the one that always makes you feel like you're going fast, and that's a respectable number that low. That means it's gonna get with it quick.

(Frankie)>> That is for a stock cylinder head on 410 inches. Heck yeah man! Well, if you find something to put it in let us know cause we got one laying around. We might do more to it, I'm not sure, but even as it sits, I think this is a really nice engine. Thanks for sitting in.

(Tommy)>> I hate that you cut it off. It sounds so good just sitting there.

(Frankie)>> I'll just let you sit here and let it run.

(Tommy)>> As long you let play with the joystick over there on the throttle that'd be it.

(Frankie)>> For more information on anything you've seen today go to Powernation TV dot com. [ engine revving ]
Show Full Transcript