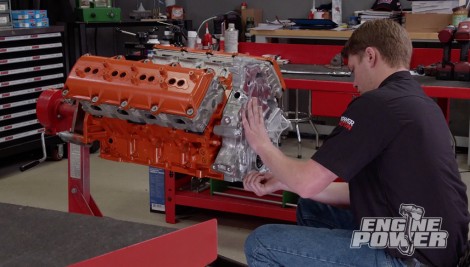
More Road Burner Episodes

Engine Power Featured Projects

Engine Power Builds

Parts Used In This Episode

Summit Racing
Cometic MLS Head Gaskets
Summit Racing
COMP Cams Camshaft
Summit Racing
COMP Cams Camshaft Phaser Limiters
Summit Racing
COMP Cams Valve Spring Compressor Tools
Summit Racing
COMP Cams Valve Springs
Summit Racing
COMP Cams Valvetrain Assembly Spray
Holley
Terminator X
Matco Tools
MATCO Tools are the Official Tool Supplier to Engine Power
The Industrial Depot
Tools, Hardware, Shop Supplies

Episode Transcript

(Pat)>> You're watching Powernation.

(Pat)>> From a forgotten burned up salvage yard engine to a power plant for a classic Mopar.

(Frankie)>> This gen three Hemi rises from the ashes on today's Engine Power. ♪ ♪

(Pat)>> Welcome to Engine Power. You may have noticed that we have been doing quite a few fuel injected engines as of late.

(Frankie)>> Yeah we did an AMC 304 with port fuel injection. We did two LS'. One was naturally aspirated and one was supercharger, and we did that five liter Coyote that was supercharged. That was pretty sweet.

(Pat)>> Now we have a new project in the shop for all of you Mopar lovers. This is a gen three 6.4 liter Hemi, and you may think we're gonna go ahead and fuel inject this one as well but we are going old school carburetion on this one and for a good reason.

(Frankie)>> Recently the Detroit Muscle crew went looking around Stephens Performance, the world's largest Mopar salvage yard, searching for a new project vehicle. Tucked away among 60 acres of rusted metal was a '69 Road Runner from California, in solid shape. After loading it up and hauling it back to the shop it was time to get started.

(Pat)>> This project will respect its Mopar heritage while updating some components like the suspension and engine. That's where we come in. Marc and Daniel showed us this gen three Hemi in questionable condition. Despite its appearance we jumped at the opportunity to put a bit of modern muscle into a piece of automotive history.

(Frankie)>> This engine actually came out of a burned up vehicle at a salvage yard, and according to the tag it's from a 2016 Ram 2500. Now obviously it's in really rough condition. So we're gonna have to go over it, do a few checks, and then maybe we'll get it running.

(Pat)>> It's a big maybe. Wiring harness, who needs that kind of stuff. ♪ ♪ The first thing we do to any salvage yard engine is to pull out the spark plugs and check their condition. These have some rust on the threads and some carbon deposits but overall not bad. Another test we will do is a cranking compression check. This can tell you if the piston rings are in good shape and if the valves are sealing up. Make sure you save these.

(Frankie)>> Yeah we're gonna need these for the next engine. [ engine cranking ]

(Frankie)>> It's like 220, not bad.

(Pat)>> No, that's good. Let's do the rest. There's no clanking or anything. So check the rest of them. [ engine cranking ]

(Frankie)>> Dang that's the best one yet, 275.

(Pat)>> It'll start to get better. The cam because it's locked in its fully advanced position it's gonna be high, and it'll start to get better because the more we turn this over the better it's gonna get because I don't know what's underneath. This had literally gloves shoved in the intake ports. So there might be a little bit of stuff under the seat. So the more we make it rotate the more we actually work it loose.

(Frankie)>> Well hey, it's promising.

(Pat)>> I bet those other two are up now.

(Frankie)>> That's promising. So I feel better.

(Pat)>> Next we'll drain what's left of the oil. It's not a surprise that it contained a decent amount of water from sitting outside. Ah yeah! ♪ ♪

(Frankie)>> Since we've decided to get this engine running we're gonna have to go ahead and use some of our new parts now. An important thing to note is that we did remove the e-g-r cooler because it was hitting the backing plate on our dyno, and so we had to install a block off plate on the exhaust. Other than that we should be good to go. You know we're kinda letting the cat out of the bag early on our choice of induction. We are using Holley's high ram lower intake manifold designed for gen three Hemi's. Even though it was made for fuel injection it also works great with carburetion. A top with a single square bore carburetor flange will get us going. Since this engine didn't come with any functional accessories we had to add an alternator and an idler pulley in order to get a belt on to spin the water pump. [ drill humming ] ♪ ♪

(Frankie)>> Finally we'll add a set of used stock coil packs.

(Pat)>> In order to run this engine as it sits we will be installing one of Holley's Terminator-X kits. Now I know what you're saying. That is an e-f-i system and you are correct, but that system will also run the ignition side of a carbureted engine extremely well, and the benefit of that is if they ever want to go to fuel injection at a later time all they have to add are the injectors and the throttle bodies and they are good to go. Like every other Terminator-X we've used it is a simple plug and play operation that makes it easy to get your engine running. [ drill humming ] ♪ ♪

(Pat)>> Up next, that's the sound we like to hear.

(Frankie)>> Precision engine building takes some precision tools. Now these can seem pretty expensive at first but over time will show a great return on investment to improve both the quality and accuracy of your builds. You can start with something small like a torque wrench that you'll use all the time. There are several different types available, including more affordable options like a dial or beam style torque wrench, all the way up to a digital one, which can do several different units and is extremely accurate. When it comes to precision measurement there are also several different options depending on your budget. Dial calipers are very versatile for measuring both outside and inside diameters and come in several different lengths. Micrometers are a little bit more expensive but they are much more accurate at measuring outside diameters and go down to the ten thousandths of an inch. Dial indictors have several different uses in engine building and come in varying degrees of accuracy, and are even offered in digital form. Plasti-Gauge is an inexpensive way to measure oil clearance, and if used correctly can be quite accurate. Dial bore gauges are more expensive but they are much more precise, and can measure down to ten thousandths of an inch. There are also some specialty tools required when assembling an engine, like piston ring squares, piston ring expanders, a set of feeler gauges, and piston ring compressors. If you're looking to expand your set of engine building tools you can find what you need at Summit Racing Equipment. We've gone ahead and changed the oil and filter on our engine, but you saw what came out and the oil was pretty rough from sitting in the junkyard so long. So the last thing we'll be doing is adding some Seafoam motor treatment. This works in either gas or diesel engines, and in the fuel system it can help stabilize the fuel for long periods of time, remove water, and clean out any debris. We'll be putting it in the oil where it'll clean off some of the parts and also break up and clean out any debris that may be sitting in the oiling system. Now Seafoam treats up to 16 quarts of oil but since this is an extreme case we'll be using the whole can. ♪ ♪

(Pat)>> Alright!

(Frankie)>> Ready?

(Pat)>> Junkyard fabulous.

(Frankie)>> Let's see if it starts. [ engine starting and revving ]

(Pat)>> It has oil pressure. I feel so much better now. [ engine revving ]

(Pat)>> I cannot believe that.

(Frankie)>> That's awesome.

(Pat)>> It had smoke coming out of it because there's some stuff in the cylinder, and that immediately cleaned up.

(Frankie)>> It's running on all eight, no leaks. The no leaks part is what I can't believe cause it's all crusty and burnt up. I thought the valve covers would drip but so far no looks, which is awesome. It looked like the intake took most of the fires. Everything underneath was just dirty. Not crusty or melted, just dirty. Man that's lucky but that's awesome.

(Pat)>> Let's go something easy, 2,500 to 5,000, 600 a second. That puts a minimal amount of load on it.

(Frankie)>> Again we don't really know anything about it. So who knows.

(Pat)>> We could destroy it right here.

(Frankie)>> Probably not. I think it'll be okay. We have a little temp in it. I just want to see if it'll do it. [ engine revving ]

(Pat)>> That made an actual pull.

(Frankie)>> Dang, not bad!

(Pat)>> It kind flailed around a little bit but it made 361 horse and 409 pound feet. It's up to temp. let's run it a little bit more just to get the Seafoam through it and then let's just drain the oil out.

(Frankie)>> You know the Seafoam is working because we put clean oil in and dirty oil came out. Good job Seafoam.

(Pat)>> Before we wash the engine we'll get it ready by pre-soaking it with some foaming degreaser. To clean our engine we're using a Bauer 2,300 p-s-i brushless max performance electric pressure washer that we picked up from Harbor Freight. Pressure washers are invaluable around the home and shop for a variety of uses, but since this is Engine Power you can guess what we're gonna use it on.

(Frankie)>> It comes with four different nozzles to choose from and since it uses a brushless 13 amp electric motor it provides high performance, longevity, and is way quieter than a gasoline version. To get into the tight spaces we'll finish off with a 25 degree nozzle. With a 25 foot hose and a 35 foot 110 volt cord this Bauer pressure washer makes your cleaning job that much easier. You can get yours at your nearest Harbor Freight.

(Pat)>> I've got the steering gear back here. To start this engine transformation we have to strip it down first. [ drill humming ]

(Pat)>> Don't break, don't break! It comes apart relatively easy with no big surprises. ♪ ♪ Yeah karate chop it. The left over oil in the pan looks a lot better than the first time. Look how clean that pickup is. Feel how clean that screen is. That's always a good sign. We can probably clean it up and reuse it.

(Frankie)>> I think we have a new one. I don't think we need to go that extreme. ♪ ♪ The rotating assembly looks good but we want to check the bearings to be sure. If the rest look as good as this we are good to go.

(Frankie)>> Because of rust in some of the threads the spark plugs were pretty gnarly coming out, but luckily none of them broke. [ ratchet clicking ]

(Frankie)>> I know, that was hurtful. That was hard to listen to. We hope the cylinders look good, but on a salvage yard engine you just never know.

(Pat)>> The big reveal! ♪ ♪ Cross hatch in the cylinder.

(Frankie)>> Oh yeah! That's really nice actually.

(Pat)>> This engine was relatively low miles.

(Frankie)>> Up next, the Hemi gets a bigger cam, some valvetrain upgrades, and fresh induction. Then it's dyno time.


(Pat)>> Oh man! ♪ ♪ A little juicy! ♪ ♪ It doesn't taste bade though. ♪ ♪ We've gone ahead and torn the engine all the way down to short block form to finish our inspection. We know the cylinders look great. So we checked the bearings and they look perfect. The next thing we will do is take out our valvetrain. This is the factory v-v-t setup. There's a spring inside this that holds the cam at its most advanced position. In this case the cam was at 102 degrees of intake centerline, and we know the cam's lobe separation is 116 degrees. So the cam was in 14 degrees advanced when we were running it on the dyno. Now that's why the power was great down low but fell off up top. We're gonna keep the cam phaser but we'll lock it out so it doesn't affect cam shaft timing. [ drill humming ]

(Frankie)>> The cam shaft will be upgraded. So the stock bump stick can be removed. If any engine we've built recently could use a visual improvement it's this one. After laying down primer the block receives three coats of Chrysler Hemi orange. We picked up a set of used salvage yard valve covers, and after thoroughly scuffing them and wiping them down with lacquer thinner they get an orange finish as well. Next we'll lock out the phaser. Comp's lockout kit comes with a special tool which relieves spring pressure, allowing us to remove the fasteners on the back side. The lock simply drops into place and is wedged outward with a pipe plug. This keeps the phaser from moving during operation.

(Pat)>> The new cam shaft is from Comp. It's a little bit bigger and will move the power band higher in the r-p-m range. It has more lift and duration with 222 degrees of duration at 50 thousandths life on the intake and 230 degrees on the exhaust. Lobe separation angle is 115 degrees. ♪ ♪ Once the timing set is bolted into place we'll install the tensioners and remove the pin to put the chain under pressure. Next we degree the cam and the intake centerline comes in at 108.5 degrees, which is six and a half degrees advanced.

(Frankie)>> During installation of the oil pump we'll use three one and a half thousandths shims to ensure proper alignment. Now we can move on to the valvetrain. The lifters and trays have to go in before the heads can go on. We're replacing the stock springs with a conical set from Comp Cams. They have an increased spring rate of 485 pounds per inch to handle our more aggressive cam shaft. We also got this Powerhouse specialty valve spring compressor from Comp. This simple tool makes changing the valve springs on gen three Hemis a breeze. ♪ ♪

(Pat)>> We got a set of Cometic m-l-s head gaskets from Summit Racing Equipment, which will seal up the stock cylinder heads. Using ARP bolts the 12 millimeter fasteners are torqued to a final torque value of 100 pound feet, and the eight millimeter bolts are torqued to 28 pound feet. Why do sometimes people fall asleep when they're drilling stuff?

(Frankie)>> I don't know.

(Pat)>> Because the drills are so boring. ♪ ♪ We'll reuse the stock push rods. With a little high pressure lube on them they can slide back in. Since they are under valve spring pressure the stock rocker shafts are gently and evenly tightened down before being torque.

(Frankie)>> The springs are coated with valvetrain assembly spray to protect them during startup.

(Pat)>> Installed!

(Frankie)>> We got a new o-e-m car style timing cover because the Holley swap components are designed to use that one over a truck style.

(Pat)>> Since the engine will live in a vintage muscle car where space is at a premium we'll install an oil filter block off plate and run a remote oil filter on the dyno. The Holley swap pan kit comes with a center sump pickup and windage tray. After putting some silicone on the parting lines of the block we'll install Holley's cast aluminum pan made for B-body Mopars. Once we get this Hemi hooked up we'll find out what it can do in the cell block.

(Frankie)>> Up next! [ engine revving ]

(Pat)>> That is slick!

(Frankie)>> Before we can get our engine running there are a few original parts that we're gonna have to replace. We're gonna be changing out our water pump, our alternator, a tensioner, our idler pulley, and a few sensors, and we choose the Duralast brand for their higher quality and improved durability. Duralast has a full lineup of parts covering most vehicle on the road, and they include brakes, alternators and starter, suspension components, batteries, and over 750 types of vehicle electronics. Parts like alternators and starters are offered new or remanufactured where Duralast improves on the o-e design to fix common failures and then triple tests them to ensure that they meet or exceed original equipment performance. If you want a look at all the parts Duralast offers you can go to Duralast parts dot com. With such wide coverage of electronic components it's easy to find the right Duralast sensor for your project.

(Pat)>> Like Frankie mentioned earlier, we did let the cat out of the bag on what induction we were using, but that was necessary to get the engine running to make sure the engine actually had oil pressure and was functional. Since then we have changed it up. We've removed the single four barrel top and replaced it with one that accepts two 41-50 style carburetors, and topped it off with two QFT Black Diamond 750's. The nice thing about all of the Holley high ram lower intake manifolds is that the tops are interchangeable. So you can run a front facing fuel injection, carburetors, or anything you want. It's a simple change. Now this specific application called for two four barrels sticking out of the hood. So it's old school tunnel ram goodness. ♪ ♪ Because the manifold is O-ringed it slides on and seals up with no problems. The Holley alternator relocation bracket works great when you need more clearance to fit a modern power plant into an older car.

(Frankie)>> With Duralast alternators all the wear components are replaced, not just rebuilt. Parts are tested at component, sub-assembly, and finished stages. ♪ ♪ Holley's power steering adapter kit gives you that extra clearance you need with this popular swap.

(Pat)>> We've already run this engine on a Terminator-X system. So there's just a couple of simple connections to be made, and with the belt put on we are ready to run. Since this engine will power Detroit Muscle's Road Runner project we wanted Tommy here so he could hear it run. Are you ready?

(Tommy)>> Yes sir, fire this thing up!

(Pat)>> Now what's cool about this one is everything is stock architecture. Essentially the short block is a bone stock short block. Bone stock heads, we put springs on it, but a cam and a manifold change.

(Frankie)>> But huge difference for just those components.

(Pat)>> This is a huge difference. Here we go! [ engine starting ]

(Tommy)>> Sounds good. [ engine revving ]

(Pat)>> That is slick. I can't believe they flow this good. Okay 540.7 at 6,600 and 494.4 at 5,200.

(Tommy)>> That ain't too bad at all.

(Pat)>> That is mean! Again that was stock cylinder head.

(Frankie)>> This thing, it's up a ton. Even off the stock numbers this thing is way up.

(Pat)>> The truck engine's rated at 410, and we're turning accessories. If you take all the accessories off that and just have like an electric water pump on this thing it'd make probably 10, 15, 20 more. I know you want between 500 and 550. So 540?

(Tommy)>> That's pretty close.

(Pat)>> So you guys are gonna have some fun with this one.

(Frankie)>> For information on anything you've seen today you can go to Powernation TV dot com.
Show Full Transcript