Engine Power Featured Projects

Engine Power Builds

Parts Used In This Episode

Summit Racing
Brass Core Plugs
Summit Racing
Comp Cams Billet Hydraulic Roller
Summit Racing
Comp Cams Double Row Timing Chain
Summit Racing
Harland Sharp 1.6 Ratio Rocker Arms
Summit Racing
Melling Oil Pump Rebuild Kit
Summit Racing
Permatex Ultra Slick Assembly Lube
Summit Racing
Total Seal Assembly Lube
Summit Racing
Total Seal Piston Rings
ARP
ARP Fasteners
ARP
ARP Main Bolts
Edelbrock
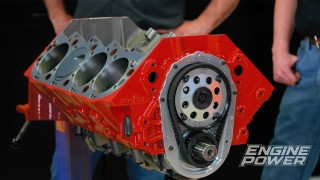
Performer RPM 401 Cylinder Heads
Edelbrock
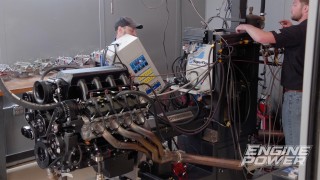
Pro Flow 4 Port Fuel Injection System
Matco Tools
MATCO Tools are the Official Tool Supplier to PowerNation
Sunnen Products Company
SV-15 Cylinder Hone
The Industrial Depot
Tools, Hardware, Shop Supplies

Episode Transcript

(Pat)>> You're watching Powernation!

(Pat)>> Believe it or not the AMC 304 has a lot of hidden potential.

(Frankie)>> Today we're gonna find it.

(Pat)>> Dude that's clean right there. [ MUSIC ]

(Pat)>> Hey everyone, welcome to Engine Power. Recently we did a project for the guys down in Carcass that involved an engine that was not actually part of the big three but was still once a major player in the automotive industry. It was our AMC 258 cubic inch inline six that we refreshed, added some bolt on performance parts, and dubbed the project "Aerosol Overhaul". We ran it on the dyno and it made some impressive power for the simple work we did. Oddly enough we have yet another AMC in the building. This is the engine out of Detroit Muscle's Javelin, which we did have some fun with in the parking lot and on the chassis dyno where it made a staggering 130 horsepower. As with any project plans sometimes change. So instead of making a big horsepower combination they have decided to retain the stock engine, which is a 304 cubic inch V-8 that we will give a little bit of love and make them a nice street driver. We have some parts here and some are on the way, but we're not even sure if this engine has been cracked open yet. So it's time for us to find out. Let's get started.

Alright when I said let's get started that means you get started and I'll go find a box for the old parts.

(Frankie)>> Alright sounds good. Even though this engine did not make a lot of power on the chassis dyno and we are getting a lot of new parts for it, we're gonna be super careful taking it apart because when you take an engine apart you can actually see what the life of the engine was and if it had any failures, and that's really important so that we can avoid that when we put it back together. [ drill buzzing ]

(Frankie)>> Look at this nasty thing. What even is that? You really start learning about an engine once you crack open the top end. Although we knew this engine would show its age we were still surprised by what we found.

(Pat)>> I got the hard part done.

(Frankie)>> Yep, almost ready for this thing to come off. Ooh!

(Pat)>> Look at that! Holy moly! We've been getting some doozies lately here.

(Frankie)>> It'll cleanup.

(Pat)>> But it ran decent. Oh! Yeah! This wins the award for the nastiest one we've done.

(Frankie)>> Look at that.

(Pat)>> This stuff is balled up there. I don't know if it's the quality of oil but what makes it do something like that?

(Frankie)>> It's got to be the old oil in it.

(Pat)>> It's balled up or something.

(Frankie)>> There wasn't a lot of oil left in the pan, and what was there was cooked. [ MUSIC ]

(Pat)>> Can see somebody tried to scrape the inside of this one, look!

(Frankie)>> Didn't do much help.

(Pat)>> Way back when, alright. [ drill buzzing ] [ MUSIC ]

(Pat)>> The funny thing is even ones that looks this nasty on the outside, if there's no oil in the combustion chamber it means they were relatively sealed up well. It didn't smoke when it was on the dyno.

(Frankie)>> The cylinders look decent with some cross hatch pattern remaining. We noticed a ridge had developed near the top of each cylinder, and this block definitely needs honing. The lifters came out pretty easy, and other than some expected wear it looked okay. [ MUSIC ]

(Pat)>> The main bearings were shot. I've seen worse, it's got a little bit of copper. What worries me is that transfer on the back side. That's never good to see. If you can see copper get a new set. Look at the skirt.

(Frankie)>> That's way better than what I thought it was gonna look like.

(Pat)>> Way better considering the condition of the rest of everything. The pistons are in decent shape. If we were just rebuilding the engine we could reuse them. A little ridge on top there. [ MUSIC ] Whoever owned this engine certainly got their money's worth from these bearings. They've lived a long, hard life. Here you go. It's been overheated, nasty. The main housing has been align honed instead of just cut with tooling. We don't know if this was done at the factory but if so that's impressive. The surface looks nice and look at that. It's quite possible since we found AMC stamping on the bearings.

(Frankie)>> Up next, after a complete rebuild and a couple of serious upgrades the 304 will be road worthy again.

(Frankie)>> I'm here with Team Summit NHRA Funny Car driver Tim Wilkerson. Now Tim as well as a driver you're also an accomplished engine builder, both for street and strip engines.

(Tim)>> Frankie I think you're giving me a little bit of the benefit of the doubt there. I've got a lot of folks that work for me that are really good at doing this but I've put a lot of them together over the last 30 years.

(Frankie)>> So would you say when you're building an engine no matter whether it's for the street or the strip, a low end to a high end race build, the process is pretty much the same?

(Tim)>> Oh sure, everything's based on measurements. We live and die on thousandths of an inch building engines. From your old conventional torque wrench with just a click style, now we really sophisticated ones that have digital gauges in them cause some things we have to do, they'll give you a torque spec and you have to go 90 degrees past that. It's hard to do that with an old style torque wrench.

(Frankie)>> So like a dial bore gauge here, we're gonna use this to measure cylinders and this is like a very precise tool. I'm kinda catching a theme here that precision is a very big part about this.

(Tim)>> Yeah there's no doubt about it. You know as well as I do this micrometer here, you get this within a couple of tenths and we're measuring crankshafts. We're measuring anything that you can get into a round area that's gonna be a very crucial tool to use. We use these in our machine shop every day, like these ring compressors. You have two different styles here. This is kind of an economy style. This one here is made for this exact bore, this 4.155 bore. So all these tools there's a lot of parameters in them for people that are building their engines at home or the professionals.

(Frankie)>> So Tim the guys at home can take cues from the pros in order to assemble their engine with the same attention to detail.

(Tim)>> You sure can. It really doesn't matter what you're working on.

(Frankie)>> With the AMC 304 completely apart the rebuild begins. First we'll get the stock crank shaft polished up. Even though the bearings were in a bad condition the journals were round and in decent shape. We're check the journals with a micrometer to make sure the crank is still within spec, and then we'll use a 600 grit belt first. We're only removing a couple ten thousandths worth of material here. So it doesn't affect the sizing much at all. Next we'll apply some polishing compound to a cork belt and finish off the journals to a better than o-e-m finish.

(Pat)>> After setting up the block in the Sunnen SV-15 cylinder hone we rough out the cylinders within one thousandths of their final bore size. This takes care of the ridges we found on the cylinder walls and gets the bores sized correctly for the new pistons. For the most part the technology of this machine is so advanced you could almost hone their cylinders to the exact size unattended, but of course it's always a good idea to stay close to the machine and check its progress periodically. For final sizing we switched to an 800 grit diamond abrasive. The cylinders are finished right to size with ease while also giving them the appropriate cross hatch angle and surface finish.

(Frankie)>> After thoroughly cleaning the block we'll install new cam bearings that are gently tapped into place. If you don't have a cam bearing installation tool your local machine shop can do this for a reasonable price. [ MUSIC ]

(Pat)>> Next up the new main bearings are laid into the saddle so we can check bearing clearance. After torqueing down the main caps vertical oil clearance is checked. They come out between 27 and 31 ten thousandths across the board.

(Frankie)>> Rod bearing clearance checks at 24 to 27 ten thousandths. The main bearings are lubed with Permatex Ultra Slick assembly lube, and the crankshaft goes gently into place. The ARP main bolts are torqued to 90 pound feet, and crankshaft end play is checked with a dial indicator. It's in spec at four thousandths.

(Pat)>> Valvetrain motion is provided by a billet hydraulic roller from Comp Cams. Duration at 50 thousandths lift is 224 degrees on the intake and 230 degrees on the exhaust. Lobe separation angle is 110 degrees, and lift at both valves is 513 thousandths. A new double row timing chain from Comp finishes it out.

(Frankie)>> The rings for the AMC 304 are from Total Seal. Both the top and second rings are one-sixteenths thick and the oil ring pack is three-sixteenths. Top ring gap is 20 thousandths and the second ring gap is 22 thousandths.

(Pat)>> When filing rings why is it a good idea when you set up to initially do all of your second ring groove rings first?

(Frankie)>> I have a guess but why don't you just tell me and we'll see if I'm right.

(Pat)>> The reason is when you get your machine setup if you mess up one of these it's not as important as messing up a top. The top gap is way more important than the second gap. The second, basically a compression ring, is an oil scraper as well. So if you missed it a little bit big on the gap no big deal, but it gets you familiar with the use of the machine. If you're grinding rings eight hours a day for five days a week you're probably gonna be a little bit more savvy at it. Each individual engine is different bore size, different ring packs. So it's always a good idea to get your groove on first with the second ring and then do the top ring so your gap's right.

(Frankie)>> Basically get your setup going on the second ring so that when you get to the top ring, which is the important one, it's all good to go.

(Pat)>> And make sure they are deburred. The biggest thing when it messes up the cylinder is the edge of the ring. You've just gotta basically break it. I use an india stone for that, and if you just break that edge it won't gnash up the cylinder. It will not scrape the cylinder. The o-e-m replacement pistons are 37 thousandths in the hole. Static compression is a meager 8.3 to one. We degree the cam next. The intake centerline comes in a 106 degrees, which is four degrees advanced. Up next, if the cylinder heads you want to run will not fit make them fit.

(Frankie)>> The AMC 304 is almost ready for the dyno cell. We've just got a few more things to take care of, starting with the oil pump.

(Pat)>> One of the unique features of the AMC that we are working on is that the oil pump is contained in the timing cover. A few other engines have the same design but what makes it unique is you don't have a complete oil pump to replace if one is bad. You have to replace the cover if this thing is junk. Fortunately ours was in good shape. So we chose to rebuild it. We picked up a rebuild kit from Summit Racing and it contains a few parts, like a new set of gears, a new relief valve, a new pressure spring, and a new gasket. It is as simple as taking the old parts out and putting the new parts in to get it back together. We'll use high viscosity assembly grease during the rebuild. It's important that the relief valve slides freely in the filter housing. Make sure the housing is clean and free of burrs. After installing the gasket the housing is torqued to 18 pound feet.

(Frankie)>> Our pistons receive a coating of Total Seal assembly lube, and then are gently tapped into the block using a tapered ring compressor. [ MUSIC ]

(Pat)>> How are you clocking the rings on that?

(Frankie)>> Top one on the pin, second compression on the other side of the pin, and then the oil rings next to it.

(Pat)>> Very nice. Do you know what causes the rings all to line up, because if you pull one apart and the rings are all lined up?

(Frankie)>> That should be the bore's out of round cause they all want to center in the spot where it's open.

(Pat)>> Correct, bore geometry is what the problem is. If you pull out rings and they're all lined up, someone didn't install them that way. They stopped at that place. [ drill buzzing ] [ MUSIC ]

(Frankie)>> After torqueing down the rod caps rod bolt stretch is checked. It's all good at 57 ten thousandths. The old steel core plugs had rotted out. So we're replacing them with brass ones from Summit Racing.

(Pat)>> Got the oil slinger in there? [ bleep ]

(Frankie)>> I knew I was forgetting something.

(Pat)>> After giving the timing cover a fresh paint job and making sure the oil slinger is put back, it's bolted into place. [ drill buzzing ] [ MUSIC ]

(Pat)>> The oil pickup assembly is unusual because it threads into the block instead of the oil pump itself. Oil pickup to oil pan clearance is checked to make sure it is between one quarter and three-eighths of an inch. The Milodon stock replacement pan is secured by stainless ARP fasteners. [ MUSIC ] We are to the point where we are installing the induction side on our 304 project. We want to run a set of big valve aluminum heads. So we picked up a set of Edelbrock Performer RPM 401 cylinder heads. They feature a 2.020 intake valve, 1.600 exhaust, and a 54cc combustion chamber. They also have a 185cc intake runner. The problem with them are they only are supposed to fit on something that is 4.080 bore or larger. Obviously our bore size is 3.810, 60 thousandths over stock. They will physically bolt on the engine. So with some careful measurement and clearancing for the intake valve side they will work. If this is something you are not comfortable doing yourself this is something you should take to a machine shop to have done.

(Frankie)>> Edelbrock's instructions call for sealant around the oil drain backs to prevent an external leak. [ MUSIC ] With new Fel Pro gaskets in place the heads get cinched down. No sealant is required on the bolts because they do not go into the water jacket. [ MUSIC ] We torque our ARP fasteners in three steps to a final torque value of 100 pound feet. Even for an engine as unique as this we easily found everything we needed at Summit Racing Equipment. After taping off the engine it receives a coat of primer followed by gloss red engine enamel. [ aerosol can hissing ]

(Pat)>> The Comp hydraulic roller lifters drop into place followed by their new push rods. [ MUSIC ] Harlan Sharp 1.6 ratio rocker arms round out the valvetrain. They are adjusted to one half turn past zero lash. The intake is an Edelbrock Pro Flow 4 port fuel injection system. This adds modern drivability and tunability to this classic engine. Finally it's topped off with our sand blasted and painted valve covers. [ MUSIC ]

(Frankie)>> The Pro Flow 4 system comes with a touch screen table. It connects the e-c-u via bluetooth and it has an intuitive setup wizard. So our initial startup is very easy. Up next, we promised the Detroit Muscle crew big power gains on their 304.

(Pat)>> Today we deliver.

(Tommy)>> If it sounds that killer there.

(Frankie)>> With the e-f-i system taken care of we'll break in the engine and make some dyno runs.

(Pat)>> Oh my goodness this is fun.

(Frankie)>> I can't get over how easy it was.

(Pat)>> That was super easy.

(Frankie)>> Went through the setup real quick. It fired right up, set the timing, and then it set IAC.

(Pat)>> That's a lot of nice engineering to have something that easy to setup, and true port fuel injection. Throttle bodies are nice. They program nice, but this is a different animal. This is true multi-port fuel injection on a '70's engine.

(Frankie)>> It's so cold in here. The engine is checked for any leaks or loose connections. Everything looks good.

(Pat)>> I'm gonna top it off on oil. Here we go! [ MUSIC ] Ooh that's clean right there. Good oil pressure! [ engine revving ]

(Frankie)>> Whoa, look at that!

(Pat)>> First out of the box 328 horsepower at 5,400 and 329 pound feet of torque at 4,700, 4,800.

(Frankie)>> I honestly thought it was gonna be a little lower, like somewhere around 300.

(Pat)>> This thing only has 8.34 to one compression.

(Frankie)>> That's what was worrying me but apparently those heads are working.

(Pat)>> What did it have for timing?

(Frankie)>> 34 total, so we can stick some in it. You want to?

(Pat)>> What's the fuel?

(Frankie)>> Fuel was 12-8 the entire time.

(Pat)>> Okay here's what we're gonna do. We're gonna do fuel first. I know that's counterintuitive but let's lean the fuel out to 13-3, 13-4 at wide open throttle. Our timing is nice. I think we're gonna leave it there. We're gonna keep this thing safe but I think we can maybe mess the fuel a little bit and see if we can do something a little bit more with it.

(Frankie)>> Yeah I'll try that first. [ engine revving ]

(Pat)>> Okay so we're 329 at 5,500. So it made a little bit more power higher. Let's not make any change to any of that and let's just turn it 6,000. We'll just turn it higher. [ engine revving ]

(Pat)>> Oh that was clean!

(Frankie)>> That was super clean!

(Pat)>> 334 horse at 5,500.

(Frankie)>> That is sweet!

(Pat)>> And 331 pound feet of torque at 4,800. The power is not cratering off. The oil pressure goes up the whole time. The manifold vacuum is almost none. I don't know if there's much more we can do with it. Tommy's playing it cool be we know that he's excited to hear this engine run. Well what do you think?

(Tommy)>> Man that thing sounds healthy.

(Pat)>> For a 304.

(Tommy)>> I know it's a baby cubic inch but it doesn't sound baby cubic inch.

(Pat)>> It's got as much chop as a 304 can have. [ engine revving ]

(Pat)>> Look at that right there! 337 horse at 5,500. It actually made nice torque as well. It made 333 at 4,700.

(Tommy)>> That's really good for that little bity cubic inch that it is.

(Pat)>> Now in '74 I think these were rated at 210 horsepower, and we know exactly what it made on the chassis dyno. I think we can safely say we probably doubled it at the tire.

(Frankie)>> This thing's a runner now.

(Tommy)>> I can't wait to get it in the car. We're gonna probably do some pretty cool exhaust up under it. So if it sounds that killer there it's gonna be amazing.

(Pat)>> This is a hell of nice running engine.

(Tommy)>> I know last time you did a one wheel peel but maybe with this bigger motor we can get both of them.

(Pat)>> I think so. I'm gonna let you do the torture test on it.

(Tommy)>> See y'all!

(Pat)>> To find out more about anything you've seen today check out Powernation TV dot com.
Show Full Transcript