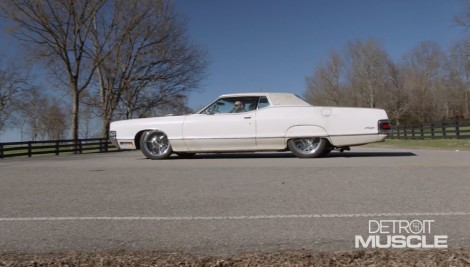
Detroit Muscle Featured Projects

Detroit Muscle Builds

Parts Used In This Episode

Matco Tools
MATCO Tools are the Official Tool Supplier to PowerNation
The Industrial Depot
Tools, Hardware, Shop Supplies

Episode Transcript

(Tommy)>> You're watching Powernation!

(Tommy)>> You've seen these cars before even though they're not as common as they used to be. The big three cranked out a ton of land yachts back in the day and today we're bringing all the sexy back. [ MUSIC ] [ engines revving ] [ MUSIC ] [ Deep voice ]>> Oh yeah girl, you don't know about our 1972 Mercury Marquis Brougham. Umm-hmm. The inside of this baby is big enough for all your friends, and you ain't gonna want us to go because when we do so does the party baby, but that's not all she's got going on. That's 19 feet of pure fever. Bigger than any car we've ever worked on. This ride floats down the road like an angel on a cloud, and that illustrious 429 sings like one too. [ MUSIC ] Mmm-Mmm!

(Tommy)>> Now I know that this platform isn't what we normally kick on here in the shop but we've got some pretty big plans for it, and we're gonna call it The Highwayman.

(Marc)>> Now in order for our Merc to live up to that outlaw name we've given it it really needs to bring the thunder when it comes to power output, and all of that revolves around this baby right here. This is a 557 cubic inch big block that the guys down in Engine Power built a while back. With this we're skipping all of the conventional power plant possibilities and going straight to the nuclear option. Just how nuclear are we talking? How about almost 1,100 horsepower.

(Tommy)>> So needless to say even with a car this size and that much power well this dude is gonna boogie, but you've got to make sure that the rest of the car can handle all that power.

(Marc)>> That's right, because the 429 that came from the factory is only making around 200 horsepower, and because we're gonna be throwing over five times that much power at it we've got some work to do.

(Tommy)>> The next thing that we've got to do is get all that old junk out of the way. [ MUSIC ] [ ratchet clicking ] [ MUSIC ] [ ratchet clicking ]

(Tommy)>> It's not every day that you get to see what a gussied up motor like this looks like sitting in a big ole land yacht, but today is the day. [ MUSIC ] [ metal clanging ] [ MUSIC ]

(Tommy)>> Now with that big stroker motor sitting at home looking all nice and pretty it's time to move on toward the exhaust. Typically you're gonna make more power with a long set of tubes as opposed to a set of shorties, and it's an almost guarantee that you're gonna make more power with a set of headers than a set of those exhaust manifolds. The headers we chose were for a Torino, and our car is a full size. They fit but kinda didn't. Where they didn't is right here where the collector comes out. It's kinda running into or interfering with our crossmember. Now we didn't show you the installation of the crossmember but while we had it out we went ahead and cleaned it up and sand blasted cause we knew we were gonna have to do some welding on it, and here's our plan of attack. So what we're gonna do is cut it across here and across here, remove that piece, and then weld in a big heavy "U" and move the "U" up toward the bottom of the floor. [ MUSIC ] [ saw buzzing ] [ MUSIC ]

(Tommy)>> A piece of cardboard will make a good shim to keep our new section off of the floor when we mark our cutoff points. Well we trimmed that thing off to cut off all that excess that was hanging down. Now we just have to set this up here, weld it up, and it'll be that easy. Now that gives us plenty of room for our exhaust but that'll have to wait until next time. Coming up all the suspension is in the bag for project Highwayman.

(Marc)>> Hey guys thanks for joining us. Now today we're getting back on our big Mercury project, The Highwayman. Now if you'll remember we stuffed a big block under the hood that makes over 1,000 horsepower, and to support it we got a built transmission, big fuel system, and exhaust. Today we're moving on to the suspension, brakes, and rear end. [ MUSIC ] [ drill humming ] [ MUSIC ]

(Tommy)>> From the get go we weren't real sure what exactly we were gonna do on our old Mercury regarding the suspension. Well we finally pulled the trigger and we decided to put this old girl on air.

(Marc)>> There are quite a few things you need to take into consideration when installing an adjustable air suspension like we're gonna be running. One of those is wheel and tire clearance. Now we went ahead and installed the wheels and tires that we're gonna be running on the rear of our big ole Mercury. Now we've got our rear end at full compression, which means the car is as low as it's gonna be on our axle. There's plenty of clearance in the front, the rear, and even up top, but we need to operate this thing through its full range of motion to make sure there's clearance everywhere. Because of the design of this suspension as the axle moves up and down it's gonna move forward and rear of the vehicle.

(Tommy)>> Now another common area that you'll run into clearance issues is here at the driveshaft and the tunnel cause whenever that rear starts to go up so does the driveshaft. So make sure to check it out. We're in pretty good shape so we can move on.

(Marc)>> These are springs, or air bags as they're commonly known, are not a direct replacement. They're actually universal and most of the time need to be adapted to fit into your application. As you can see here this is a spring out of the rear of our Mercury and it's quite a bit taller than this air spring, but we can't just take the measurement here on the table and use that to make our adapters. It's actually a bit more complicated than that and it has to do with the specs of the spring. Ours have a maximum height of 12.5 inches, which is full inflation. When you deflate it it can be compressed down to 2.8 inches. Clearly ride quality will be diminished drastically at both minimum and maximum height, but there is a sweet spot which is between 6 and 9 inches in overall height. So to optimize ride quality we're shooting for right down the middle at 7.5 inches.

(Tommy)>> We've got our rear end set at ride height and now it's time to do some math. We know our bag will be 7.5 inches tall and here we have 9.75 inches between the frame rail and this perch. So that means we've got 2.25 inches to fill.

(Marc)>> Now we can put that all at the top or all at the bottom, or we could put some at the bottom and some at the top depending on where we want the spring to live. Now for us we want to put it all at the top but we are running these quarter inch plates both at the top and the bottom. So we'll just subtract a half inch from our measurement leaving us with an inch and three quarter, which we're gonna cut out of a piece of pipe that we got from a local steel yard. [ MUSIC ]

(Tommy)>> Then we'll grab the tig torch and get it tacked to our mounting plate. We'll use a hole saw to make an access hole through the frame and body here. The reason we need to do this is to allow a pathway for the air lines as well as allowing access to fasten the mounting bolts. [ MUSIC ]

(Marc)>> It might take a few attempts to get this lined up the way it needs to be but it's important because if you do it wrong you're gonna assassinate your bag. Nobody likes that! [ grinder buzzing ]

(Tommy)>> We'll get the area prepped for welding with a small grinder. Then we get our upper mount burned into the car. [ welder crackling ]

(Tommy)>> Then we can re-insert that big ole bag. While Marc's in the back finishing up that rear I've been up here doing a little bit of plumbing. Now this right here may look a little bit intimidating but really and truthfully it's just time consuming. Let me explain it to you. We've got 8 individual valves but really and truthfully you only four circuits. You've got these two for the front and these two for the rear, and how this would work is there's compressed air inside of the tank. You trip this valve, air flows through there, down and up to your front bag, and then let's say you want to let it out. It will back feed whenever you trip this valve and back out allowing the car to go down. Now to wire them up it's pretty simple. You've got a ground and then you've got a trigger wire, and this is where your options come in. You can wire them so that you can control them all individually, meaning if you want one corner of the car, or you can wire them in pairs so the front comes up, front goes down, same with the rear, or let's say you can wire all four of them together so the whole car comes up or the whole car goes down. It all depends on what you want. Making pancakes is easy if you bag it right.

(Marc)>> Alright so we've already done the other side. So we've got a pretty good idea of what needs to be done here on the front to get our Mercury laid out on the ground. Now we've already removed the spring and shock as well as the sway bar, the brake caliper, and the tie rod. So now it's time to get dirty. We need to cut out this old spring perch to provide a good spot to attach the bottom air spring mount. Oh that's hot! We're also gonna cut into the frame right here to make room for the bag itself. The upper shock mount goes away as well to access the air lines and bolts. Hot!

(Tommy)>> We're gonna get after those cut points with a grinder to make them look nicer. Plus a bunch of jagged edges next to a pressurized air bag might make things a little bit too exciting. This old fuel line ain't doing nothing but sitting in the way. A quick whooping on this seam will close up the hole and add to our clearance. We need to make sure we have enough room for the air spring with at least eight inches either direction. We good! Since we sliced up the frame right here we're gonna weld it back together to keep things nice and strong. After a little cleanup we can move on.

(Marc)>> Time to get that upper mount and spacer welded in. The plate is offset so that we'll have proper clearance when the bag is installed. Everything can go back together now. It looks like we might need to come back later on and replace that ball joint. We'll double check out travel. Then tack the bottom mount in. [ welder crackling ] [ MUSIC ]

(Marc)>> Make sure you pull that thing out before you weld it solid. You don't want to burn your bag man. [ welder crackling ]

(Tommy)>> Alright guys we've got everything wired up, and plumbed up, and it's ready to see what she's gonna look like sitting on the ground. Now one nice thing about that adjustable suspension is you can raise it up, lower it down, depending on your personality of the day. Mister Marcus go ahead and let's see what she looks like.

(Marc)>> Here we go. ( )>> Yee haw! [ compressed air hissing ]

(Marc)>> That's it, wow, she low!

(Tommy)>> Well we got our bumper on and now the next task is pretty obvious that our hood's not gonna close. So we're gonna have to find a cure for it. This air cleaner is sticking well above the top of these fenders. The next process is gonna be a little bit primitive but I think it's gonna turn out just fine. So the first step that we're gonna do is make sure that the engine is setting in the engine compartment, centered if you will from left to right, and to do that you just simply measure from the air cleaner stud to the edge of the fender. Looks we're at 32 and an eighth. Whenever you're doing something like this you want to make sure that you measure in common points.

(Marc)>> Alright this is 31 and five-eighths, which is a half inch difference, which means it's only a quarter inch off. Take a quarter inch away from one side, add it to the other, we'll be in the center.

(Tommy)>> Next thing we're gonna do is measure from the front of the hood all the way back to the carburetor. I'm setting it just to the side and I'll do that here, and we're at 34 and a quarter.

(Marc)>> Now we need to account for the gap at the leading edge of the hood. So we're just gonna take about an eighth inch off of that measurement. We'll mark it at 34 and an eighth, and we're gonna use the crown of the hood here as a guide. Now just need to get those left and right measurements that we took earlier transposed here onto this line. Plus 32 and an eighth.

And then that's gonna be 31 and five-eighths. Now where these lines intersect that's gonna be where our stud's gonna come up through our hood. So we just need to make a mark here, drill a hole, and then we need to figure out what our radius is gonna be so we know how big our hole needs to be for that air cleaner.

(Tommy)>> Now that all is gonna be determined by like he said how big this air cleaner is. Now we want to make sure we give it plenty enough room because that big block is liable to move around a bit whenever we actuate the throttle if you know what I'm saying. So we want to give it two inches on this side and two. So we'll just add four inches total to this overall measurement. Overall at 16.5 plus those four inches of clearance is 20.5. [ MUSIC ] [ drill buzzing ]

(Marc)>> Now we've got this piece of cardboard here and this is gonna be our tool that's gonna allow us to make that big circle. So we've just got a starting point here and Tommy's measurement was 20.5, which is the diameter. So we're gonna cut that in half to make our radius, which is gonna be 10 and a quarter. So mark 10 and a quarter. Use our center punch here. [ MUSIC ] Alright so I'm gonna use the drill bit that I used to drill this hole as the pivot point here in this cardboard. That's gonna go there, and just stick the pencil through this hole that I made with the center punch, and that's gonna make our mark. [ MUSIC ]

(Tommy)>> With our circle marked out we can make a hole to give our saw a place to start. Then it's time for the soothing song of a body saw. Now we are cutting through a little bit of bracing here but not enough to compromise the strength of the hood too much. [ MUSIC ] [ saw buzzing ] [ MUSIC ]

(Marc)>> Well Tom what do you think?

(Tommy)>> Well we caught a little bit of grief over this ride but I do believe we did alright.

(Marc)>> I like it!

(Tommy)>> We'll take her for a shakedown run, which is gonna involve putting her through her paces but not burying the throttle. Never do that with a fresh build. Once she's got a few miles on her we can get her back to the shop and make sure everything is kosher. Next time you see her we're gonna open that throttle up. Brougham mercy, Project Highwayman is finally ready for the big road party.

[ engine rumbling ]

(Tommy)>> Well we've been out riding around in our big body Mercury and we thought we'd have ourselves a pit stop and see a friend of ours, and get his impression of our latest creation.

(Marc)>> Hey Smo, what are you doing?

(Smo)>> What's going on man, I'm making breakfast. I'm just joking, I'm making miniature log cabins. Chopping wood guys.

(Tommy)>> You may recognize Smo, a-k-a Big Smo. He's a country rapper, musician, songwriter, producer, and film director. You might also recognize him from his t-v show called, well, Big Smo.

(Smo)>> Brougham mercy, look at this Merc mobile. It's like the Stay Puff Marshmallow Man. I love it! Oh, my goodness. Did it not come standard with that, what is that, a 19 inch hole in the hood?

(Marc)>> We had to cut the hole. We didn't just do that for fun, we needed it.

(Smo)>> Wow look at this thing man.

(Marc)>> It makes about 750 horse the way you see it. With a 300 shot of nitrous it'll make over 1,000. Do you want to go for a ride?

(Smo)>> Heck yeah I want to go for a ride. Let's take this thing to the moon. [ MUSIC ]

(Marc)>> So you'd think a big ole car like this would be kinda slow right?

(Smo)>> I mean my granny's car was.

(Marc)>> Was it like this?

(Smo)>> It was kinda like this. [ engine revving ]

(Smo)>> Woo!

(Marc)>> Was it like that?

(Smo)>> She had a lighter foot than you do. [ engine revving ]

(Marc)>> You gotta check this out right here. [ air hissing ]

(Smo)>> Serving up them pancakes. I like that. That's the emergency brake. [ engine revving ]

(Smo)>> Think we can stop at this church? I feel like I need to say a prayer. God help us in this beastly machine to survive the twists and turns of the road that lies ahead, amen.

(Marc)>> Amen! [ MUSIC ]

(Smo)>> I like it that you kept it standard, what is that an eight track?

(Marc)>> Yeah eight track, a-m radio works too. [ garbled music ]

(Marc)>> Wonder if we can hear some of your music on here.

(Smo)>> Probably not on a-m, but I am working on releasing my new single on eight track.

(Marc)>> Really?

(Smo)>> No!

(Tommy)>> Well we all know this thing ole thing will run pretty good straight down the road. What do y'all say let's go set up a few cones and see how she does on a slalom?

(Smo)>> I want to see this thing dance. [ engine revving ] [ MUSIC ] [ engine revving ] [ MUSIC ]

(Smo)>> Let's access the damage here. That's point spread. Look at that one, two, three, four, and five. We've got a little dinger right there. We've got a wonky eye lid up here. We're gonna need some duct tape. Well boys you built one heck of a car. I'm talking about this is as cool as a car can be.

(Marc)>> Thanks man, that means a lot coming from you cause I know you like big cars like this.

(Smo)>> I love this car, and it really makes me think about a song that I've got called "Rollin'" that we're gonna be shooting a video for real soon. This car would be perfect for that video.

(Marc)>> Dude that would be so awesome. We could be in a music video. ♪ (Smo singing)>> Wide open got the tail pipes smoking. ♪ ♪ Lane to lane floating no g-p-s loading cause even when I got ♪ ♪ no place to go it's just me, myself, and the open road, and ♪ ♪ when I hit the I-24 gonna put the pedal to the floor. ♪ ♪ I'm gone but baby I be back by dawn. ♪ ♪ Until then crank my favorite song cause I got ♪ ♪ that clear blue sky. ♪

(Smo)>> I'll tell you what. You let me drive this thing I'll let you be in my video.

(Marc)>> Deal!

(Smo)>> Let's do it. [ engine revving ]
Show Full Transcript