More Drifting Trailblazer SS Episodes

Carcass Featured Projects

Carcass Builds

Parts Used In This Episode

Summit Racing
Electronic Exhuast Cutout System
Summit Racing
Magnuson Supercharger
Summit Racing
OMP Racing TRS-E Racing Seats
Summit Racing
Wilwood Hand Brake Lever Assemblies
American Powertrain Systems
Tremec Magnum 6-Speed Manual Transmission
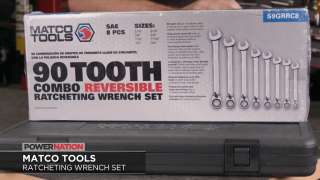
Matco Tools
MATCO Tools are the Official Tool Supplier to PowerNation
PowerTrain Products
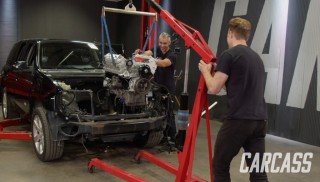
Chevy 6.0 LQ9 Stage 2 LS Engine
RockAuto.com
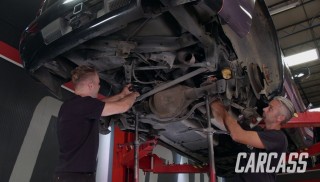
Powerstop Extreme Street Performance Brake Pads
The Industrial Depot
Tools, Hardware, Shop Supplies

Episode Transcript

(Jimmy)>> You're watching Powernation!

(Jimmy)>> Today on Carcass we're building custom control arms for our Trailblazer.

(Jeremy)>> Plus we get a lesson in drifting from pro drifter Josh Robinson. [ tires squealing ]

(Narrator)>> When you want to build something different you turn to Carcass. They transform cars and trucks into one of a kind builds. From street to mud, if you dream it they can build it. This is Carcass, a non-traditional speed shop. [ MUSIC ]

(Jimmy)>> This is the Holden Ute but it isn't any ordinary Ute. It's a 6.2 liter 1,000 horsepower supercharged vehicle built for one purpose, to roast some tires. [ engine revving ]

(Jeremy)>> This Ute is outfitted with some special equipment that was strictly chosen with drifting in mind. From a carbon fiber body, which had to be custom formed, to the tires designed to withstand some harsh conditions. This whole vehicle from head to toe is designed to drive not straight but sideways.

(Jimmy)>> This sporty vehicle has a 6.2 liter LS-3 engine paired with a Magnusson supercharger, and keeping this bad boy running are Duralast parts. Things like the idler pulley, the power steering pump, the water pump, and even the starter have to be solid to keep this car on the course.

(Jeremy)>> In the cab you'll find a stripped down interior with only the essentials, like a hand brake and a sequential gear box which is currently being maintenanced. The Ute has 18 inch wheels hugged by four radial tires designed to give it just the right amount of grip, allowing the rears to perform a controlled slide and the fronts to maintain steering at a high rate of speed.

(Jimmy)>> Now the radical steering angle couldn't be achieved with the stock Holden Ute. So custom suspension parts were created using c-n-c machines and Duralast tie rod ends were used to get 65 degrees of steering angle.

(Jeremy)>> And we can't overlook the carbon fiber body, which has more to do with performance than you would think. This is a lightweight material contributing to an unbelievable overall weight of 3,300 pounds by shedding all of those heavy body panels, allowing for more of these 1,000 ponies to perform.

(Jimmy)>> And the man who's in the saddle of this powerhouse is Josh Robinson, an Australian veteran in the drifting world. He was the first Aussie to earn a Pro 2 license in the United States and quickly snatched a Pro 1 license allowing him to compete in the US Formula Drift Series.

(Jeremy)>> Josh drives for the Duralast team and was nice enough to carve a few minutes out of his busy schedule to give two wannabes a lesson in drifting.

(Josh)>> Good day guys, my name is Josh Robinson. I'm a Formula Drift driver from Australia and I also instruct down here at Texas Drift Academy. So today I'm gonna show you how to initiate a drift, and that's seemingly a simple thing to do but there's definitely a lot going on and a lot of very fine things to pick up on. So basically to start out what I'd recommend doing is just feeling out how the hand brake works. So all you're gonna do is put the car into first gear, get up a little bit of momentum, and then put your foot on the clutch and pull the e-brake until you feel the rear wheels lock up. So I'll show you how to do that. [ engine starting ]

(Josh)>> Get up to about 30 miles per hour. Put on the clutch to pull the e-brake, and then release the clutch again. So second of all we're gonna combine that with initiating a drift. Now there's a few things to keep in mind when you initiate a drift. First is whenever you use the hand brake you must have your foot on the clutch. So the process to initiate is again take off to about 30 to 40 mile per hour and then clutch, turn, e-brake. You're gonna hold the e-brake for maybe one to two seconds, counter steer at the same time, and while you're counter steering you actually let go of the steering wheel because you can't physically turn your hands fast enough for how quickly the car is going to change direction, and it will find its own center. So you don't need to worry about that. [ engine revving ]

(Josh)>> So it's clutch, turn, e-brake. [ engine revving ]

(Josh)>> The next one is after you do your initiation is to maintain that distance around a barrel or a traffic cone. Again it sounds quite simple but it's actually quite an advanced technique, but what it's gonna do is teach you to maintain the throttle, and to understand the dynamic of when you give the car more gas it gets more angle, and when you come off the gas the car gets less angle. So I would definitely recommend starting off with a distance of no less than 30 foot from your obstacle because the bigger the radius around that barrel the easier it's gonna be. If you get really close to that barrel and you're trying to do really tight Scandinavian type flicks around it the whole time like a hairpin corner it's gonna make it a lot harder for you. So let's show you how to do that now. I'll find a barrel. The initiation is still the same. It's just a clutch, turn, e-brake, and then when you get back on the gas try and maintain that distance around your initiation point. Okay so I've got my barrel here. As I said before it's the exact same process to start. It's just a clutch, turn, e-brake, and then we're gonna maintain that 30 foot distance around the marker. [ engine revving ] [ tires squealing ] [ engine revving ] [ tires squealing ] [ MUSIC ]

(Josh)>> And there we have it. That's your first two challenges. You'll definitely notice as you do the barrel for the first time you're gonna be moving your hands a lot more than that. You'll be on and off the gas a lot more. That's totally fine. That's all about learning. This isn't my first day so I guess practice definitely helps you refine that skill and stops you being quite so busy behind the wheel, but you'll definitely feel it out quite quickly and honestly it's the most fun you'll have in a car. So I'm sure you'll have fun getting the technique down pat. [ engine revving ] [ tires squealing ]

(Jeremy)>> Up next we get back to work on our drifting Trailblazer and we'll begin by giving our tires some better grip on the pavement.

[ MUSIC ]

(Jimmy)>> While getting a lesson with pro drifter Josh Robinson was fun it's time that we stop oogling over his Holden Ute and it's time to start working on our own drift truck.

(Jeremy)>> That's right, we're about half way done transforming our stock Trailblazer SS into a four door drifting machine that you can bring the whole family along for a ride.

(Jimmy)>> We started by ripping out everything on the inside, constructing a roll cage for safety. Then we added some lightweight racing seats from Summit Racing and a custom console.

(Jeremy)>> But we couldn't call the interior done before we attacked the powertrain. We ditched the old engine with 230,000 miles on it and replaced it with a brand new LQ-9 from Powertrain Products.

(Jimmy)>> We paired that with a Magnum 6-speed from American Powertrain that will give us better control when we're in a slide.

(Jeremy)>> And that slide wouldn't be possible without a drifting hand brake from Summit Racing, and a homemade shifter that matches our personalities to a "T".

(Jimmy)>> With the interior out of the way we turned our attention to the looks department, crafting a carbon fiber hood the same shape and size as the original along with a custom wrap that gives our Trailblazer that drift car look.

(Jeremy)>> Yeah you're right, a supercharger would be crazy on this thing but I think we should get into the suspension before we even think about the engine bay again.

(Jimmy)>> I agree but before we start taking all this stuff apart I think we should mount the new wheels and tires just to get a feel for what mods we're gonna have to make.

(Jeremy)>> Jimmy's right. We need to roll in our new wheels and tires before we can even think about our suspension. We chose a set of 18x9 Enkei wheels we got from Summit Racing, and we're gonna pair those with General Tires' G-max RS. The 255/45 18 variant which has a speed rating of up to 186 miles per hour. Now these tires have a UTQG rating of 360 AA, which means that it has a tread wear that's three and a half times longer than the government standards. Plus they carry the best grip rating and temperature dispersement rating available.

(Jimmy)>> And you know we'll be dumping a lot of heat into the rear tires. This set of General Tires has a unique feature called the tire wear monitor. Those works are molded into the tires, and when the tires wear so much that you can no longer read these words it's time to replace them.

(Jeremy)>> With our tires mounted on the Trailblazer we'll have a good idea of how much clearance we have and what steering will look like when we go drifting. Well what do you think?

(Jimmy)>> I think it looks a whole lot better but there's still some work we've got to do in regards to suspension.

(Jeremy)>> Yeah, we really don't want our wheels cambered like that.

(Jimmy)>> We'll figure something out.

(Jeremy)>> Well let's get to work.

(Jimmy)>> Well actually before we do that I want to unbox some tools I just got.

(Jeremy)>> Oh yeah?

(Jimmy)>> Yeah so as you know I've been using your wrenches for a while. So I thought I'd get some of my own. These are the 90 tooth ratcheting wrenches from Matco Tools. They're a 12 point set that allow you to loosen or tighten 6 point, 12 point, square, torx, and even partially rounded bolts and nuts.

(Jeremy)>> You know what's really great about these is you only have to swing the ratcheting ends 4 degrees to get the ratcheting end to work. So working in those tight spaces are a breeze.

(Jimmy)>> Well I can't wait to use them when we start on the suspension. Now our o-e setup is not the best for a drifting vehicle. When you're at full steering lock the outside tire cambers out, reducing the amount of contact that the tread has with the ground, and since you're generally in those full steering lock positions throughout a slide it's not the best. So to combat this we're gonna be building our own upper control arms to allow for more camber adjustment. Our goal with this is to align the tire in such a way that the entire tread is in contact with the pavement at full steering lock. Now this will affect the tires when they're going straight due to the added camber causing uneven tire wear, and this would be a problem in a daily driven vehicle but for us it doesn't matter because the Trailblazer will hardly be going straight.

(Jeremy)>> We have a lot we need to disassemble before we can access the upper control arms on our front end. The wheels need to come off and then we need to unbolt the tie rod end and give it a few... [ metal clanging ]

(Jeremy)>> Well a lot of blows with the hammer.

(Jimmy)>> We'll tackle the brakes next. We need to remove the caliper bolts. Slipping it off the rotor and hanging it up, preventing our brake line from getting damaged. This is followed by the rotor, which comes off without any blunt force.

(Jeremy)>> Something that does need a little bit of muscle is the upper ball joint mount but it's nothing Jimmy and a hammer can't solve.

(Jimmy)>> And with the upright free from the upper ball joint we'll tackle the lower next, tapping the whole knuckle free from the vehicle. We can then unbolt the strut, easily lifting it away.

(Jeremy)>> Finally we need to tackle the upper control arm. We'll need to unbolt both sides working the wrench in some awkward spaces, and even though we're not modifying the lower control arm we'll remove it for good measure because after 230,000 miles the bushings in these were less than ideal.

(Jimmy)>> Our wheel wells are now empty leaving us with a clean canvas to rebuild our front suspension.

(Jeremy)>> Coming up we'll build a jig for someone off adjustable upper control arms.

(Jimmy)>> You're watching Carcass!

(Jeremy)>> The front suspension on our Trailblazer SS has seen better days. It has over 230,000 miles on it and it shows.

(Jimmy)>> Fortunately we have plans to replace a lot of parts but right now we're focusing on the upper control arms.

(Jeremy)>> We want to modify how our tires grip the pavement at full steering lock. Right now the tire cambers outward and sits at an angle that only allows for a portion of the tread to make contact with the ground. To fix this we would make a camber adjustment but our upper control arms don't have any adjustability and our lower control arms, well they won't move enough to solve our problem. So we're gonna build a set of upper control arms with integrated rod ends to give us the adjustments we need.

(Jimmy)>> To do this we're gonna need to build a jig. Not only do we need our fabricated upper control arms to match the same geometry as the old one but we will also need to be able to repeat the process for the other side.

(Jeremy)>> Now your work surface is very important when building a jig. It needs to be extremely flat and adaptable to your needs. The welding table we have is nearly perfect for the job but it has some issues. The five-eighths holes can prevent us from putting a tack exactly where we need it. So we're welding a piece of three-sixteenths steel to the top to solve that problem.

(Jimmy)>> Our jig journey starts with some mounting tabs that we'll just hog out on the drill press. They'll be used as reference points as we build out the new control arms. To orient them we'll use the existing mounting points on the old upper control arm squaring them to our three-sixteenths plate before they get tacked into place.

(Jeremy)>> To ensure these don't move around on us we'll add some gussets. These will be added to either side tacking them securely to the mounting tab and the metal plate.

(Jimmy)>> We need to make one more set of mounting tabs for the remaining mounting point on the control arm. These are attached in a similar fashion using a through bolt and nut before welding the tabs to our plate.

(Jeremy)>> We're adding a gusset on one side as well but what's different about this arrangement is that we're adding an angle guide so we can maintain the same geometry for this mounting point.

(Jimmy)>> With our simple jig out of the way it's time to prep our pieces that will make up our new upper control arm. We'll start by scavenging one of the mounting points off the old arm. A cutoff wheel makes quick work of slicing through the solid arm but any time that you do some cutting it's followed by grinding. [ grinder buzzing ]

(Jimmy)>> A lot of grinding. [ grinder buzzing ]

(Jeremy)>> With our mount all nice and shiny we can affix it in the jig, setting our sights on the tubing of our new upper control arm. We'll cut a non-specific length of inch and a quarter 120 wall tubing. Now the length isn't all that important. It needs to be just long enough to make the bend and allow for some trimming.

(Jimmy)>> We'll bend our section of tubing to 90 degrees. Then we'll bring it over to the jig and mark out where we will make our cuts. We'll then bring it back over to the jig and check that it fits. Money in the bank.

(Jeremy)>> With this side fitting perfectly Jimmy can hit it with a few tacks. [ MUSIC ] Then we'll get started on the second half of our upper control arm. This arm gets a slightly different bend at 60 degrees. Once we know it fits like the other the welding can begin. It's very important to get good penetration in welds like these. A component like this is under a ton of stress, and a faulty weld could lead to disaster.

(Jimmy)>> Now this is only half done. We have a whole other arm to build but while I jump that into high gear Jeremy is gonna get back to work assembling the front end.

(Jeremy)>> That's right, we've got a whole bunch of worn out parts that are gonna be exchanged for new ones. The whole suspension is gonna breathe new life. Even the brakes we picked up from Rock Auto are an upgrade over the stock ones we had in there.

(Jimmy)>> The lower control arms go in first, securing them using the stock bolts. The mounting holes on our strut towers need to be hogged out to match the rod ends on our new upper control arms. So we'll do that before installing the coil overs, which use the stock strut yoke to slip onto the lower control arm. With those linked to each other we can raise our coil lover into position.

(Jeremy)>> With that all in place we can add our newly fabbed upper control arms. An extra pair of hands help line up these grade eight bolts, which can be a little stubborn. With the remaining spacer, a lock washer, and matching nut the arms can be snugged up on each side.

(Jimmy)>> The upright can then be installed. It slips onto the lower control arm and is then married to the upper control arm. We'll then need to connect the sway bar, followed by the wheel speed sensor. The new rotors can go on next along with the stock caliper.

(Jeremy)>> With everything in place we can start tightening the nuts and bolts to everything.

(Jimmy)>> That completes our front end suspension upgrades but it'd be all for nothing if we didn't touch on the rear as well. So we'll disassemble the rear suspension starting with the tired shocks.

(Jeremy)>> Then we'll lower the axle to relax our worn out springs, which we'll quickly replace. Then we can add our new shocks, add our brake upgrades along with new pads, and snug everything up. That wraps up our suspension. Our rear shocks are adjustable. So we can tune them to match our needs, and as for the front we now have more camber adjustment so we can drastically change the way our tires grip the ground at full steering lock.

(Jimmy)>> Up next we let our LQ-9 roar at the flip of a switch.

[ MUSIC ]

(Jeremy)>> Our Trailblazer has the horsepower and it has the grip we need to maintain a slide, and now we're gonna let it sing to the tune of 6,500 r-p-m with an electronic exhaust cutout we got from Summit Racing.

(Jimmy)>> This simple concept splices into your existing exhaust adding a Y-pipe to divert exhaust either toward your muffler or with the help of an actuator it dumps the raw sound from the engine to the ground.

(Jeremy)>> Now adding the components for this is fairly easy but it does involve a little bit of cutting with the reciprocating saw. We marked out where the Y-pipe will go just behind the merge pipe but before the muffler.

(Jimmy)>> With the clamps loosened this section can be removed from our exhaust system. We'll then slide in our new Y-pipe to check the fit. With it fitting nicely we'll mark the muffler side of the fitting and prep the area for welding. [ grinder buzzing ]

(Jeremy)>> The Y-pipe can be slipped in one last time, securing with the a clamp to the merge pipe. [ drill humming ]

(Jeremy)>> And welding the other end to the muffler pipe.

(Jimmy)>> That completes the plumbing for our original exhaust but now for the fun part. The other end of our Y-pipe is going to have an actuator attached to the end allowing us to divert the exhaust for some raw track noise. To attach the actuator a gasket is added to avoid any leakage. Then the mechanism can be added followed by an additional gasket, and finally the flange which will sandwich the whole assembly together.

(Jeremy)>> The last part to be added is the down spout, which is clamped to the v-band flange.

(Jimmy)>> Now this all won't work without something to control it. We'll make the simple connection to the actuator making sure to shrink wrap it so it doesn't come apart. Then we'll just feet the wiring through our existing shifter hole.

(Jeremy)>> In the cab we'll find a good place to put our switch, and then drill a fifteen-thirty-seconds hole in our custom console. The switch gets added, which we attach to a power source in the cab. [ MUSIC ] Well I want to hear this thing.

(Jimmy)>> Yeah it should sound pretty good I think. [ MUSIC ]

(Jeremy)>> Here we go! [ engine starting ]

(Jeremy)>> Alright so that's stock... [ engine rumbling ]

(Jeremy)>> Ready? [ engine revving ]

(Jimmy)>> That's sounds pretty good.

(Jeremy)>> That's just got a really good tone.

(Jimmy)>> Imagine hanging it wide open throttle.

(Jeremy)>> For more information on this build check us out at Powernation TV dot com.
Show Full Transcript