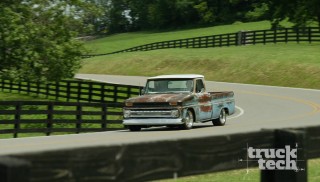
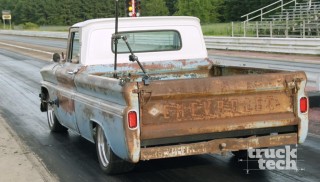
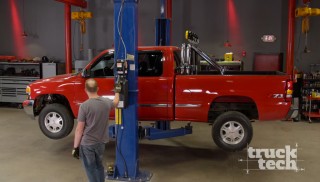
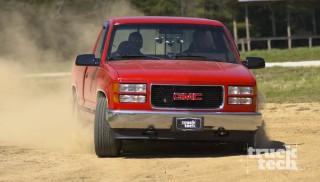
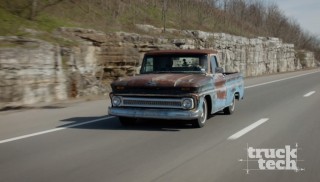
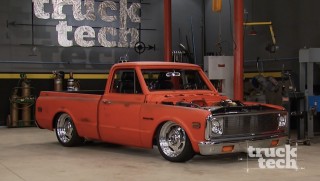
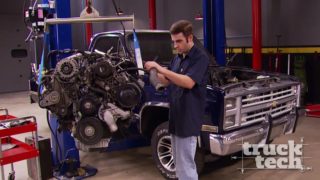
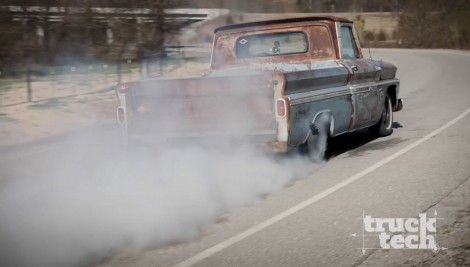
Truck Tech Builds

Parts Used In This Episode

Summit Racing
Borgwarner S366 Turbo
Summit Racing
QA1 Coilover Conversion Kit
Summit Racing
Stainless Steel V-Bands
Forney Industries
Forney 220 AC/DC TIG Welder
Matco Tools
MATCO Tools are the Official Tool Supplier to PowerNation
The Industrial Depot
Tools, Hardware, Shop Supplies
WyoTech
Trim & Upholstery

Episode Transcript

(Jeremy)>> You're watching Powernation!

(LT)>> Today on Truck Tech we're starting a brand new project that's old school with a new attitude. [ MUSIC ]

(LT)>> Yeah baby! Woo hoo! [ MUSIC ]

(LT)>> We wanted to start a bowtie project that was a mix of old and new. So sight unseen we took a chance. [ MUSIC ] After months of searching we just picked up our newest project truck, this 1965 Chevrolet C-10 short box fleetside straight out of Marshall, Texas. We broke the number one rule of truck buying and pulled the trigger sight unseen. Since this truck had spent its life in sunny Marshall, Texas, we figured it would be pretty solid even though it's well over 50 years old.

(Austin)>> We brought it inside the shop, gave it a once over, and we were pleasantly surprised to find the sheet metal was in very good shape for its age. The truck was mostly originally with the only major changes being the torched coils and a later model 305 small block. However we did get the impression this truck was slapped together for a quick sale. Since the truck mechanically checked out we decided to hit the road and see how this old girl performed, and it was a blast to roll through the gears with the three on the tree although the coils did make the ride a little bumpy. [ MUSIC ] Feel the bumps!

(LT)>> And even though our truck is a more deluxe model by today's standards it's very bare bones. This was just before the days of air bags, and traction control, and a-b-s. Man we're lucky to have an f-m radio, and we couldn't end the shakedown without one very important test.

(Austin)>> What do you say we burn the rubber off these bad boys?

(LT)>> Why not? [ engine revving ]

(Austin)>> Oh yeah, don't stop baby! [ tires squealing ]

(Austin)>> Even got smoke on that one!

(LT)>> That's the old one tire fire.

(Austin)>> One tire wonder we call that.

(LT)>> With all the fun out of our systems we got right to work to begin the teardown process. We removed the bumpers, unbolted the bed, disconnected some hoses and wiring underneath the hood, and lifted the cab off getting down to the rolling chassis.

(Austin)>> With all the drivetrain removed we took a trip to Blast from the Past in Lebanon, Tennessee, where they strip and powder coat a wide range of parts for various applications. The powder coat process starts out with a crushed glass media, which removes all the rust and corrosion. Once prepped and in the booth the dry powder is electrostatically applied. This allows it to stick to the surface but will still require a quick bake in the oven to fully cure, and this is the finished product. Nice and clean! We chose the semi-gloss black powder coat for its durability and it's gonna last a long time. Now with a little pre-planning we knew we were gonna have to do some frame modifications, and with the style of suspension we're going with this front coil over is gonna come right through this crossmember. So we had to cut out some holes. We chose to do it before the powder because we didn't want to cut into it after.

(LT)>> We took the same approach on the rear with the C-notch. Our reinforcement also includes an upper coil over mount and a lower panhard bar mount that'll keep the axle located side to side. This kit is actually designed to be 100 percent bolt on with the bed still on the truck, but we just figured since we're blasting and coating the frame anyway why not weld it in ahead of time for a nice slick look?

(Austin)>> And that makes this chassis 100 percent ready to bolt on some parts. We've got some unboxing to do.

(LT)>> I got the scissors. We have two goals for the suspension on project Lo 'n Slo, our '65 C-10. First is to get it sitting closer to the ground, and second is to improve its handling. We didn't want to mess around with the hassle or complexity of an adjustable air suspension system. So instead we're installing a QA-1 coil over conversion. The upper spring mount bolts onto the crossmember and the frame with some existing holes and new provided hardware. The lower coil over mount is bolted to the control arm with a spacer, and the coil over shock slides from underneath the crossmember and attaches to the spring mount with a through bolt and some more spacers. The control arm pivots up to meet the other end of the coil over, and all the hardware is tightened up. Up top the dished spacers slide onto the mounting point, and the control arm slides into place. The lower bump stop and bracket bolt onto the control arm, and the spindle attaches to the lower ball joint. With little assistance the springs are compressed. Then the upper ball joint can be connected.

(Austin)>> Over at the table we'll attach the urethane bushings to the swap bar, slide on the brackets, and loosely tighten the hardware. The spherical end links attach to the sway bar. [ drill humming ]

(Austin)>> Mind grabbing that end over there? And the whole thing slides under the front end. It first connects to the lower control arms, and finally the brackets attach to the frame.

(LT)>> Coming up we've got a great start on suspension. So what about power?

(LT)>> The rear suspension assembly begins with the trailing arms attaching to the crossmember. The rear axle attaches with some five-eighths inch bolts. The pinion angle adjustors attach, the axle is raised, the coil overs are connected, and the panhard bar and frame brace will locate the axle side to side. The very last thing we'll do out back is install the sway bar. Then once the truck is fully assembled and the weight's on the ground we'll make some minor adjustments to the pinion angle and the front pivot points, but for very little effort the handling and ride quality of this truck is greatly improved.

(Austin)>> When it came to selecting a power plant for our '65 C-10 we had one goal in mind and that was for it to be different, the oddball. We didn't have any crazy expectations of making high horsepower. Our thing was let's just make it faster than stock.

(LT)>> Since just about every truck we build here has some sort of a V-8 under the hood we decided for project Lo 'n Slo we're gonna be installing a Chevy 292 straight six. Now it's kind of an oddball but these we're primarily used in heavy duty and commercial applications, and from the factory they put down 165 horsepower and 280 pounds of torque, which is not a bad start, but we do have some upgrades in mind where we'll be able to pump up the output of this engine, and it just might involve some boost, and my power adder of choice has always been the turbo. So I went to Summit Racing and did some shopping. Now this is a Borg Werner S-366 turbo and it's a great charger that's affordable and durable. So it will work perfect for our application, and here's some of the specs. It has a 66 millimeter inducer on the compressor wheel, a 73 millimeter exducer on the turbine wheel, a T-4 undivided turbine housing with an 0-88-AR ratio. Now this thing will ultimately support a lot more power than we're gonna be making with that 292 but it'll be right in its peak efficiency zone, somewhere between 400 and 500 horsepower, which is our ultimate goal. Now the exhaust manifolds that we ordered, they come with this doughnut style of gasket. Now that works great in a naturally aspirated application and gives you a nice leak free seal. However when you're turbocharging there's a lot of heat and pressure that's gonna be in the exhaust, and these doughnuts they'll just blow out. So Summit also sent me a couple of two and a half inch stainless steel V-bands. Now this manifold is actually made from ductile iron, which means I can weld to it. So my first order of business is to chop off this two bolt flange and weld on some V-bands.

(Austin)>> So I know we told you guys that we weren't gonna touch the exterior of this truck. After all this patina is what makes this project so cool in the first place, but we kicked it around and after some thought and consideration we changed our minds. We decided let's add a little pizazz in one specific spot and that's that rusty old roof. We're gonna paint it, and we're gonna drape it all the way down the back side of this body and end up somewhere right on this body line, and as you all know with a good paint job comes a lot of good prep work. [ MUSIC ] Got her! [ MUSIC ] The truck wants to come with it.

(LT)>> Back at the welding table our 292 manifolds are going under the knife. The two bolt flanges are being cut off to make way for a V-band. [ grinder buzzing ] [ MUSIC ]

(LT)>> Basically just trying to get this flange to sit nice and flat on the manifold with as few gaps as possible. I think we're there. So all I'm gonna do is clean up the outside just a little bit so it welds on nice and clean and we're good to go. Once the surface is flat and clean I can start by tack welding the V-band ring to the manifold. I'm using our Forney 220 ac/dc tig set at 120 amps for the thicker material, and since I'm joining cast to stainless I'm using a 309 filler material. I'm also running my go-to number 12 cup and gas lands, which will keep the weld area properly shielded with argon, and my post flow is set to 7 seconds. Alright with just a little bit of effort we have ourselves a manifold that'll have a nice leak free seal. Now if you've never seen how a V-band clamp works they're actually kinda cool. The sealing surface is made up of these two flat areas that just sort of index together, and there's a clamp that holds the whole thing together. Now on this particular style of V-band there's a small ridge around the inside that indexes both halves together so they can't wiggle around, but like I said, a little bit of effort, a little bit of work, this thing will last a lifetime and it's guaranteed to never leak.

(LT)>> Up next, can patina and paint work together?

(LT)>> I'm always nervous when we blast something. You guys at home know the risks. Whenever you're stripping paint you never know what's underneath. Luckily we have a metal roof and not just a big block of Swiss cheese.

(Austin)>> Yeah there was more than enough material there that stayed to where this thing is totally salvageable. A few minor points here and there where we've got a few pin holes but nothing we can't fix with simple metal working techniques.

(LT)>> Yeah I mean looks like the worst of it is kinda right along this edge where the drip rail meets the roof skin. There's a couple of small holes but like he said. A mig welder will take care of that in a hurry.

(Austin)>> That's it, and these drip rails are not broken to the point to where they're hanging down or anything. So we're not gonna touch them cause if you start fixing that there's no telling where you'll stop.

(LT)>> Well speaking of stopping I see that you stopped your sand blasting kinda half way down the back, and you stripped the roof as well. So help me get inside your head and kinda understand your theory there because this is a patina truck and you're obviously gonna be painting on the roof.

(Austin)>> Yeah definitely. We bought this for its charm and its natural character right, but we're still gonna class it up just a little bit with new bright work, custom touches here and there. So why not blast off all this patina on the roof? I know you haters out there are gonna hate but we're gonna add our little flare, brand new paint.

(LT)>> Well that's where I think you're wrong actually because you said patina on the roof. This was just rust. To me patina is paint and rust that have kinda intermingled. Up here it was just a solid block of brown rust. So I don't see anything wrong with blasting it off and putting a nice shiny cap on this thing. It'll really set it apart from the crowd.

(Austin)>> I obviously agree! So how about you get out of here and let me prep this so I can get some primer on it so it doesn't rust again.

(LT)>> I have some cool work to do with the turbo building and I'll let you take care of this boring body work.

(Austin)>> Sort it out. I'm laying down two coats of epoxy primer on our cab's newly blasted surface. This will prevent that flash rust until we have time to paint it.

(LT)>> Since the intake and exhaust manifolds are both on the driver's side of a Chevy straight six I figured the passenger side is the best place to mount our turbo since it's pretty much wide open. So I went ahead and mocked up a bracket that's gonna bolt onto the side of the block right where the motor mounts go, and this is gonna provide a nice sturdy place to mount the turbocharger. Now it's up high, it's out of the way, and there's plenty of space to run a charge pipe out the front, a crossover underneath, and the exhaust out the back. Plus the oil drain is a straight shot to the pan. So the only thing I need to do is build a crossover.

(Austin)>> I'm doing a final wipe down on this cab in preparation to shoot some primer. Now if you look close you can tell time has definitely taken its toll on this panel and pitted it in pretty well, but there's a few ways we could address that. We could skim coat this whole thing with filler. Then go ahead and sand it back down to that metal and the filler will only be filling in those tiny little holes. Some guys actually prefer this method because you're not really building thickness. However it's very labor intensive. I'm gonna choose to shoot some DTM high build primer on this and it'll achieve the same results. This is the time to figure out your movements. Distance from the panel, speed of the gun, when and how you're gonna move the ladder. After letting this high build primer cure overnight we pushed the cab over into the prep booth where I can get a good head start on blocking out these panels. Woo baby, after about 16 hours of blocking all the pits are gone. These panels are laser straight with nice soft edges. I thinks he'll clean up nice. It's now off to the booth to shoot the cab with sealer. This gives the paint solid foundation for adhesion and helps promote a uniform color. The base coat begins with mixing up this awesome color called ermine white. It was a factory GM color back in the early '60's. It's a solid off white that is just the right shade we're looking for. The base coat is applied with 25 p-s-i at the gun totaling three coats. Now I just got finished spraying that base coat but it doesn't stop there. This is where that custom touch comes in, and it all starts right here with this pearl. A lot of guys like mixing this directly into their clear coat but the issue you can have with that is if you have a run it's a lot harder to correct and blend in. I prefer to use a high quality color blender, which is essentially a clear base coat. Now this is custom paint, there's no rules. Throw that out the window. However there's a few simple things to keep in mind. The first is the size of your pearl to the size of the tip in your guy. You want to make sure your tip's big enough so it doesn't clog up the gun, and lastly if you're running cup filters or screen filters rip those out too. The most accurate way to measure pearl or flake is with a scale. We're using one gram per 28 ounces. [ MUSIC ] I'm going to apply two coats of the pearl while keeping the gun set at 25 p-s-i. The third is a control coat allowing for uniformity for the desired effect. I'll lower the pressure of the guy from 25 to 17 p-s-i. The fan pattern remains wide open. This is where the distance from the gun to the panel is extended and the motion of spraying slows down. It's now time for my favorite part of all, and that's smashing on the clear. The gun gets set up with 32 p-s-i. It's sprayed with a pattern overlap of about 50 percent maintaining about a 10 inch distance to the panel. We're gonna finish this bad boy off with a total of five coats of clear and let it cure overnight.

(LT)>> Up next, Austin gets all stitched up with our custom interior.

(Austin)>> We can get started on the interior. Our plan for this is to make it inviting, clean and classy, and that involves repainting. We'll use the same color we used on the exterior roof except no pearl effect and no shine, and then add in those custom leather seats, nice saddle brown, something to contrast the light color, round it out with some dash components, new and shiny. This is the original seat we yanked out of old Lo 'n Slo, and well just with a quick glance you can tell it definitely needs some help, but not to worry I brought in just the right guy got get the job done. Our buddy Mac is a fourth generation upholstery expert who has lent his skills to our shops before.

(Mac)>> Sometimes it's better to take the old seat and do something custom with it. I think we ought to take this old saddle blanket cover off and see what we have. Actually this seat's not in bad shape. It's a good candidate to do something custom. Maybe a leather cover or something like that. I made some sketches. I kinda kept it a little bit retro. If you guys want to do something different we can always sketch something else out, and that's where start from.

(Austin)>> I say we get started, tear this thing down, and go from there.

(Mac)>> Let's take it apart. [ drill humming ]

(Austin)>> Set it on the ground. This piece is over a half a century old. So stripping it down to the frame will get a better idea of how it was treated by its previous owners. I ordered a bunch of extra material just in case it needs to be completely rebuilt.

(Mac)>> So a quick inspection of this bun Austin, looks like everything's in decent shape here. I'll take a look at the top side real quick. We have minimal wear on this thing. I would salvage this piece, re-use it.

(Austin)>> It looks way better than what I thought it would.

(Mac)>> So maybe we should take a look at the frame, look at the springs, and see what we have.

(Austin)>> No broken springs means all we need to do is put down some burlap.

(Mac)>> Just roll that baby out, set it right there.

(Austin)>> And add a layer of jute padding to support the old cushion, which will be reused. When it came to choosing interior trim we had a few different options. Could have went with cloth, could have went with vinyl, but why would you not to ride in class on some fine Italian leather? This has a very good hand and is also fade and scratch resistant, and well the color, legacy dark caramel, in my opinion will work great in this truck. With our design sketched out for Lo 'n Slo's bench seat.

(Mac)>> Inserts have to be, square that off.

(Austin)>> We first laid out our marks on the cushion to get a visual reference. Then carefully cut out the sections that will serve as the inserts. With our four insert panels marked we'll cut some foam with a half inch overlap before Mac begins the sewing process. I can't let Mac have all the fun now can I? Try my luck at this. I have had prior experience sewing but it was maybe 15, 20 years ago back in junior high, high school days, sewing the pillow cases and pajamas at home-ec class, and after he corrected me and taught me the right proper techniques and started fresh clean with the right instruction made all the difference in the world.

(Mac)>> Okay you did well. Now we've got to border stitch it.

(Austin)>> Once we got our base panel sewn up this whole process is just consistency, repetition, and having patience. If you trace out your lines and measure correctly the first time you could repeat that pattern over and get real consistent results in the end. If not, if you rush something, or skip a step, or try to cheat a little bit it'll probably show in the end result.

(Mac)>> A lot of guys will try to learn out of a book or maybe a video. Take a class, take a class. I mean most of my students bring a project in, they bring their own vehicle in, and they roll out with a fresh interior. Not only did they get a fair deal on their interior but now they have a calling car, and they can show customers hey I can do this.

(Austin)>> This whole time we're building two completely different sections of the seat. The seat back and the bottom cushion measuring, using those techniques, and I've got to say it was flawless.

(LT)>> Our C-10 has come a long way and we're not finished yet. So keep watching, and if you want to find out more about anything you've seen today check us out at Powernation TV dot com.
Show Full Transcript