Trucks! Builds

Parts Used In This Episode

4 Wheel Drive Hardware
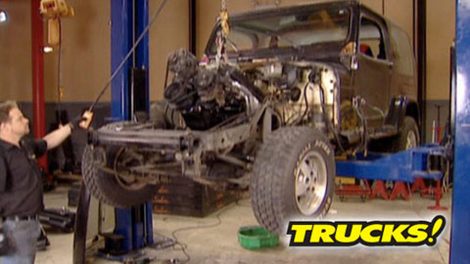
Chevy engine conversion kit for CJ, YJ or TJ: includes radiator, adapter, headers, and engine mounts.
Chevrolet Performance
GM Vortec cylinder heads.
Edelbrock
Performer Plus cam and lifter kit. Part # 3702.
Edelbrock
Performer RPM Pro Flo EFI kit Part # 3507.
Gold Eagle Co.
Diesel Power - Anti-gel and fuel treatment.
Gold Eagle Co.
Diesel Power - Performance Improver and Cetane Booster.
O'Reilly Auto Parts
Rebuilt Turbo 350 4wd trans, new engine oil pan.
Performance Distributors
High perf. distributor, LiveWires plug wires, billet wire looms.
Summit Racing
Chevy 350 "re-ring" kit: gaskets, bearings and rings.

Video Transcript

Today, we're starting a whole new project.

We're turning a really beat up and boring YJ into an awesome all terrain Jeep with some real power.

We'll dump that puny straight six and replace it with a junkyard 350.

We'll strip our V8 down to the bare block, clean it up and then trick it out for some big power. It's all today here on trucks.

Hey, welcome to trucks. The year is 1987 the first year of Jeep's new YJ series and what most hardcore Jeep guys refer to as the Yuppie Jeep. It was lower wider, used unproven parts and for most said, it appeared, the Jeep had lost track of its off road rules with a heavy emphasis on street performance

even with an asphalt bias.

The 4.2 L in line six in our YJ was only rated at a measly 100 and 12 horsepower and 210 ft pounds of torque. Now, we picked ours up cheap because it's basically worn out with a ton of miles on it and it looks ok on the outside, but on the inside it's a different story. Ryan started up,

Kelly

man, that thing is shot.

So our mission here is quite simply to redeem this infamous chapter in Jeep's history by getting rid of that engine and getting this vehicle up in the air where it belongs. And that will make it a capable off road vehicle and something that looks cool and remains street legal. Now, a re ring kit for that Anemic straight six is actually going to cost you more than one for a small block V8 because there simply not that many people rebuilding them. But everyone makes a kit for a very popular upgrade for these Jeeps Chevy 350.

Now we could throw down for a crate engine with all the money we saved buying that old worn out tub, but we can do this build better and cheaper by doing what a lot of guys do, which is rebuild a Junkyard engine and take the money left over putting it into other parts

in order to get that V8 in here. We've got to get rid of this old motor.

Find a new home for the.

We're going to start this project with this 1987 350 that we got for next to nothing, tear it down, freshen it up with a basic kit and then build off of that short lock.

There are parts we'll hang on to and then there are parts for the strap

hes like the old exhaust manifolds intake and even the heads. But you're not always guaranteed that accessory brackets and mounts are going to work. So throw it on the pile, but don't throw everything away just yet.

But no matter what you're planning on reusing, pay attention as you tear down the engine

signs, like sludge wear patterns and leaks can all tell a story as to what the condition of your engine is in internally. We're in good shape.

Yeah,

we got lucky with our engine having never seen the donor vehicle and it looks like other than normal wear our blocks in good shape. But if you have the opportunity, check out the condition of the vehicle your parts came from, that can tell you a lot about the previous life of your motor.

If you're going to have your crank shaft out for any extended period of time, it's a good idea to stand it on its end or better yet, hang it from the snout with it, laying on its side. It can actually sag over time from the weight of its own journals.

We're going to be reusing the pistons rods and crank from this engine, but almost every other mating surface in the rotating assembly is going to be replaced. The good news is that there's no signs of excessive wear. So now all we got to do is clean everything up, get the block ready for the kit

when you're cleaning up your pistons to reuse them, you can take the old rings,

break them in half and use these as a cleaning tool, gets all that crud out of the ringer.

I'm using a nylon cleaning disk for the aluminum pistons that cleans the carbon off but won't hurt the metal.

Pay particular attention to oil passages in the crank and engine. These are the main arteries for your motor and need to flow freely.

Now, here's where we saved some money. We picked up this basic rear ring kit from summit racing for about 220 bucks. It comes with rings bearings, gaskets and seals. And now with our block in decent shape, we're going to be up in the 300 horse range pretty darn quick, which is going to be just fine for that old Jeep. Now, this is going to give us a solid enough foundation with that short block to throw some more tricks at it. So we're going to throw this kid in right after the break. Stick around

when we come back, we'll get our short block put back together, then top it up with you injection.

Hey, welcome back to trucks. We are elbows deep into reviving this 350 cubic inch junkyard dog getting it ready to set into that old 87 YJ, which needs a little resurrection itself. Now, we're ready to finish out the short block and set it up for a new top end and one that's going to be a lot better suited for off roading as well as some pretty serious street duty.

We had zero ring ridge on the cylinder walls, but you still want to hone the block. So you get a good seat and seal with your new piston rings.

You never want to take things for granted like bearing tolerances. So we're going to throw our new bearings in place and tor

the main cats down to measure the clearance with plastic age.

Plastic gauge is a simple wax strip of a certain thickness that you flatten by installing the cats.

Then you remove the cats and check how wide the plastic gauge was flattened too, which tells you the clearance,

the plastic gauge color we use is green, which measures from 1 to 3/1000 of an inch plastic gauge must be used dry. So make sure there's no oil present on the crank or bearings.

Now replace the main caps and torque them to spec in our case, 65 ft pounds, then remove the cap and measure the crush of the plastic gauge to find out your clearance.

Ours is about two thousands and that's great for a reliable street engine,

set your thrust bearing and then measure your crank shaft and play too much end play can chew up the main and rod bearings and even cause connecting rods to break details like this. Don't take much time to check and now's the time to do it.

If you don't have a dial indicator, you can use a feeler gate

index or offset the gap on your piston rings to minimize excessive oil burn off, then drop them into the cylinders using a thin film of oil and a dead blow hammer

cover the raw golds with some spare vacuum line to protect the crank Jervis too.

Our Edelbrock performer plus CAM will give us good low to mid range torque and it will work great with the heads. We're going to throw on this engine.

The valve train gets its motivation from an Edelbrock double roller timing set, which is the line of communication between the crank and the cam.

This is another area where cheaper is not better. So go with the best quality parts you can afford,

we'll install our straight up with lock tight on the bolts to hold things together.

We did reuse our old timing cover along with a new seal and then threw out a stock replacement oil pump followed by a new painted steel oil pan.

You.

Is there a real advantage to painting your engine block? Technically speaking. No, not really, but it sure does look better when you pop the hood.

Now, for the heads on our engine, we decided to go with these brand new off the shelf vortec heads. Instead of rebuilding these old ones. By the time we had gone through these heads and paid to have them rebuilt, we'd have enough cash in them to buy a set of these guys which are stock replacement heads for 96 to 98 truck, three fifties, you can identify them by the Sawtooth pattern here on the end of the head,

they feature 64 cc combustion chambers with 194 intake and 150 exhaust valves and can handle valve lift in the 420 to 430 range. These things will perform great, be super reliable and only set us back about 300 bucks each

before you install them. Use a rotary tool or even a file to knock back. This sharp edge created by the milling process that'll prevent any hot spots from getting in the combustion chamber.

Our vortec heads are dropped onto new gaskets and get a new set of bolts to hold them down.

So when it comes time for fuel delivery, you've got lots of options. You can always go carbureted and get yourself up and running a little faster and a little cheaper, but let's face it. A

carburetor is just not as efficient as a fuel injection system. Fuel efficiency means fuel economy and the way gas prices are, that's something to consider, but that's not the biggest reason we want to go with this pro flow fuel injection system on our YJ, when we're off roading

and we're going up a steep incline, we just don't have to worry about fuel starvation issues.

Ours comes as a turnkey kit especially designed for a 350 engine with its own plug and play harness.

AC M controller, fuel pump, all the connections and sensors you need. But the best thing is that it requires no laptop tuning

to get your vehicle up and running.

The Pro

F manifold is based on the proven Victor Junior cast intake with the same air gap that's engineered to help keep the fuel charge cool going into the engine.

We'll drop in a performance distributor, he I unit from Davis Unified Ignition.

All right. Now we're going to clean up our valve covers and throw them on here along with some front drive accessories as well as deal with this fuel line. But when we come back from the break, we're going to show you what this fuel injected 350 is going to hook up to, to get the power to the ground

after the break. We'll marry our reborn small block to its new tranny and show you how to drop a Chevy drive train into a YJ. Stick around.

Hey, welcome back to trucks. If you're just joining us, we've stripped the shame out of this 87 YJ. And we're well on our way to redeeming its embarrassing reputation as a mall crawler.

So far we've gotten our fuel injected transplant ready to make some power. But what we're not going to do is make this engine to the stock transmission. Instead we're going to use this remand unit. We got from a local auto parts store only set us back about 800 bucks.

Now, obviously, these components are made for each other. So bolting them together is a no brainer. And since it's a whole lot easier to do with the engine, now, you definitely want to consider replacing some accessories like your starter, water pump and belts with new parts before you drop it down in the frame rails.

YJS didn't come with GM DRIVE trains, but there has to be a way to bolt up the new engine and tranny as well as for the new transmission to see the transfer case. Well, four wheel drive hardware had everything we needed with this swap kit that covers 87 through 95 yjs that are going to receive a 4.3 L V6

or small block V8 like ours. It comes with new engine mounting brackets, heavy duty hardware and isolators and a brand new aluminum radiator with an electric cooling fan and its own recovery jug coated headers, transmission mount with urethane isolators and this transfer case adapter

the adapter bolts right in behind the turbo 354 wheel drive tranny.

The next order of business is to remove the stock motor mounts and pedestals to make room for the two piece V8 conversion mounts.

The adapters are mounted to the block with the longest mount on the driver's side to offset the engine and make room for the front differential and drive shaft. Now, while the engine is out, we'll install the spark plugs and throw on the headers.

It helps to have a lift, but this can be done with jack stands and a cherry picker as well. We'll be floating the engine and tranny in place while we set the location of the transfer case back to stock,

the new mount goes in place on the adapter.

Then you can use your skid plate as a guide for setting the location of the mounting walls.

Nice

with the engine and trans located. The motor mounts can be tacked into place for a final fit test.

You can use the sock drive shafts to double check alignment and transmission placement. But this kid is well engineered and everything drops into place,

but everything fits really well. So Ryan and I are gonna pull this engine out one last time and finish burning in the wells on the motor mounts. But after we get back from the break,

we

get this thing one step closer to pulling its own weight,

stick around

up next. It's time to wake up our old junkyard dog.

Hell, yeah.

Hey, welcome back to trucks. We're bringing this beat up 87 YJ back to life with a healthy injected 350

we got a few other plans up our sleeve for this Jeep before we're done with it. But you're gonna have to keep watching to see how that turns out for. Now, we got some plumbing and wiring to take care of and we can hear this baby. Roar.

Now with our engine back in place and sporting our new pro flow manifold. We need to think about getting fuel up front. So we're going to tap into our yjs existing fuel lines for a couple of reasons that the right size they're in good shape and less time working in here means more time out playing in the dirt.

This system won't exceed 50 pounds of fuel pressure. So we'll just flare the factory steel lines and use the pressure rated hose that comes with the kit to make our connections.

It's important to mount your fuel filter ahead of the pump to maximize the filter's efficiency

and route your lines away from exhaust systems, linkages and any moving suspension parts.

This system needs the correct fuel volume. So we're using 38 id line to the left fuel rail,

but it also needs the right pressure, which is regulated here on the right side rail and any excessive pressure is just bled back off. It goes back to the tank.

You can run your harness through the firewall anywhere you want. But we wanted to keep the factory heater box where it belongs. So we'll make our bulkhead passage right underneath the main factory wiring grommet on the driver's side,

the pro flow ECU can be calibrated to your engine size and cam specs just fill out the forms and send in your engine information and they'll send you back a custom chip with a tune especially for your engine

mount up the inside portion of your harness out of the way and away from your foot pedals. Then it's just a matter of plugging in the other side of the harness and the engine sensors,

an 02 sensor is provided and gets mounted in the right bag header collector.

Who let's fire this thing up.

Oh, I hate when that happened.

Star connection is good.

Now, here we go. loose ground.

Really?

I should do it.

All right, let's try this thing again.

Well, that sounds good.

Well, now that we got some power to play with, don't think for a second or we're gonna leave this stock suspension or these lame wheels and tires alone. Next time you see this Jeep, we're gonna get some serious attitude.

You can't always count on the quality of diesel fuel coming out of the pump. A low grade of fuel can make your truck a little tricky to start.

Well, diesel power has just come out with this new performance improver and C 10 booster C 10 is the measurement of how fast diesel fuel ignites the higher the number, the faster the ignition and this will boost the C 10 levels in your tank by as much as 5 to 10 numbers. And what all that means is a quicker start.

Now, diesel power also makes this new anti

gel and fuel treatment. And I know from personal experience that when diesel fuel gels in your system. It can cost a lot of time and a lot of money to repair. And this stuff eliminates the water in your fuel and will keep you out of trouble in a cold climate.

Diesel power products are made by the same guys who make heat and stable and just 20 ounces of either their anti

gel or C 10 booster will treat up to 100 gallons. You can pick up either one of these for about seven bucks a bottle.

Hey, thanks for watching trucks. See you guys next week.
Show Full Transcript