Trucks! Builds

Parts Used In This Episode

CanDo Specialties, Inc
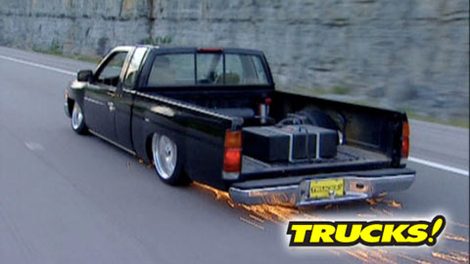
Tubular Nissan to Toyota conversion, A-arms and front bag brackets.
Flowmaster
Extreme Off Road Muffler.
Low Rider Depot
Firestone Air Bags, Air Zenith Compressors, dual needle guages, air valves, 7 gallon air tank, fittings, 1/2" air line & bag mounts.
Skyjacker
2 wheel drive lift kit with Platinum Coil-Over; Suspension Lift Kit; 6 In. Lift & Rear Springs.

Video Transcript

Today, we'll dig a project body bag to get our full on mini truck laying on its frame.

First, we'll install our bag, front end suspension and make room to tuck our twenties.

Then

we'll get the air suspension up and running so we can go out and lay frame for more sports than the fourth of July.

It's all here today on trucks.

Hey, welcome to trucks. Today. We are knee deep in our first ever full on custom mini truck.

This 97 Nissan hard body, we're calling project body bag. Well, our goals here are simple. We want a cool looking truck that tux twenties and lace frame all over the world.

We started out with a hard body that probably could have lived out the rest of its life as a regular truck. But that was all over when we hacked the rear leaf spring suspension off,

fed our own triangulated for

link sea notched the frame and lobbed about a third of the bed floor out just so we could get the drop we wanted.

So now that we're way past the point of no return, we're just going to keep on hacking until the front suspension matches the drop that we built into the back. And although this system is functional, it's by no means finished. We've still got bag mos to deal with shocks airlines to run. Not to mention the fuel system because our factory fuel tank was sacrificed to allow for suspension travel. But don't worry today, we're going to take care of all of that and hit the road, lay the frame, throw some sparks.

We're gonna drop the front end to get it ready for the air bags like in the back. But

before we do that,

we gotta get rid of the stock suspension.

So we're gonna start with the torsion bars.

We want to keep the strength of the frame and since it houses the engine, front suspension, steering and brakes, we can't be as aggressive as we were out back. And that means redesigning only one component of the front end, the suspension,

the stock front set up on our Nissan is this torsion beam suspension pretty easily adjustable. And you Nissan guys know that you can get a surprising amount of drop just by adjusting the preload on these torsion bars. It's usually good for a couple of inches. At least the problem with that is that the lower you go, the more your suspension travel and ride quality suffer

up until now we've been able to build pretty much everything for this project. But there comes a point in time when you got to buy some stuff. So we called Lowrider Depot and had them send us among other things, this trim to fit kit for a Nissan. It comes with upper and lower mounting plates, front and rear

gussets to add strength

shock mounts

and these torsion bar elimination plates that weld into place and add stability for you guys that want to keep the stock Nissan lower arms. But unfortunately, that doesn't solve our issue with our Nissan six lug spindle up front. So what we're going to use is the world's first system specifically designed for these hard bodies. These custom made tubular upper, lower

control arms from can do specialties. The upper arm just mounts right into place in the stock location.

The lower arm is pressed into the lower bushing sleeve. But the best thing about them is that they utilize these Toyota ball joints and that allows us to use these bel

tech two inch drop spindles that will allow us to retain our consistent five lug pattern and give us the wheel and tire selection that we want.

The upper shock tab also needs to go away to give us the clearance we need for suspension travel.

So what are we doing in the fridge? Well, our next step is to press in our lower control arm shaft and by putting it in the freezer, it shrinks it slightly and makes it easier to press into the bushing sleeve.

Can dos kit comes with guests. It's especially made to fit our truck that'll give us back the stability we lost without the strut bars,

unequal length. Lower arms are pretty common in the street rug w

and definitely the ticket for supporting the load of our front suspension with heavy duty construction and urethane bushies. If you guys go the route we did with a junkyard rear axle, get them to send you the stock front hub assemblies. Dealerships always charge more for the unforeseen parts you're going to need like caliper brackets, dust, shields, bearings and rotors

for wheels and tires. We threw down with these race line two piece 20 by 8.5 inch aluminum wheels that have a 6.5 inch back space. Now we've wrapped them with these NTO directional 2 35 35 ZR twenties. They are going to look great. Now, all we got to do is make them fit.

Yeah, that's it.

We knew that was gonna happen because you just can't expect to put this big of a wheel and tire combo inside a stock wheelhouse, but we got some help for that.

Well, you guys remember Eric saliva

from the little shop of horse. Well, you offered to come by and help us with some of the hacking on project body bag and I see you got your weapon of choice with you too. Got a grinder with a six inch cut off wheel, make some relief cuts in the fender for the 20. Speaking of relief for the twenties.

Yeah, it's a trailer fender here. Uh, we know we're gonna be in the firewall. So we had to have something to, to block it now. So it's just a small tub.

You can buy one for about 20 bucks. So, saves a lot of money. Well, before we can start hacking this thing up, we got some interior to pull out of it, don't we? All right. let's get to it.

We knew it was going to be a ton of fab work to tuck twenties when you have to relief your firewall. Like we do make sure you strip everything bare of all the insulation, wiring and plastic. So you can see what you're doing and you don't burn down your project.

Trimming for the wheels to tuck is done a little at a time. So make sure you're fitting with the tires you're going to run with and you better get used to throwing those hoops around too.

You can use the radius of your tire to trace your cut lines.

Eric Whittles about an inch at a time again and again

and again, until we've got all the clearance we need.

Every action has a reaction. Tuck and twenties means there's no room for the stock brake booster. But don't worry, we got a plan that we'll show you later on.

All right, let's see what we got.

Yep. There it is. Let's see this thing on the ground.

Well, the last time you guys saw a body bag on all four wheels, it looked something like this,

but now check this out.

Well, we're going to take a short break, but when we come back, we're going to mount our bags and finish out this air system. Stick around.

This is on the ground

with our frame on the ground. It's time to get our air bags installed so we can breathe some life into them and resurrect body bag stance. Stick around.

Hey, welcome back to trucks. We're lowering the altitude on this 97 hard body creating the foundation for a cool custom mini truck. We've got a frame lane on the ground and we're tucking twenties. Now it's time to put in an airbag suspension.

Air is usually the system of choice for people that are building this kind of truck, but it's not the only choice guys have been putting hydraulic systems on vehicles since the fifties. Now, hydraulic systems are designed to handle extreme pressure since the fluid can't be compressed, which makes them perfect for brake systems. But for suspension, it can get a little harsh and you usually have to engineer some sort of ride control with springs or shocks around the hydraulic

air. On the other hand, can be compressed and will absorb energy. So for us using air springs like these Firestone 2500 pound air bags is going to give us the perfect combination of a smooth ride and major adjust ability. So we're going to use this whole system. We got from Low Rider Depot.

We're using half inch lining to all the fitting switches and gauges. We need to monitor the system and pushing it with these two air zenith compressed

that have a 100% duty cycle and a 2.8 CFM flow rating. Just one of these are designed to fill a five gallon tank in a minute and a half. So two of them into our seven gallon tank, that'll get us back up to pressure in a hurry.

But right now, we got to get these front bags mounted

to get the best lift out of our bags. We'll set the mount in place on a fully compressed air bag, mark it

and burn it in

the lower bolt hole is drilled about a half of an inch offset to the inside. So the bag won't get stressed or pulled right height.

All right, with our bag mocked into place. This upper mounting plate is not strong enough by itself to support the suspension load here. So it's going to have to be reinforced.

So what we did was make this three piece gusted that's going to give us the reinforcement and the strength that we need for that upper bag mount. And we drilled and tapped these four holes so that we can remove the center section if we ever have to replace or serve as that upper control arm.

We also solved the problem we had with our stock power brake booster by replacing it with this 6.5 inch diameter unit from a Geo

Metro. That way, when our wheel cameras up and in, when we're fully laid out, it doesn't contact the booster.

Well, that just about takes care of the front suspension, we're going to take a quick break, but when we come back, we'll take care of those rear air bags and the rest of the air system, get this thing a little bit closer to laying out on the frame, stick around.

Coming up next,

body bag gets the rest of its air system.

And later,

we're going to the drags

frame dragon.

Hey, welcome back to trucks. We've shifted our focus to the back of the hard body so we can take care of the rest of the airlines and the rear bag mounts. Now, one of the loose ends we had was our Nissan drive shaft and our Toyota rear end. So what we did was red drill, the Toyota yolk to accept the Nissan bolt pattern and that took care of that.

Now, to mount our rear bags, we need to see where a truck is going to be with it fully slammed.

Now, the problem with that.

So now we have a clearance issue between our drive shaft and the cross member that we made. Do you know what that means?

Another sea notch?

So how much extra clearance do we need? Well, right now with our truck on the lift, the frame is about 23.5 inches off the ground.

The bottom of the tire where it would meet the road is about 22 and three quarters. So really, we're only three quarters of an inch from laying frame. If we were rolling on eighteens, we'd already be on the ground. But like we said before, we want to allow ourselves enough room to go to a larger wheel and tire size later on.

So for our drive shaft, sea notch, I'm gonna use this piece of quarter inch steel. I found on the scrap pile. We know we need about an inch. I'll go ahead and mark it, cut it out and weld it in.

That'll give us a clearance we need for our drive shaft at full drop

with our relief cut out. We've got plenty of room to fully drop our truck and now with our cross member strength and we can mount our upper and lower bag mounts.

Again, use a fully compressed air bag to mark and drill for the rear mounts. You don't ever want to use your air bags as a bump stop. They should be placed where you're not in danger of riding on a deflated bag.

The reason we use square tubing on the lower links is to have them support the rear bags. You get a fixed amount of lift out of air bags. So let leverage work for you by mounting towards the front of the lake.

For a rear shock mount. We used the tube shark and bet up some one and five eights inch suits and

fed up a bar to hang from the sine.

We picked up a set of shocks at our local o'reilly's to mount out back and set them up to be fully compressed at maximum suspension drop.

Another reason for using shocks on the back is that with a single inlet and outlet valve, air transferred between the rear bags is possible and that'll cause pretty drastic body roll and two shocks will keep our hard body level in the corners

out of all the stuff we got from Low Rider Depot. We've made up our front and rear systems out front. We've got a single inlet from the tank using separate valves for up and down for each side

out back. We've got a single inlet, one valve for up one valve for down. We're also using these double needle gauges. This one will monitor left and right front air bags. This one will monitor air tank pressure and the rear bags.

One of the cool things about any custom vehicle is that there just aren't many rules and accessories like air tanks and the compressor's location is up to you and whatever style and look you want to achieve.

Ours will sit at the front of the bed on what's left of the floor and, hey, let's face it. This truck's days of light duty hauling are over.

Well, we're gonna take a quick break and get the rest of these airlines routed. But when we come back, we'll throw the fuel system in this truck, take it out on the road and drag it. You don't wanna miss that.

The sparks are going to fly

as body bag cut those big 20 s

and hits the pavement.

Hey, welcome back to trucks, man. We are so close to getting our truck ready for the road to see our rolls and our rails. One of the last things we got to do before that happens is to mount our fuel cell and our electric fuel pump we got from summit.

The pump will sit under the bed,

it gets plumbed with our own custom fuel line and a and fittings

is wired into the stock circuits

and then connected to the factory metal lines under the cap.

The front valve assembly is mounted in a safe location behind the lower radiator support. Then it's wired up to the harness for the switch box and the half inch airlines are pushed into the valves. If you're planning to drop your truck onto the pavement, like we are protecting your air system is pretty high up in the lid. So we weld it in a skid plate up front just in case.

Now you might notice that we're putting a brand new set of fenders on this truck. There was nothing wrong with the original two wheel drive fenders, but these four wheel drive fenders have a deeper pocket and let's face it. We need all the wheel and tire clearance we can get trying to turn corners with these big twenties.

All right. Try that

half inch airlines man.

Well, the air system checks out great. Looks like body bag is ready for the road. So me and Eric are gonna go catch up with his buddies

some fun.

Well, as you can clearly see, our goal of laying frame while we're tucking twenties has been achieved.

The air system worked flawlessly no matter how stupid we got with it.

What what do you say?

It's railing, man. It's railing. Big time

added benefit of an air system is the ride quality. You get over stock springs and shocks.

It really rides smooth with surprising control and cornering. Well, there's 1/4 of July Spark show too.

We're laid out, man. That's it. We're riding on the rails, buddy.

We're working the heck out of this system and it just keeps on kicking.

There's great control and fast recovery. Not to mention the jaw dropping stance that you can only get on air.

I don't get. No,

it just doesn't get any lower than

and don't think this is the last you've seen in this truck either. How about suicide doors, shaved handles, graphics paint. Keep watching for us. A resurrect body bag suit.

Is that mission accomplished or what?

Well, here's an interesting twist. What about a muffler that doubles as a skid plate for Jeeps four by fours and suvs. Well, this is Flow Master's New extreme off road muffler.

Now check this out its diamond plate case is made out of 14 gauge steel

that's 27% thicker than that of the regular 40 series car muffler. Now 27% may not seem like a lot but the crush resistance of this muffler is 15 times greater than that of an Oe muffler

inside. It has Flow Master's delta flow technology that delivers more power and torque as well as that awesome sound. But this one won't tear up on the rocks. The street price on Flow Master's new extreme off road series muffler is about 89 bucks.

I know you guys have seen us put Skyjacker lift kits on four wheel drive trucks, but now Skyjackers making their kits for two wheel drive F one fifties.

This is a true six inch suspension lift that includes Skyjacker's platinum series front, soft dried coil and shock assembly C and C machine steering knuckles. And this unique design features a high clearance front cross member. The kit comes with rear A

leas, but you can upgrade to the soft dried rear springs. This kit fits 04 to 062 wheel drive F one fifties and requires no cutting welding or grinding and they start at about 1900 bucks. Thanks for watching trucks. See you guys next week.
Show Full Transcript