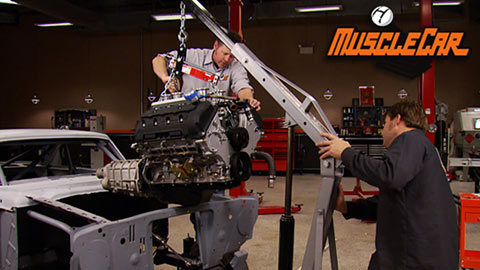
MuscleCar Builds

Parts Used In This Episode

Maxima Technologies & Systems
Electric Power Series - Titanium 6 Instrument Box Kit
Summit Racing
Tilton 75-Series Universal Master Cylinder Kit
Summit Racing
Tilton Overhung Pedal Assembly
Summit Racing
Trans-Dapt Performance Cable Actuated Throttle Pedal Kit
Nitro-Plate
Aluminum Ceramic Coating of Headers
Nitro-Plate
Satin Black Ceramic Coating of Exhaust System
Very Cool Parts
Tall Velocity Stacks

Video Transcript

Today on muscle car, we dropped the heart into alter ego and add more custom touches with a set of race pedals and old school gauges. Plus how two brothers revived this numbers matching barn.

Hey, welcome to muscle car. The body work on our A FX car altered ego is all done.

Today, we're gonna take care of a few final details like the gauges, clutch and pedal assembly and then slide in the power plant. This entire project has been about building a drag car. The old fashioned way, obviously, with one exception, we're gonna be using a Ford fuel injected 4.6 mod motor. It's then put down almost 500 horse on our

dyno. But to hold on to that old school vibe, these stacks are gonna have to head north

all the way through the hood

when it comes to under appreciated components. One of the most overlooked and important parts of your setup are the foot controls. Your life literally lays in their engineering

and installation. This Tilton racing style pedal assembly has a built in mounting bracket for the master cylinders. We also picked up a universal floor mount gas pedal. This entire setup came from summit. Once mounted, we'll be able to control our horsepower and our stopping power.

Our two pedal set up uses three master cylinders, one for the clutch and two for the brake. Since they're all the same size, I'm only putting one in place for moa.

This assembly doesn't come with mounts so it's time to come up with a game plan. I

fed up some mounting tabs using some eight inch plate. The one on the driver's side is gonna be made from two pieces since my brake isn't strong enough to bend this heavy steel. Our sheet metal brake, like most auto shop brakes is designed to bend up to 16 gigs. So any thicker has to be done in two pieces and welded together.

The pedal assembly needs to be mounted directly to the road cage so it can be as solid as possible. I'm welding the left side bracket directly to the cage, but the right requires an extra piece of dom tubing.

All of these mounts will be welded solid, but the pedal assembly will be bolted to these brackets so it can be removed for maintenance.

All right, the mount is solid and there's no interference. I could go ahead and mount the reservoirs and master cylinders, but there's really no need until you're ready to bleed the brakes. So I'll leave them out and give us some extra room when I'm out in the cages. As for the clutch Well, we need a transmission, so I'm done for now.

Hey man, I got this gas pedal ready to go in. You wanna take a break? Shoot.

Yeah. By all means, I'm out right on.

The nice thing about universal parts like this pedal is you can mount it however you want

for comfort. We're putting ours at an angle so we can mash it to the floor easier.

I prebuilt a mounting pad that will be welded to the floor, the pedal will bolt the plate and can be easily removed

for now. I'm just mocking up the pedal when you put it in. For real, I'll use lock nuts so it doesn't go anywhere.

And while most modern engines use a computer controlled drive by wire accelerator, the fuel injection that's been installed on a 4.6 uses a traditional cable type accelerator. Now, once we get the engine installed, we can measure it out for the cable

after the break. Looks like we're gonna need a shoe horn and later a rare GTX that's grabbing a lot of attention.

Hey guys, welcome back. It's finally time to drop the heart into our wheel. Standing beast. We chose this modern Ford 4.6 because it can pack a lot of power in a lightweight package

but still can be built to have that retro look we're after now, these motors are capable of up to 2000 horsepower, but alter ego is built to reflect the time when numbers like that were almost done,

heard of. So we kept ours at just under 500. Anything more than that would require a stronger, more modern chassis. And that just wouldn't work with our nostalgic theme.

This is the first time we've tried to drop the real engine and transmission into this car. And let me tell you full mockups are a lot lighter and easier to handle. We're gonna have to go kind of in and up. We're in and down,

get

back, hold it, hold it

and to tell you what,

let's just cut this out, dude.

Yeah,

it'll save us a lot of hassle. Yeah. They used to do that to them to try five

Chevy all the time.

Jesus

is your

rache

from the factory. The core support was a structural part of the car, but our comet is a long way from the factory and all of our bracing more than makes up for what I'm cutting out

just when you thought we were done chopping this thing up.

Can we come on down with it?

And,

ok,

all this in

it probably go right there.

Sure.

With the motor mounts lined up, the transmission mount should drop right in

our hand fab headers look better than ever with their nitro plate coating

the piece I cut out earlier will be easier to remove. Next time I attached mounting tabs on the centerpiece and welded nuts to the backside of the core support. So, the whole thing unbolts with four allens,

we knew our stacks would be too short and now's a good time to see how much more height we're gonna need. Careful. We don't stretch paint job.

Yeah. These things lacking a little bit of link I say probably about right there. Yeah. W with

very cool parts. He built these originally. So, if we get a hold of him, I'm sure he'd hook us up with another set. Cool. I'll give him a buzz. See what he can do. I'll go and get these. All. All right, cool. I'll get the exhaust put on and get started on the dash. Sounds good.

And you guys have seen nitro plate ceramic coating on a lot of parts that we've used around here including the headers that we just bolted on to alter ego. But this is the first time we've ever used their black coating.

It's tough resist rust increases airflow and reduce his radiant heat just like their

iIn coating. Main difference is this is a lot more subtle.

One reason you may choose the black over the aluminum is the black is rated at 1700 degrees where the aluminum is rated at 1300.

Now, this makes it ideal for turbo and supercharged applications.

We chose it because we just think it looks cool.

Altered Eagle's chassis is just about done,

man. She's looking good

coming up a Canadian Plym pack in real American muscle. And later, why? Nine inches is better than four.

Today's flashback. A 1971 Plymouth GTX 440.

You've all heard of great Barn finds? Well, the Schroder brothers found the 71 gtx in their own barn.

It all started when Lars and tour bought it in the eighties. When they were just a couple of wide eyed teenagers, we were doing some detail work. Finally put the engine in the, in the car and

cranked it over and

didn't realize that

was it. The lifters. We got a solid lift cam and we'd put hydraulic lifters in. So we bent some push rods right away, frustrated.

They left it in their dad's barn where it sat for 20 years

in 2007. They finally decided it was time to finish the job. It's a good thing they did. This numbers matching car is one of just 100 and 35 made that year and one of the few built in Windsor Ontario

in

case you couldn't tell.

Yeah. Lars

and Tour are Canadians.

Hey hosier, check this out. Hey,

the 440 is packed in six barrels of fire power under the hood capable of pounding out 385 horsepower. It added 15 horses to the standard 440.

Now, once again, the

hemi

option was available at a whopping price tag of 750 bucks.

The lighter weight and price of the 446 barrel made it a very desirable choice. 71 brought a whole new level of styling to Plymouth mid size satellite which the GTX was built on

a fuselage look transformed the car into a streamlined piece of muscle with the horse collar, front bumper,

sculpted body panels and a sloping fast back route painted in the one year only color curious yellow. This car is like a highlighter rolling on four wheels. Now inside it's got the tough steering wheel which had a smaller diameter and thicker grip for race like handling, heavy duty suspension was standard all rolling on six inch steel wheels with wide oval rubber. It's wearing a set of

red line radio

because it likes to be driven

introduced in 67 as Plymouth's first all in one muscle car package. The GTX soon played second fiddle to its sister car, the road runner.

It was essentially just a spruced up version of the

Mimi car with deluxe interior chrome rocker moldings and a 440 as the base engine with no cool cartoon mascot and a higher price tag. It's no wonder the GTX was often overlooked.

Sales hit an all time

low

of 2942 and 71.

This marked the last year for the GTX as its own model, but the name lived on as an option on the road runner.

When Lars and Tor restored the car. They weren't expecting a whole lot of attention,

but they sure got it

the car was invited out to the S

A

show in Vegas as a prime example of Mo

car performance. So what kind of advice do a couple of Canadians have for American muscle car fans?

Never use snow tires. When you try to do a burnout

up next, rick shows you how to make your own custom gauge cluster.

You're watching Muscle Car for a DVD copy of this episode. Just go to Power Block tv.com and order your copy for just 595 plus shipping and handling. Start your own muscle car collection delivered right to your door from the power block.

Hey guys, welcome back to Muscle Car in 1964. A lot of cars like ours came straight from the factory with a full set of gauges. Now, they may have look cool, but they weren't always accurate. Well, technology has come a long way since the sixties and nowadays, thanks to companies like Stewart Warner, you can get a classic looking gauge with modern internals.

The first thing I need to do is make sure the gauges are actually gonna fit.

It looks like we're in luck. So I'll start transferring my measurements to a template.

I want to make this as wide as I can. There are gauges

about 3.5 inches.

So it's gonna be a fairly tight fit in here anyway.

So if I can get

the back part of this, about four and a quarter,

it'll give us about three quarters of an inch, which is 3/8 of an inch on top and bottom

to the bezel. So that'll go in the

room four and a quarter.

And that will give us the flat piece for the gauges to actually set it into

using a sheet metal brick on cardboard, may seem like overkill, but it gives the precise bends I need for an accurate template.

The closer the mockup piece is, the better the final piece will fit

from here. It's a lot of trimming and fitting,

make small changes until it drops into place. Then you're ready to transfer the template onto some steel.

I'm using 18 gauge. It's easy to hand trim and there's really no reason to use anything thicker for a non structural part.

A

break can't bend opposing angles. That's so I split the design into three pieces that will be welded together after the bends are made.

Just take this a little bit at a time

just like I did with the cardboard. I'll make small changes and test fit as I go

and I wanna build something to fill in these edges.

I could tack weld this from the backside to keep the front clean.

But I think the welds match the raw handbuilt look of the car. So I'm leaving them

after making sure it all fits, I can trim the edges and mount the gauges

to make sure the gauges are spaced properly and level. I'll mark the center line of the panel and use that as a guide

from there. I can set them in place and find an arrangement that not only looks good

but will allow the mounting brackets to clear one another on the back.

Now, once I have a layout that works, I'll mark the positions and start cutting some holes. I have a hole saw the correct size for the small ones. So these are easy.

The big ones, that's another story to cut them out. I'll start by drilling a pilot hole, then finish the job with an air saw

time to see what all my hard work has brought me.

Yeah. Now that looks nice. I'm not gonna clamp it all in place yet because I still have to paint the panel. But once we get the harnesses installed for the body and the engine, then we can use the wiring and the sending units for the gauges, get everything hooked up and finish out the install. So for now

we're done

earlier in the show, we talked about swapping out our velocity stacks for some taller ones that would stick through the hood. They not only look better, they'll increase low end torque. And since it's got the same flange as the other, we can go ahead and bolt them on. See how they look. These nine inches came from the same guys who made the four inches very cool parts.com,

they specialize in fuel injection stacks. And intakes for just about any set up.

I got it. Oh, yeah, we're good.

See how this dude looks and I think it's gonna be a little tight but I think it'll work, especially since we're gonna use pins instead of the hinges.

Yeah,

we don't need no stinking hinges.

Oh,

dude, that looks sick right there.

The exhaust, the stance, the big and little on the hauler

brands the in your face. Roll cage, dude, this thing screams a fl yeah. But man, it's far from done. Yeah, I think what it needs now is a little blue candy over some flake and maybe some white pearl that looked nice. But you know what, for this week, right? A time. So until next time we're out of here.
Show Full Transcript