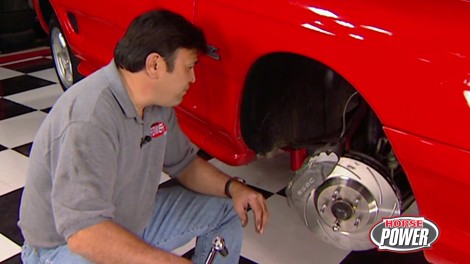
HorsePower Builds

Video Transcript

The Scarlet stallion is back for a big break in suspension upgrade this time. Hold your horses and hang with us

today on horsepower TV.

The stallion comes galloping back this time for a set of massive brake rotors and four piston calipers

plus high performance shocks all the way around

and improve control arms in the rear in addition to Cobra rims and new wide rubber.

So hang on for horsepower TV.

Welcome to the horsepower shop where this week we're gonna get back in the saddle and back to work on Joe's Scarlett stallion.

You know, Mustangs are a popular platform for any one of a number of modifications from drag racing to road racing and well even treatable show cars like this, Shelby GT 350 here. Now, this one has a hot solid lifter 289 under the hood and it's back by a top loader four speed and a nine inch rear end.

Of course, the suspension has also been

52 to lower the center of gravity and really help this thing stick to the road.

Yeah, this thing is nothing but fine. Of course, I'm not planning to take my 94 GT to the track any time soon. That is.

But as you recall, we started our build up on this Scarlet Stallion last week under the hood. Now, that's when we installed a cold air kit, a

bigger throttle body,

an adjustable fuel regulator and a set of power pulleys.

Plus we upgraded the ignition

and installed a cat back exhaust.

Of course, with more horsepower, we gotta have a way to rein it in. So today, we're gonna improve the braking with this force 10 extreme kit from stainless steel brakes,

at least slotted rotors measure a massive 13 inches up front.

And with them, we're using aluminum four piston calipers plus a set of carbon metallic pads.

Now, braking is all about turning kinetic energy into heat

in the system here ought to be enough to

slow the mustang down and uh make a contribution to global warming at the same time. Well, at least you're not cutting down the rain for us. Now, we chose these calipers for a good reason. Just check this out. These four pistons are gonna apply pressure to the pads a whole lot more evenly. And of course, that's gonna give you a better pedal feel and allow you to modulate your brakes for better performance. Now, when we say we get the mustang in the air, get to work on it, let's do it.

After removing the front wheels disconnect the brake lines

and on both the stock caliper,

then slide the rotor off the hub

with 100 and 26,000 miles on it. The shocks and struts on Joe's Mustang here are getting pretty tired.

So while everything's apart now is a great time to go ahead and replace them. Of course, shock technology has come a long ways even since the time when this car was new. And well, the Edelbrock Ias shocks use this special inertia valve to change from soft and firm settings to instantly adapt to the road conditions.

Use a floor jack to support the lower control arm,

losing the lower strut nuts, leave the bolts in place and move the A Bs line out of the way,

use an impact wrench to remove the upper strut nut,

then remove the lower strut bolts and finally the strut itself.

Well, we're gonna go ahead and just reverse the procedure to install our new strut shocks. And of course, once everything is in place, make sure that you torque all the nuts down to the recommended specs.

These new rotors come with a protective coating on them that you need to remove before installing them. And we're gonna handle that with some of this brake cleaner.

Now, while Joe's cleaning up those rotors,

I'm gonna go ahead and install this caler mounting bracket to the spindle using the hardware that comes in the kit

and let's get these bolts snugged down. We'll go ahead and torque them to 90 ft pounds,

ok. The rotor just slides over the wheel studs.

I'm gonna hold it in place with one of these new lug nuts. But, hey, first, how about a little comparison?

Here's the stock rotor up against our new 13 inch from the Force 10 kit

who says size doesn't matter?

Now, I preassembled these calipers with new pads and pins and before we bolt it up, we wanna make sure that we check the bleeder screw. So that's at the top part of the caliper when it's bolted in position here. Now, that's gonna allow us to evacuate all the air out of the system when we bleed the brakes. Now, this one is for the passenger side

after sliding the caliper over the rotor, attach it to the mounting bracket

and torque the bolts to 45 ft pounds,

then install a new flex line between the caliper and the frame mount

and torque the banjo bolt to 20 ft pounds.

All right, that looks good.

Now, once everything is all bolted up, you want to go ahead and turn the wheels lock to lock to check for any binding interference or any strain on this brake line here. Ok. Joe. Come back the other way with it.

Um,

ok. Now, the front brakes do the most work, but we are gonna upgrade the rears as well. Now, the mustang comes from the factory with four wheel disc brakes,

but we can improve their performance with the stock size rotors that have been slotted

to dissipate the gasses generated by the pads.

And while we will keep the stock calipers,

we can upgrade their pads with these carbon metallic pieces. Now, this is a similar material that's used by those NASCAR drivers.

After you get the caliper out of the way,

slide the rotor off the axle

and install the new rotor.

There we go.

And of course, after you install the new pads into your stock calipers,

you can both the calipers back up torque the boats to the recommended specs and that's about it.

Well, we recommend you stay tuned for these messages. We'll be right back after this

just ahead. We'll swap the stock rear control arms for some high tech improved pieces.

We'll upgrade the rear shocks before bolting up some new chrome cobra wheels and massive meats.

Hi. Welcome back to the horsepower shop and more of our breaking suspension upgrade on the Scarlet Stallion here. Our latest project car.

Well, we put the pony down on some jack stands to finish up this project. But so far we've installed a stainless steel brakes force 10 kit up front that includes 13 inch rotors, four piston calipers and carbon metallic pads.

Now, while we were at it, we also swapped out the stock struts for some edelbrock ias pieces.

Yeah, out back here, we retained the stock brake set up, but

we improved its efficiency with some slotted rotors and some pads to match the front and next, we're gonna bolt up a set of Edelbrock shocks plus a set of their lower control arms. But before we can get rid of the stock control arms, we're gonna have to drop down the exhaust so we can get to the front bolt that's located right here.

Say, well, my partner's lying down on the job over there, check out these replacement control arms that are engineered from rectangular steel tubing

to eliminate flex. And they have these polyurethane bushings to minimize deflection during acceleration and hard cornering. That one feature of this set up I like is the fact that the bushings are Grez and

they'll

get rid of that suspension squeak that's common with urethane.

Well, I haven't been laying down on the job the entire time. In fact,

I've got a couple of tips that'll make this installation go a whole lot easier.

Now, you wanna only work on one side of the differential at a time, so everything will keep in position and it won't rotate out of place and also give all your attaching bolts a little shot of penetrating oil.

That way they'll be easy to break loose,

start by removing the sway bar.

Then after supporting the rear of the control arm with a floor jack, remove the rear control arm bolt.

Now, carefully lower the control arm with the floor jack to

take the tension of the spring.

Now you wanna make sure that you note the position of the spring here on the lower perch before you remove it.

Now, this is important because when you reinstall that spring,

any change in position is gonna affect your ride height.

Now you can remove the front bolt

and the control arm itself.

Well, it looks like you've been kind of busy. You bet I've done my job and now I guess it's time for you to get your hands dirty. Well, all right, I plan to, but right now I wanna show you the difference in that stock stamp piece that Chuck just removed and our Edelbrock replacement

because it doesn't take a genius to see the difference there. Now, this thing is gonna keep the rear end properly positioned, eliminate wheel, hop and, uh, Hippo Scarlett there hook up. Now, first thing we wanna do is install one of these steel sleeves from the kit

into our bushie.

Then install the front boat, first

position the spring onto the perch,

raise the back of the control arm into position

and reinstall the rear boat.

We torque all the boats to 70 ft pounds. But first,

I wanna make sure I give them dab a thread lock to keep them secure

after this. All that's left is reinstalling. The sway bar

looks like that went pretty well under there.

Now, we still have to install our grease, search on the control arms and give everything a shot of grease. But later on, we're gonna bolt up a new set of shocks and some new wheels. So, stay with us.

Hey, don't let your lug nuts.

Hey, welcome back to the shop where we're putting the brakes on Joe's Mustang here, but we're not stopping yet.

After bolting up a set of Edelbrock lower control arms, we're gonna finish the job off out back here with a pair of their is shocks.

Now, the first step though is to get inside the trunk here so we can loosen up those upper mounts. And once Joe gets the top up, we'll have a little more room to work back here.

Well, the bottom mount is a through boat right down here on the rear end.

Once I get it out,

this whole shock will fall right out of place.

Now, before we can install these shocks, we need to secure the boots with these plastic ties that come in the kit.

Here we go. Now these boots are gonna keep dirt and grime off of that shaft and ultimately protect all the seals in there. Of course, once we get done,

just throw these rubber grommets on here for the upper mount.

Well, here you go. Now, what do you say? We double team this job. Get it done in a hurry. You stab it in from the bottom. I'll get the nuts started here on top. We got you covered

there. We are.

Well, that takes care of the shock installation. Now, after we bleed the brakes, this whole upgrade will be handled.

Speaking of handling,

when will you see what we've got to take advantage of the improvements we've made,

you know, adding those big brakes up front meant that we also needed to go with a large diameter rim to clear those monster rotors and calipers. Now, what we did was ordered a set of these five lug chrome cobra wheels from classic motor sports. Now, these things measure 17 by nine inches

and they have the right offset to clear the steering linkage and struts. Plus this big concave area here is gonna give us plenty of room around those monster calipers.

We've mounted our cobra wheels on a set of Yokohama A VS four tires in a 2 55 45 17 size.

Now, their design is inspired by years of involvement in racing

and that's pretty evident with this massive tread width, the square shoulders and a tread design that offers optimum handling in wet and dry driving conditions.

Now, these things are gonna put up huge footprint on the pavement

and since they're the same size, all the way around, we can rotate them for maximum wear.

All right.

Well,

yeah, we've made one proud looking pony out of this thing. I can't wait to get it on the street. Well, you know, we still have to bed in the break. So what do you say we take advantage of this pretty day? Hey, I'll get the top back. Good deal.

Now, the brakes need to be properly bedded in for the best performance and the way that you do that is to make a few normal stops first.

Then let your brakes cool down, then repeat the cycle getting a little more aggressive each time. Oh, and don't forget to let those brakes cool between each cycle and, well, let's see what we got here, Joe.

Yeah.

Well, let's say we got a real thoroughbred on our hands here when it comes to Halling, handling and leaving. Coming to a hall.

Hey, we're gonna stop right now for just a minute. But we'll meet you back at the shop right after this.

Coming up a cool way to measure the RPM s in our beefed up horsepower Honda. Stay tuned.

Yeah.

What a ride almost didn't want to come back.

This thing is a whole different car, isn't it?

Hey, welcome back to the horsepower shop. Well, it's time to put the old Mustang back in the corral and turn our attention to our Tuer project. Now a few weeks ago, we picked up that 94 Honda Civic as a budget build up. And so far we're doing all the modifications to it with an $8500 budget. And of course, that includes the price of the car.

So far, we spent most of our money on good looks and power. In fact, this thing's even got a nitrous kit on it. But you know what? We need a way to keep track of that power in the engine. Now, this Honda came from the factory, uh, tackler, so to speak. But you know what, today we got a remedy for that situation.

I know, I know exactly what you're thinking. Why do they need such a large tack for such a little car? Well, it's no secret that small engines are capable of high RPM. S and well, a large face tack like this one will make it a whole lot easier for you to keep up with them.

Now, we're gonna install this auto meter Phantom tech.

It's got a white face for a contemporary look. A 10,000 RPM range and a built in shift light. Oh, and check this out. The controls are right up front here making it easy for you to change those settings. It's a great feature.

Another feature I like about this tack. It's calibrated at the factory

to work with eight cylinder engines. But if you've got a six or even a four cylinder engine like the Honda, well, all you have to do is clip one or both of these little wires in the back to make it compatible with your setup

instructions will tell you which one.

Now, the first thing that we want to do is find a suitable mounting location for the tack. There you go. All right, thanks a lot.

Now, you wanna keep it easy to read without obstructing your view of the road

and this, a pillar

is a pretty popular place and I think it'll work pretty well for our civic too.

Now, what we need to do first is remove this bottom bracket here and we'll attach it to the A pillar

with a couple of sheet metal screws.

Ok. Now, we just reattach the tack to the base here,

making sure it's in an easy read position.

Once I get this thing snug down,

we can start hooking up some wires,

there are only four wires to hook up. Red goes to a 12 volt lead that's hot when the ignition is on white to a dash light source black to a solid metal ground. And this green one that goes up to the ignition

a few weeks ago, we installed an MS D sport compact ignition on our Honda

and it's got a tack port right here on the side of the box. Now, all we have to do is take our green wire

and plug it in

right there.

Well, now that we got the wiring all handled, let me show you how the shift light works

to display the shift point just to press this red button

and to change the shift point,

press and turn the shift set knob.

There we go

and to double check it,

just press the red button again.

Now, for demonstration purposes, we've got our set at 3500.

See what we got here.

Horsepower TV

S hot parts is brought to you by Wyotech,

the nation's premier technical training school.

Hey, now, if you want to make maximum power, you've got to contain your compression

and to do that. Well, you need a good seal. Now, these multiple layers steel head gaskets from Mr

gasket

use two nitrile coated and embossed outer steel layers that sandwich yet another steel spacer between them.

Of course, the result is superior ceiling,

improve fastener, torque retention and reduce cylinder bore distortion.

Now, they work with any iron and or aluminum combination and hey, to get a set of those, you can order them right out of your jags catalog.

Whether you spend riches for a living or just on the weekends, you'll find plenty of uses for these valve train trays from jazz products.

Now, they're made from a durable space age plastic with handy handles on the ends of them. Now, the rocker tray has compartments for things like your push rides, lifters and of course rockers while the valve tray holds your springs, locks and of course valves, the price getting organized like this

about 25 bucks a piece. Well, keeping your cool, just got a whole lot easier no matter what your space limitations are.

This gen two compact cooler from vintage air fits into the smallest of spaces making it ideal for street rods, mini trucks and well even sport compacts. Now, what makes this whole deal work? Is this ultra compact heating and cooling unit here

that features, full temperature control and true bi level operation.

Now, the kit comes with a compressor, condenser hoses and of course, all the hardware that you need to make it work.

Now, if you want one of these,

you're gonna need about a grand in cold cash. Yeah. Well, you're gonna need to tune into our show next week to see what cool things we're up to. Here's a little sample,

we'll show you how to spray your way to more horsepower in your late model F body with a 125 horse nitrous kit. Of course, we'll mash the gas on our

dyno Jet to see how much power we get at the rear wheels. We'll close the lid on our budget Honda project with a front face lift

before we wing it out back for a truly tricked new look hot wing.

There you go. Thinking about food again

for information about the products used in today's show and more. Check us out online at horsepower tv.com

Horsepower TV is an RTM production.
Show Full Transcript