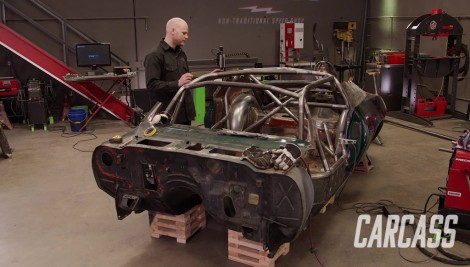
Carcass Featured Projects

Carcass Builds

Parts Used In This Episode

Episode Transcript

(Jimmy)>> You're watching Powernation!

(Jimmy)>> Today on Carcass we work on strengthening our '72 Camaro's body with a fabricated roll cage that will also keep us safe.

(Jeremy)>> Plus the 51 year old suspension can't handle all the twist and turns on the race track. So we'll strip down the old subframe to make way for modifications to accept the new drivetrain and the new suspension components. [ Music ] [ engine revving ] [ Music ]

(Jimmy)>> Welcome to Carcass. Jeremy and I are back on our 1972 Camaro, and as you can see there's not a single part on the inside or the outside. The next thing we're trying to tackle is fabricating the roll cage. So having nothing on the interior is a great place to start.

(Jeremy)>> There's three major parts to this build. We need horsepower, we need traction, and the biggest thing of all is our safety. Jimmy's got a really good idea on how he's gonna lay the cage out. We have done a couple of things for him to work around. We did put in a set of mini tubs back here. Plus Jimmy went ahead and installed the fuel cell in the back as well. So he's gonna have to work around that, and I'm sure you've got a pretty good idea how to do this that's all in your head.

(Jimmy)>> Yep, and the first thing we're gonna tackle here is making some base plates, and we also have to clean the floor to make sure we can get a clean weld. So that's where we're gonna start.

(Jeremy)>> So the spots that we're gonna be cleaning up for the base plates is this big flat area right here in the back on both sides. Plus we've got two little areas to do up front. We're gonna be using this crud buster, and that should whip right through the paint. [ crud buster humming ]

(Jeremy)>> We're using the crud buster because it doesn't remove any of the actual material or metal from the floor. All this is doing is removing the paint and the seam sealer. [ crud buster humming ]

(Jeremy)>> Then we'll switch over to the bristle disc to do a little bit of polishing. [ grinder humming ]

(Jimmy)>> Now that Jeremy has these areas cleaned up, I wanted to talk about why we chose these areas to put our base plates on and ultimately land the roll cage. So back here we have a nice, flat area. It'll obviously be behind the driver's seat, but also under the car is kinda where the rear frame rail section starts. So this is just a nice, flat, strong area for the main hoop. Up front is a little bit different just because we have less room up here. Our feet are gonna be up here. The pedal box is in the way. We just want to make sure that we can keep our legs as far away from the roll cage as we can. What we're gonna do is make a plate to cover this body plug hole, and also have a plate up on this inner rocker section. This whole rocker section here is one of the strongest parts of the car. So we're gonna notch the tube to land on the inside part of that and also touch the floor. So, I've got these templates made up. I have to get to the plasma table and cut these out, and then we'll tack them in. [ Music ] [ torch hissing ] [ Music ]

(Jimmy)>> After cutting out pieces on the plasma table I always like to use a grinder to get rid of the hardened edge as this makes it a little bit easier to weld later on. I also like using a d/a sander to clean up the faces just to get off any surface rust and mill scale. [ Music ] Some of these base plates I'll put some bends in just to make sure we get the fit as tight as possible to the floor. [ welder crackling ] [ Music ] [ welder crackling ] [ Music ]

(Jimmy)>> So that's all four base plates tacked in, and something that's interesting about this car is just how different the base plates are from side to side. Some of the bends I had to put in just a little bit different location, and that's not uncommon but the thing you want to make sure that you get right is the gap between the plate and the floor cause if you have to weld across a gap it's just gonna make your life a whole lot harder. Now that I've got these in I can start working on the main hoop. Coming up, we start the process of cut, bend, notch, and weld for our road race roll cage.

(Jimmy)>> It's finally time for us to start on the roll cage for our Camaro, and we are using one and three quarter o-d by 120 wall tube, and mild steel d-o-m is pretty much the standard for roll cages. And in our case, when you use a one and three quarter o-d tube, you usually only need a 095 wall, but we're going a little bit heavy duty with the 120 and we're gonna start on the main hoop. It's gonna have five bends, and the tube has to be 119 inches long. [ Music ] [ saw buzzing ] [ Music ]

(Jimmy)>> To bend our cage we're using the Rogue Fabrication M-625. With a wide selection of dies this bender can handle anything we'll throw at it. Some details I really like are that this bender can bend past 90 degrees in just one stroke of the hydraulic cylinder, and another is that the clamp block on the tube can come out of the machine, which makes it easy to finely tune the bends on this main hoop so we can achieve a great fit. [ Music ] Pretty good! [ Music ] Having the cage fit tight to the body has multiple benefits for driver safety and performance, and Rogue Fabrications' bender will help us achieve that. This is the best bender that I've used to build a roll cage. It's very easy to use and I didn't have to give a second thought to landing these five bends in the same plane. [ Music ] Get this guy up and in here.

(Jeremy)>> Tell me kinda where you want it.

(Jimmy)>> There! So, I got the main hoop in now, and we tweaked on this thing a little bit. Just kinda crept up on the bends to make sure this thing fits like it should. We've got about an eighth inch gap on each side of the car, and it actually touches the roof. So we'll be able to weld to the car in three places, which is really good. This is just a great base for the start of the cage. So, we'll start working on the diagonal brace, harness bar, and the two down bars. [ Music ] So for the diagonal bar I put a piece of tape here, and obviously I can just measure this with a tape measure. To get the angle of our notch I zeroed the angle cube against the main hoop, and then I'm just gonna take this and hold it roughly against the tape somewhere in the 43 to 44 degree range. I can do it down here at the bottom as well. [ Music ] This one's about 35, 36. [ saw buzzing ] [ Music ] [ saw buzzing ] [ Music ] [ saw buzzing ]

(Jimmy)>> Got this diagonal brace cut and notched, and it fits pretty good. So it's pretty much the same thing for the rest of the tubes on the back half, but just to make sure nothing moves I'm gonna go ahead and get the main hoop tacked. You'll notice I've got all these areas where I think I'm gonna have a tube come into contact. I've got it prepped, and I just used Scotchbrite to scrub the mill scale off. Grab the welding and get this thing tacked up. [ Music ] [ saw buzzing ] [ Music ]

(Jimmy)>> When you're building cages or other tube structures you want to take your time to get the joints fitting as tightly as possible. I can tack in a lot of these tubes without a filler rod because the fit-up, and that's also helpful just in case you don't have someone to hold the tubes for you at that time. [ Music ] To notch our tubes we're using Rogue Fab's VersaNotcher. It's quick and precise to adjust using the cam locks. Our roll cage is pretty straightforward, but for more complex tube structures you can use this notcher to clamp on bends or do offset notches. [ Music ] I made some base plates to tie in the roll cage to two other points on the rear part of the body just to increase the rigidity of the car itself, which should help us with performance. [ Music ]

(Jeremy)>> Next step, seat placement for the harness bar. I'll crawl in here.

(Jimmy)>> Gotta figure out where our shoulders are gonna be.

A really important part of building the roll cage is getting the location of the harness bar correct. That's where the shoulder belts of your five or six point harness are gonna attach to the cage, and in most instruction booklets that you get with your harness it'll specify that you need it at zero degrees or up to 20 degrees below the should line. So we're gonna use this big square to simulate a belt, and then I'm just gonna measure along the main hoop to see where our tube needs to land. [ Music ] That's about 23 and a half off the base plate. [ saw buzzing ] [ Music ]

[ Music ]

(Jimmy)>> Well that wraps up the back half of the cage. So at this point I just have to cut the tacks where it mounts to base plates, carefully remove this thing, weld it all up, and then I can move on to the front.

(Jeremy)>> Our subframe has seen better days. We start the teardown to make room for our new racing suspension.

(Jeremy)>> So now that Jimmy's been working on the roll cage I figured it was a good idea to start here on the subframe and the front suspension for our Camaro. Now we've talked about subframes before and the fact that they're a little unique, but manufacturers had different reasons for running these things. One of them was the fact that it was a big weight savings. So you have to imagine a full frame underneath the car versus only half of the frame underneath the car. You have half the weight. The other is for pure efficiency when building the car. You have to imagine a full frame car coming down the assembly line. You're gonna have to have another group of guys come in at some point to build out the suspension, build out the steering, set the engine and transmission in it, versus when you have a subframe you can have the car being worked on one side of the assembly line and on the complete opposite side you could have other guys assembling this full subframe setup with the engine, transmission, steering, brakes, all that stuff into it. When it comes to meet on the assembly line it's literally only four bolts that bolt it together, and the car keeps moving along. We're only interested in using just the two frame rails of our subframe. So everything's got to come off of here. We're gonna get rid of all this junk because we're gonna get this thing all cleaned up, and then we're gonna start building out the suspension for our Camaro. [ Music ] There's a couple of things we need to remove before we get to the suspension, like the a/c compressor and the headers. [ drill humming ] [ Music ]

(Jeremy)>> I'm choosing to leave the engine in at this point because I want to keep the suspension under load. This will just help with disassembly a little bit later. [ Music ] At least everything's coming apart nicely. [ Music ]

[ ratchet clicking ] [ Music ] [ drill humming ] [ Music ]

(Jeremy)>> One thing to note. When taking your suspension apart be mindful of the pressure or the energy stored in the coil spring. It can be deadly. Make sure you do this carefully and pay close attention to the forces on the suspension pieces. [ metal clanging ] [ drill humming ] [ Music ]

[ hammer banging ]

(Jeremy)>> The disassembly process is the exact same on the other side. [ Music ] [ drill humming ] [ metal clanging ] [ Music ]

(Jeremy)>> And with the suspension completely out of the way we'll move on to removing the engine and transmission. At this point it's only held in with a couple of bolts. [ Music ] [ drill humming ] [ Music ]

(Jeremy)>> Get this thing up high enough to clear every cross member, steering, all that stuff. This works really good with this engine sling. We've got four solid points of mounting the engine, and it keeps the engine sitting pretty level too. That should do it. Let's see if we can get this thing out of here. [ Music ] That's a beauty Clark! [ Music ] Up next, we make some small modifications to our subframe. Then raise the roof on our Camaro.

(Jeremy)>> Now that we have the front subframe pretty much stripped down to its bare bones we're gonna get ready to get this thing cleaned up. There are a couple of things that we're gonna do before we get to the actual cleanup. We're gonna be running UMI's front suspension on this thing and it has a set of coilovers. To run their coilovers we have to come into this upper control arm mount bracket here and make a couple of specific cuts to get this piece out of the way. We're not gonna be installing the suspension right now, but what we are gonna do is get this out of the way. That way it just makes it a whole lot easier to get it all cleaned up, get this down to bare metal cause we are gonna have to do a couple of mods a little bit later. It's pretty simple to get it out of the way. Got the old cutoff wheel here. We'll make these three cuts on both sides and keep moving on. [ Music ] [ saw buzzing ] [ Music ] [ saw buzzing ] [ Music ] [ saw buzzing ] [ Music ]

(Jimmy)>> The roll cage is almost done and I have a few joints up top that I need to weld around, and I do have a roof bar made that I need to put in as well. In the past we've basically used two methods to get to the top of the roll cage. The first one is using a hole saw to cut holes in the floor to drop the cage down, or we build the cage on plinth boxes, which also allows us to drop it down. Basically what we're trying to achieve is just to give some room between the cage and the roof so we can get a tig torch up there. The third method, which we're gonna show you guys, is actually taking the roof away from the cage. So we're just gonna cut the A-pillars and the B-pillars, lift the roof off, do what we need to do, and then weld the roof back on. [ Music ] [ saw buzzing ] [ Music ] [ saw buzzing ] [ Music ] [ saw buzzing ] [ Music ] [ saw buzzing ] [ Music ]

(Jimmy)>> Camaro convertible.

(Jeremy)>> That's how you do it though. [ Music ]

[ Music ]

(Jimmy)>> With the roof off of the car I can finish welding the joints up top as well as put in the roof diagonal bar. [ Music ] For the cage itself I prefer tig welding just because it leaves a little bit nicer of a finish, and that's what I'm comfortable with, although it does take a bit longer. You can also mig weld this if you want to do it a little bit faster but just choose whatever you're comfortable with. [ Music ] That does it for the welding on the cage, at least the tubes. There's quite a few taco gussets and things that I want to add in different areas, but the nice thing with the roof off now is we have tons of access to every part of the car. We want to make some panels and other things on the inside as well. So for now I'm just gonna clean up my mess on the inside.
Show Full Transcript