MuscleCar Builds

Parts Used In This Episode

B&M Racing
Hurst Pistol-Grip Quarter Stick Shifter.
AAMP of America
Glue activator, Glue, Super Fast Adhesive, Semi-Rigid Plastic, Mixing Tips, Upholstery Adhesive, Fiberglass Resin, Chop Mat, Fiberglass Mat, Hardener, Mold Fabric, Carbon Fiber Vinyl, Vinyl Mercedes Cloth, Suede Fiber.
AAMP of America
Extra Vinyl Material
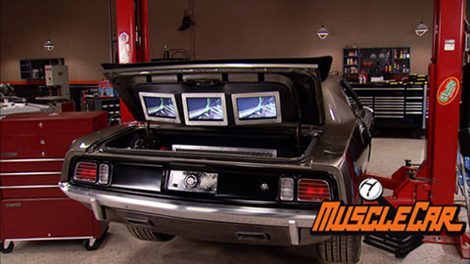
Accele Electronics Inc.
10.2" Widescreen LCD Monitors (3), 8 Out Multi-screen Video Amplifier.
Audiotuners
Custom fabrication and install of stereo and A/V systems.
Image Dynamics USA, Inc.
4" Component Co-axial System (pair), 6.5" Premium Component Set, 12" dual 4 ohm Subwoofers, 4 x 75 Class AB Amplifier, 600 watt Mono Amplifier.
KGS Steel
1/2" #16 4FT. X 8FT. expanded metal
Loftis Steel
1" x 1/4" flat, 4ft. x 4ft. 6061 sheet
Napa Auto Parts
1" velcro 6 FT.
O'Reilly Auto Parts
20 AMP glass fuses (5)
RadioShack
Male and female RCA union (6) each
Sierra Select Distributors, Inc.
Pioneer In-Dash Double-DIN DVD Multimedia AV Receiver with 7" Widescreen Display, iPod┬о Direct Control Cable.
The Home Depot
3/4" MDF, 1/4" Hardy board, 1.5" Drywall Screws, Wood Glue
The Home Depot
Table Saw Rental
UPS
Freight Incoming
UPS
Freight Outgoing
YearOne
Dynamat Xtreme bulk pak
YearOne
Side glass weatherstripping, wiper motor seals, door jamb end seals, adaptor ring foam seal, hood seal clip set, weatherstrip clip set, body/filler tube seal, E-body firewall gasket, body plug super kit, quarter glass sealing strips, hood to cowl seal with clips, steering shaft seal, roof rail weatherstripping, door end seal, door opening weatherstrip, fuel filler seal, front of hood seal, trunk weatherstrip.
YearOne
Window crank spacers, sill plate screw set, door jamb switch, window crank screws, door lock knob retainer screws, door panel clips, kick panel insulation, window cranks, front door panels, kick panels, sill plates, headliner, carpet set, package tray, jute padding for package tray, rear seat divider, sunvisor bracket covers, body bumpers, hood bumpers.

Video Transcript

Today on muscle car parts are flying on a project Street Fighter, an electronics expert installs the custom audio video system. And

Hewitt's big beast is,

hey guys, welcome to Muscle car. Our project Street Friday here is really coming together nice. We got the suspension and the drive train and installed. The paint and graphics are almost done. But I tell you what, it's still a ways to go. We gotta finish up the wiring, put on all the body panels, get the interior and audio video system installed, plus take care of a lot of other loose ends. We're doing all that today

when we brought the 71 Barracuda into the shop, it was a blank canvas. We started with a new suspension, stepped in a 440 with a six pack backed up by a torque flight transmission,

then transformed it into the Street Fighter Ka

with paint

graphics and a shaker hood.

Well, you guys probably noticed some work's been done since the last time you saw it. Most of the framework for the stereos in the wiring has been laid in and right now

the dynamite is being installed and it's all due to one guy, Nate Larson from audio tuners. Thanks for coming back out, man. Appreciate it. Had so much fun on the Trans AM. Had to come back out again. You suckers. What's your plans for this thing? We're gonna do a custom center console,

uh, rear deck lid, custom trunk

and the uh custom tray right back there. Right on. Well, I got some other stuff to get on. So, uh, you do that and I'll do what I gotta do. Sound good. Great. Right on.

It feels really good to mount these body panels for the last time knowing they're gonna stay. There you go. Perfect timing.

Since Nate's got the wiring done, the carpet can be laid in.

I'm using bolts to mark the seat mount holes to make them easier to find later.

The custom console and shift are going to require customizing the carpet.

I'm slicing it open so we can mount them straight to the floor.

Your one repos

most of the interior parts for this car and they hooked us up with new panels all the way around.

The original seal plates were restored and refinished to match the exterior trim and the dash pad isn't restored original as well.

Now, this is the original grill at a Street Fighter. It had a few cracks in it when we got it, but Tommy took care of those. Now, I shot a black with a satin clear and it's looking pretty mean. But what's really gonna set this thing apart is a red stripe around these cheese graters. I saved some red from the rims and I'm gonna put that down and that's really gonna help set our

ka

apart from the crowd,

I always start by pallet in the brush. That means loading the bristles with paint.

It's a critical step in any pinstriping job.

A sword striper may not be my best choice for something like this. You know, a lettering quill or, or even a swirly cue. One of the Jensen brushes might be a better choice. But to be honest with you,

I forgot my striping box today. So I had this in the studio. It'll work

uh keep a steady hand and when you come to a corner, be sure to twist the brush

and that is it. Let this thing dry while I clean my brush and plug it in.

It's amazing what a little paint work can do to a stalk coa

front end.

All it takes is some imagination and a little time

while Rick and I have been busy throwing parts at this fish. Nate's been hard at work, getting the wiring done and the entertainment system installed. We get back after the break. We'll let him show off some of his skills.

Maybe

coming up. Street Fighter gets ready to entertain the crowd.

Yeah.

Hey guys, welcome back. You know, the days of going down to your local parts store and buying a cassette deck to drop in your dash. They're long gone. Today's modern entertainment systems are exactly that

systems and to get all these components to work together, takes a pro lucky for us, we've got one Nate.

Hey, man, I've been watching you crawling all over this thing for the last two weeks. Why don't you tell us about some of the stuff you got going and we got some super sweet equipment for this car. Right on. Our friends at Image Dy

Makes sent us two amplifiers, four channel amp for the highs and a model block amp for the base. They also sent us two sets of these components, 6.5 inch speakers. We're gonna install on the front doors and on the rear deck of the car, a pair of ID Q 12 inch subwoofers,

three excel vision screens are gonna mount the trunk lid and a pioneer in dash DVD player. Nice. Well, I've seen you lay out about 10 miles of wiring in this thing. What's next? We gotta get this console put in. You wanna help me out?

Yeah,

this thing turned out nice, man. Well,

thanks. Hold it right there so I can hook this thing up.

All right, Rick, let's go ahead and slide this one in here now.

It's right about where it sits.

Hey, Nate, it looks like you got most of the heavy construction then. Why don't you give me the low down on what you're doing here? Well, this is the piece on the trunk lid that's gonna house the three monitors.

I made a frame that goes basically right on the trunk lid itself, three frames for each one of the screens and then you pedestal them off to get them to the shape exact you want.

Then what you do is you stretch a cloth over that

and then you fiberglass that and make it so it's all solid, but you have to make sure that you strengthen this up quite a bit. You can come back through and take this off later. But if you don't strengthen this part, it's gonna twist like a pretzel on you. OK. So this is basically the same way that you've done all the other pieces in the car, right? It's pretty much

the same way.

Well, you told me before the structure here has to be really strong. But to me that looks like a hot glue gun. That can't be right. That is definitely not hot glue and that would not work, especially in the heat in Vegas.

We got the select products. It's basically ac a glue, it's like a super glue with an accelerator and then I came back through and I use this Dumi

4247

and it made everything really strong and holds it all in place really well. Right on, man. You're doing a good job and I got a whole bunch more chrome and parts that hang on that thing. So I gotta get back to work. Have fun.

Nate forms the contour of his custom pieces by stretching material over the frame and staple in it in place.

Fiberglass resin is brushed on to give it some strength.

Once the resin hardens Nate can open the holes back up for the monitors then trim the edges.

Here's where actually I need an air. So,

hey, now it's starting to look like something.

Yeah, thanks.

I'm glad you're here. You're the body, man.

It's all you.

Thanks. I'll get my plastic,

you know, the old adage about not putting plastic on thicker than a dime.

Yeah, forget about that. Here. I gotta build this stuff up till it's smooth

and once it dries ad A and some 80 grid will take it down to where we need it

once my skills were no longer required. Nate kicked me out of the way so he could put some skin on it.

High strength contact adhesive will keep the vinyl stuck down and a lot of pulling, stretching and patience will get the wrinkles worked out.

Rick. I need your help real quick.

So when it comes to upholstery, I'm good at holding stuff down. That's about it.

I

love how strange this stuff is.

It's like rubber.

Once it looks like it's been Botoxed, he's stapling it down and trimming off the excess

free to mount this thing wi some screens

since the screens are gonna cover the inside of the deck lid. We need to sneak the spoiler in while we can still reach the mounting holes. I got Nate coming in.

Well, congratulations, Nate. This is the first car ever built on muscle car that has more TV. S in it than my house. Why would you want monitors in the trunk anyway? Because the car is made for displays to show UFC fights and muscle car TV. Shows to the crowd. Right on. Well, hey, I know there's a lot more to this thing than just monitor. So why don't you show me around the rest of the car? All right, Rick, you've seen the rear deck lid with the custom screens in it.

There's two amplifiers

and a two fair at Stinger Cab. The trim rings still need to be done around those. I'm gonna leave that to you guys. We can handle that. There's four speakers that are mounted right here in the trunk to bit some sound back here. When people are watching the screens, the taillight sections all covered up.

It's a piece that needs to be made for that. That's metal work. That's right up your alley also.

So where'd you hide the subs?

Well, they're mounted underneath the rear package tray

cut and vented that area to let the sound flow in a lot better.

The front doors, speakers are mounted wired ready to go

and then you could put the door panels on and then the grills on the front of the door panels, we can handle that

kick this thing on see how it sounds.

Yeah,

sounds good, man. Heck yeah. Thanks for another killer install. Appreciate it any time. Um There's a lot of little loose ends here. You guys are gonna finish up. I got a plane to catch, I gotta get rolling,

man.

Thanks for

having me.

See you later.

See you.

Hey guys, don't go anywhere because we got a lot more muscle car coming your way

up next. A big bad cat that's still out. Crowning the streets.

Today's flashback, a 1967 Buick Wildcat

in 1967. If you wanted a big car with loads of power, you really only had a couple of choices, a Catalina two plus two or Buick's luxury powerhouse, the wild cat

tipping the scales at close to 5000 pounds and stretching over 18 ft. Once this car got rolling, it was like a runaway brake train.

The heart of the beast was the brand new 430 cubic inch V8.

Spent 50 million bucks designing a replacement for the legendary 401 nail head.

They opened up the heads with a slanted saucer dome chamber and expanded the exhaust ports helping to breathe better.

They kept the same four inch bore but

a nodular iron crank shaft up the stroke to 3.9 giving it the extra 29 cubic inches of this placement.

This also jacked up the torque to 475 and 3200 RPM.

You needed that low end muscle to get this tank moving

all in all. It produced 35 more horses for a total output of 360.

The engine was so potent. It was known to break the motor mounts and Buick issued a recall at the time to equip them with a safety cable.

The 67 not only got a new engine but it was completely reskin, a sweeping body art with bulging fenders replaced the rigid straight lines of the previous model. A blacked out crosshairs style grill set it apart from the Lesabre

while claw like front end made it look ready to pounce.

The body was dressed up with simulated fender vents while the rear got new ribbon style taillights,

chrome badges graced the quarter panel and deck lid

and a snarling wildcat spiced up the wheels which had fender skirts for the first time.

Bench seats with luxury styling were standard though you could order the Wildcat custom

that got you bucket seats, a floor shifter and a sportier interior. But this setup makes the car into a real Sleeper.

Wildcats occupied a spot between the upscale Electra and the lower price of the

Saber.

It shared the same 126 inch wheelbase as the Electra and came in everything from a four door sedan to a sport coupe to a convertible.

The Wildcat had been around since 62 and some people consider it. Buick's first muscle car

though. Its size always gave it less than catlike response when taking off and cornering.

But cruising on the interstate was like gliding on air

ads called it the tuned car for young people of all ages,

it was priced to the tune of 3700 bucks which for that much power and luxury was a bargain.

Over 70,000 were sold of just a bid from 66 and only about 2200 were rag tops.

Today. The Wildcat is sadly overlooked in the muscle car history books while it was certainly no stoplight warrior, it more than made up for it with its brute force and aggressively styled look

driving one well, is the cat's pajamas

after the break, Tommy gets a grip on the coa

Hey, welcome back while Rick's trimming out the speakers, I'm gonna get the shifter installed. We're using the hers pistol grip. Now, automatic cooters didn't come with the pistol grip, only the manuals did, but we really dig them. So that's what we're gonna use.

Here's where the surgery I did on the carpet earlier comes into play. We need to get to the tunnel to run the cable and mount the shifter.

Hooking up. The linkage is a snap, a couple of connections and brackets underneath. Bring control over that torch light into your grip.

It's always nice when a plan comes together, the console fits perfectly

sweet. All we lack now is finishing up

while Tommy has been playing with the shifter. I've been trimming out the trunk and rear deck with aluminum rings.

I'm building them out of one inch aluminum bar stock, cutting them to length, taking them together and grinding down the welds.

Next. It's over to the drill press for the mounting holes.

I'm kind of thinking the screws for a more finished look.

I walk round the corners and the belt sander does the training

to keep it from shooting across the room. I'm screwing this thing down for the last step. A handheld belt sander will give it a finish. That looks as tough as the rest of the car.

But with all the trim rings on that means the entertainment system and the wire in this thing is done. And now all we have left to do is drop in the glass, finish the interior, throw a hood on it and hit the key. But for this week we're out of time. So until next time we're out of here.
Show Full Transcript