HorsePower Builds

Parts Used In This Episode

Crower Cams & Equipment Co., Inc.
Hydraulic flat tappet camshaft, lifters, pushrods, assembly lube, timing set, ZDD Plus zinc additive.
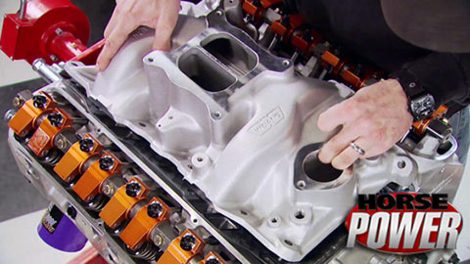
Edelbrock
Edelbrock Performer RPM cylinder heads and bolt kit.
Edelbrock
Head gaskets, intake gaskets, exhaust gaskets, valve cover gaskets.
Holley
Ultra Double Pumper, 750 cfm, Black
Mallory Performance
COMP S/S 32 Series Distributor
Weiand
Intake Manifold, Stealth, Dual Plane, Aluminum, Natural, Square Bore, Chrysler, 318, 340, 360.
Custom Speed Parts Mfg.,Inc.
Harland Sharp needle bearing, single shaft mount, rockers for Small Block Chrysler.
Dynamic Test Systems / (DTS)
Dyno Cell and equipment
O'Reilly Auto Parts
Cel-Pro water outlet gasket
O'Reilly Auto Parts
Fel-Pro water pump gasket
O'Reilly Auto Parts
Fel-Pro rear main seal

Video Transcript

Hey, you know the motto around this place. Good horse power is never good enough and that definitely applies to this 360 mo power

we built recently

using mostly direct replacement parts.

With the exception of a more aggressive cam

aluminum intake and new 650 CFM car,

the factory 360 made around 250 horsepower.

Our version 314

all around. Good moat. That's a little moment and this is just the stock, but we still got a performance deal.

Ha.

That's gonna be fun. Yeah,

well, that time is now it's time to pull out the stops and live up to our name just like we did with recent Ford and Chevy Bills.

It's gonna be an interesting challenge though.

You see we're keeping the original block and rotating assembly which consists of a steel crank and original cast pistons.

So we had to select parts that would make as much power as possible without tearing up that bottom end. And it all starts with the heart of the engine, the can shaft. Now, just like before we're using a hydraulic flat tap it, but this time it's a rower piece with more lift and duration.

Now to complement it, we're using a set of proven Edelbrock performer RPM aluminum cylinder heads to replace our factory iron ones. Now, a lot of the parts you see on the table we're reusing from the first build since we didn't want to go overboard, like the timing cover, water pump balancer and pulleys something we are replacing is the car

operator and this one has some unique features, but we'll get to that in a few minutes.

Now, for an intake manifold, you might expect another Edel rock piece which would make sense for those hats but

not this time, we're gonna try out this wine stealth intake and see what kind of power we get with this unique combination. Oh,

we got some other new cool stuff to show you during the build up. But right now time to get to work and get that new cab shaft, a bath in the parts, wash,

washing and insolvent gets rid of the rust inhibitor used during shipping.

Then after lubing it up with crow's

assembly lube,

we can install it in the block.

Now, the specs include a duration of 290 on the intake 298 on the exhaust with a max lift of 507 and 522.

Now, that's all based on a rocker arm ratio of 1.5.

The timing chain is an inexpensive part considering how important it is.

So we're replacing ours with this new double roller,

then we can put on the cover.

Now with the gaskets in place, we can drop on our heads.

The special length bolts included with the cylinder heads it's required for installation goes in the number five hole. So make sure you don't forget it.

Remember to torque your heads down in the proper order and always torque them in three progressive sequences.

By the way, at 30 pounds each, these RPM heads are a full 27 pounds lighter than those cast iron boat anchors there. Plus they got other features too, like larger intake valves and free flow and 177 intake runners.

Well, next, we can slide in the crow

hydraulic lifters

and the push rides.

We actually started prepping for this build last night when we mixed a bottle of engine treatment with a few quarts of break in oil, both contain lots of zinc and phosphorus that help protect the rocker components during initial start up

after an overnight soak they're ready to go in.

This new direct fit kit was developed by Harlan Sharp, the creator of the roller tip rocker.

It's made exclusively for the performer RPM heads

just like the original design. The rocker shafts deliver a supply of oil to the upper valve train of the 360.

With Sharp's new set up, the shafts and rockers are hardened for extra strength

and the rocker tips are designed to create minimal valve stem sweep for better performance and longer wear.

You know, sometimes it's the little things that make engine assembly easy. Like these little tabs on Edel Brock's head gaskets, they're there so that

the intake manifold gaskets can rest on them and won't slip out of place pretty cool.

Now, we know they won't slip when we install this wine intake.

Now it's bottoms up for the motor to reinstall the oil pan.

We're gonna leave our valve covers off for. Now, That's because we wanna see how well this rocker shaft set up, distributes the oil. Well, you know, we're back in the dyno Cell just before we test the horsepower on our 360. Stay tuned.

The best is yet to come.

We're back with more horsepower and soon we'll find out if our Mopar is up to par and performance on our DTs engine dyno,

as we mentioned earlier, our 360 made 314 horsepower after a bare bones budget build up a few weeks ago.

This time, we vamped up the power by swapping to a Crow or cam with more lift and duration better flowing aluminum RPM performer heads and a high performance wind aluminum intake manifold among other upgrades.

Now, with all the sensors hooked up

tip and six quarts of oil. We're close to hearing our new combo fire up.

We've got a little something extra to add to the oil. This time. You see Crow

includes a bottle of this ZDD plus treatment with all the flat table at cam shafts, they send out

much like the rocker shaft treatment we saw earlier. This has lots of zinc and phosphorus in it which attracts heat

and forms a protective film on the cam lobes. And the lifters.

Remember the oil that's supposed to be coming out of these rocker shafts? Well, it's not,

we've been priming this thing for quite a while and it's kind of like drilling for oil in a dry hole. Finally, Mike tries turning the motor over and bingo, that's what we're looking for.

I'm glad we thought about that.

Me too. Here's what was happening.

You see the holes in the cam shaft are drilled at a 90 degree angle and if they're just in line with the cam bearings, well, those holes get blocked and no oil gets to the top of the valve drain when he turned the motor over, well, freed up the flow. And now we're good to go.

The hardened oil pan rails in our RPM heads promote a good gasket seal and that'll reduce the chance for a leak.

This is the first time we're using one of Holly's new ultra double pumpers. Now, they use lightweight aluminum in place of all the zinc. And this one measures in at 750 CFM.

This time, the spark for our 360 is coming out of a mallory compass s distributor.

It's got a billet housing and easy to adjust mechanical advance and requires a CD ignition system

for this combination. We're using 91 octane premium fuel. We used 89 when our budget bill runs,

we also made 314 horsepower back then.

Let's see how a few upgrades can change that.

That is if we can get this thing to start,

you might can tell that Mike's not in the mood for this today.

See if it hits

now, this little tester will tell us if we're getting spark and

yeah, it looks like we're not

no spark, a tool like this can save a lot of troubleshooting time. Brand new distributor.

Ignition box is working.

Well,

that was my fault.

Now, we'll have some fire.

We were retarded,

man. This thing's touchy,

but she goes this time.

Well, looks like success.

Shut it down

or maybe not.

Has a wicked knock to it.

First place to look the rockers.

Well, they're fine. So I guess the search continues. Must be deeper.

Well, I don't care. We'll blow it up if it's,

that's what it takes.

Hey, Groucho Marx turns into Sherlock Holmes.

I think he found something

hell of an exhaust leak.

That noise was making me nervous when I first fired it up.

Those gaskets. You don't expect it to be a header leak,

but

it didn't sound like a header.

No, I didn't at first. That's what it was really harmony.

Right.

Then an internal, got a leaky hitter

and I'm gonna run it that way.

371

5200. We're at 313 before.

Yeah. All right.

We'll bump it up three degrees to 33 at 6500 RPM.

377 and 4 2063 horsepower

going on a set of heads in an intake, slipping the canon.

That's about it. Really.

A

little more timy.

Yep. This time. 35.5 degrees.

Wow. 3 81 84 25. That was significant there. Yeah. What was the torque before?

I don't have it here, but it's, well, I know

it

but I didn't. All right

while I go do my job, galley does his

pumping the timing up to 38 degrees,

didn't like it.

But,

and we maxed it out

sometimes you don't know the limit until you pass it,

but we love our best run a gain of 67 horses, 24 ft pounds of torque.

You heard us mentioning a header leak earlier on the motor and, well, we could plainly see it through the window. If you suspect you got one in your car,

here's what to look for.

You'll find some carbon around the problem area like we've got here between the valve cover and the middle of the header.

Well, now we know where it is, see if we can find out why.

Ok, we're missing material right there

and believe it or not, in this case, it's not the gasket's fault because

I'm betting if you take a straight edge and run it across the surface of the flange.

Yep,

right here in this middle port. Definitely a low spot.

Best way to correct this problem is with the belt sander

keeping the flanges flat as you level out the surfaces,

checking it frequently as you go. Of

course, it's not finished till the straight edge says so and well, this time it says we're good and flat.

We ran a Holly 750 on this mo part for the

dyno test. Now, if you plan on buying your first car or you just wanna get a little more up to date on your car by you, make sure you don't go anywhere. We're gonna show you how to take one of these apart and the anatomy of it when we come back, see you after the break.

After more than 100 years, the carburetor still has the same basic job converting liquid fuel into a vapor mixing that with air to create combustion. Now, most of you guys know basically how they work, but from the emails, we get you guys wanna know more about what makes them work and the basic job of each component. So today we're kicking off a carb text

series and it begins with the basics.

One of the main questions we get is how do I identify what carburetor I've got? Well, the answer is pretty simple. Each carburetor has a list number either on the side of the main body or on the front of the choke horn, once you've got it simply jump online or call the Holly Tech line and they'll let you know what you've got.

Halls have two styles of boosters. The straight leg booster that's found on all vacuum secondary carbs and the dog leg booster that's found on carburetors made for competition engines. Now, the style of the booster helps atomize the fuel more efficiently coming out of the squirter for better acceleration.

Next up are the fuel bowls. Now, they're basically a holding tank and work much like a toilet.

They get supplied fuel from the fuel pump and as the fuel level rises, so does the float, it closes a needle and as the engine consumes the fuel, the float drops back down, you get the picture of what happens next

to go along with the float is a site window. Now, there's two types, either one with a glass view or with a plug like this one. Now, it's the only way to set the float level when the carburetor is on the engine,

you also have to have the fuel pump on or the engine running. So make sure you have an adequate fire extinguisher handy

behind the bowl is something called the power valve. Now, it gives the carburetor a richer mixture when you push the throttle all the way to the floor. Now let's get a little deeper,

all primary and some secondary metering blocks have a power valve. Now, it's basically a vacuum operated mechanism that opens on power demand. Now, you can also change at which point they open, which is measured in inches of vacuum. Now, you can get power valves in the 2.5 to 10.5 inch of vacuum range.

The accelerator pump is located on the bottom of the fuel bowl. Now, it's got two basic jobs. The first one is to prime the engine prior to cold starts or fresh fire ups. Just remember too much priming can put the engine in a flooded condition.

Now, the second job is a little more complicated

as you put the throttle in the wide open position really fast air flow through the carburetor increases faster than the fuel flow does. So this lever operated by the throttle linkage and this diaphragm force more fuel into the throat of the carburetor to correct that lean condition.

The main jets control the amount of fuel being introduced to the venturia. They're located in the metering block on the fuel bowl side. Now, if you look close, each jet has a number on it which represents the orifice size,

they're available in sizes 40 through 100. But here's something to be aware of.

Once you get to about size 66 the number on the jet and the orifice size aren't consistent. So keep that in mind. Now, the final journey for the fuel through the carburetor is to the actual throat and that gets introduced right here through the discharge nozzle or also referred to as the squirter.

We showed you all the components that go on to the metering block. Now, let's talk about the metering block itself. All the primary ones have idle adjustment screws. And here's something that's pretty unique to each carburetor.

The power valve restriction channels, which are, these two holes here are sized to match the CFM rating of a particular car

carburetor. So the larger the carburetor, the larger those channels are going to be,

hopefully, that'll help raise your car by Q. Now, we don't want to load you up with too much information right off the bat. So in a few weeks, we'll be back with more carb tech anatomy and even take care of some tuning tips. But right now we're moving on to more horsepower.

You're watching horsepower for a DVD copy of this episode. Just go to Power Block tv.com and order your copy for just 595 plus shipping and handling. Start your own horsepower collection delivered right to your door from the power block.

Hey, welcome back. If you hang around guys that work on cars long enough, you gotta pick up all kinds of helpful hints that can

actually make your work easier and faster. Sometimes

funny thing is some of them ridiculously simple and

involve stuff that well, you probably got around your house. For example,

remember the header we blew out in the

dyno earlier. Well, after smoothing it out, it's ready to go back on.

Now, anytime you're doing something like this and run out of anti CS. Common, ordinary malos

works just as well.

It'll dry to a powder that not only prevents seizing,

it won't burn off.

Now, here's a question for you. How could this foam rubber from a discarded cushion

come in handy next time you're changing gaskets and a cylinder head.

Well,

if you poke the foam piece down into the port like that, it conforms to its size.

Now, just scrape away the old gasket material with no worries about debris falling into the port, then just pull the foam out and keep it for the next time.

If you're really into car Cosmetics, you could go as far as to paint each engine bay boat the same color as everything else

and you could take each cap and paint it by hand and probably get as much on your fingers as you do here.

But

there's a much easier, faster way.

Just take an old piece of cardboard and poke several boats through it.

Then you can use the old rattle can paint treatment without any paint getting on the thread.

Well, next, did you know the same vinegar? You used to make a salad, can help get rid of rust and crud in your radiator.

Just make a 5050 mix of vinegar and water,

pour it into your radiator. Let the engine run for about 10 minutes. It'll break up the rust and lime deposits. Then you just drain and flush with water

and you're done.

But will this stuff really work?

We've had this piece of rusty iron soaking in vinegar for a few days. And,

well, you be the judge,

but the most important, one of all this is what you get with all that money you saved

for your wife. Of course, it'll make up for all that time. You've been spending in the shop

works every time. Trust me,

we'll see you next week.
Show Full Transcript