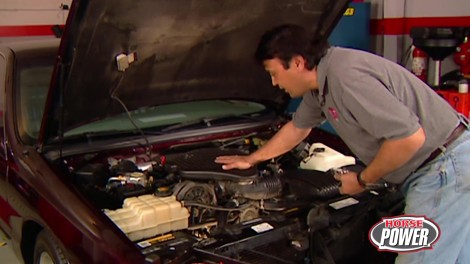
HorsePower Builds

Video Transcript

Hi, welcome to Horsepower TV. Where today we've got a real dog and pony show for you.

The dog, I have to say is Chuck's 96 Impala Ss here. Sure needs a lot more power.

Now. The pony. Well, that's my 96 Mustang convertible here. And I tell you what, I'm all shook up over the bolt on. We got for this thing a little bit later in the show. That is

dog. Huh?

Well, just remember this Impala

Ss was built to run with the big dogs and it'll put your little mustang back in the horse trailer even before any of the modification

that we got planned for today.

But I gotta tell you this old Impala

SS is a popular platform with a lot of dedicated enthusiasts and the LT one small block responds well to most any performance enhancement such as aggressive cam timing, increased compression or a deeper set of gears. Plus with a wide array of parts available for the SS. It's easy to build a machine that'll give you both power and financial,

but the best place to start is with the respiratory tract. After all the factory is fighting fuel economy, sound control and emissions. And of course, all those things get in the way of performance. So I guess what you're saying is we need to put more bite in this old dog's bark. That's right. Ok.

And we'll get started with some simple intake modifications after we get a baseline on the dyno Jack.

Good.

Looks like we're barking up the right tree so far. 210 horsepower at the rear wheels is our baseline.

You know, with all the ducting and baffling under here, air has quite amazed to navigate here before it can finally get to the engine.

And quite frankly, I'm pretty amazed myself, the engine runs as good as it does.

But, you know, for years, I've been reading about these throttle body air foils here in the magazines and quite often wondered if they actually work. So I went ahead and ordered this one from Holly so we can put it to the test.

Now, once I get rid of this home plate here and this ducting, hey, we'll have access to that throttle body.

The air foil goes right on the front of the throttle body, making sure the tangs are on the outside lip, then slip the rubber duck back into place

and reattach home plate to the rubber duck.

You and your rubber duck really cracked me up. But I think we ought to waddle through another run now.

Well, it looks like we're stuck at 210 now. Every engine is a little bit different and where you could bolt one of those foils onto your tom poor Camaro or LT one application and perhaps pick up some horsepower. Well, let's move on. All right.

Of course, we're gonna move on by moving more air into the engine. And the way we're gonna do that is by getting rid of all the original inlet plumbing and replacing it with this cold air induction kit from S LP.

Now, it starts with this twin cone pipe here that features a pair of high flow filters and it feeds into this 3.5 inch tube right here.

We also ordered this 90 degree elbow. And what that's gonna do is help us get rid of that ugly home base plate that sits on top of the engine

start by removing the factory air box lid

and the base.

Remove the mass airflow sensor

and set it aside,

remove the home plate silencer

the 90 degree elbow

and the tuning box is an assembly.

Now, with all this stuff out of the way,

we can go ahead and start assembling this dual inlet cone,

the inlet side of the mass airflow sensor,

then the 3.5 inch tube

goes on the outlet side

after removing the nut from the lower washer reservoir mount,

install the whole assembly

in the place,

then connect the tube

to the elbow

and the elbow

to the throttle body.

Well, that was pretty easy and

only took us.

Well, you about 30 minutes and, well, as you can see, the air's got a shorter straighter shot to the engine now. But

does that translate to more horsepower?

Thank you know what's coming up next?

Now, that's an improvement. We cranked out over 218 horsepower on that run.

Well, here's our baseline of 210. So we're making some progress.

Of course, those numbers are a little bit soft since we don't have the benefit of the cold air like we would going down the road. In which case, we'd probably pick up another three or four horsepower. Now, what else you got for us, Joe?

Well, how about something to help your Chevy dog bite a little better, Chuck. It's Holly's Avenger throttle body that's CNC machine out of billet and features a pair of 58 millimeter throttle blades and this thing bolts right up. After we transfer the stock throttle position sensor.

Before we remove the stock throttle body, we need to check the TPS voltage

and record it.

After disconnecting the battery,

remove the air inlet tube,

vacuum

and electrical connections,

throttle cable

and the cruise cable

then remove this coolant line

and finally the four boats holding the throttle body in place.

Well, now we got this thing off of here. We gotta remove seven screws that hold this water crossover manifold in place so we can transfer it to the new throttle body along with our throttle position sensor and then we'll be ready to bolt that thing up. Right. You are. Now, while Joe's taking care of that, we're gonna take a little bit of a break, but we'll be right back.

We'll see what a big throttle body brings in the way of new horsepower and show you how a free flowing exhaust frees up some extra power too. All on the

dyno Jet. All coming right up.

Hey, thanks for staying with us. Now, back here at the shop, we've already transferred this water crossover manifold and throttle position sensor to our new Holly throttle body.

Now, the throttle body comes with longer bolts and a new gasket. So we wanna make sure that we use all of them. Now, what we're gonna do next is

throw these bolts in here,

hang the gasket on the backside

like that.

All right. Now we're ready to bolt it up to the intake.

They gotta remember those boats are going into an aluminum manifold, so you don't wanna over to torque them. In fact, 18 ft pounds is recommended.

Yeah. Now, while he takes care of that, I'm gonna go ahead and reconnect the throttle and cruise control cables, plus the vacuum and water lines

your nose in.

Get out of your way.

Well, with everything in place, I guess we're ready to check for wide open throttle. Go ahead and mash it chuck

there that checks out. Now we can reconnect the battery

recheck the TPS voltage with our meter there and uh see if this new throttle body is worth anything in the way of horsepower.

Ok. We're just over 220 peak horsepower which is not a big gain you might say. But the graph tells the real story. I want to show you something

in the upper RPM range. We've made over 12 horsepower from the last run. And well, that tells us probably that the new throttle body will work best on an engine with more cam, more compression and a free flowing exhaust. Well, speaking of that,

check out what Chuck's got next for the LT one.

Well, you've heard us talk about flow masters, American thunder exhaust systems here before and well, if you listen closely, you heard for yourself that powerful sound of horsepower once they were installed, now we're looking for more horsepower today. So we're gonna install this set up on the impala. Now, it's engineered as a direct bolt in cat back system with free flowing mandril bends on all the pipes. A

pair of 50 series muffler and some

tail pipes

with Polish stainless tips. Hey, I got another tip for you. Blow master also makes a force two system

that has tail pipes that are fitted with resonators to quieten things down a bit. You see guys, my partner here might like his old dog to bark before it bites. But if you wanna sneak up on the competition, this is the set up you need, well, you know what else we need. We need to get the impala in the air so we can get rid of that old exhaust.

I got it.

I got that piece.

Let me get that set down. Give me a hand with his tailpipe. We'll roll it out of here. All right.

There we are. That's it for the scotch stuff. Good deal.

Ok. The first part we install is this connector, flange the boats up behind the passenger side Cadillac converter. And, well, now we're ready for that head pipe.

All right, here we go,

slide it up in there

after supporting the head pipes, install the mufflers

and connect the hangars to the rubber mounts.

Next, install the four rubber mounts for the tail pipes

and slip the pipes into the mufflers.

Now, you can loosely install the clamps but don't tighten them until you ensure plenty of clearance around fuel and brake lines, chassis and drive train components and about a half inch ought to do it. Oh, make sure you take in account your suspension travel. Now, once you're happy with everything,

go ahead and tighten them down or weld up the joints. Hey, looks like you did a great job here for

boy. We're gonna make a Chevy mechanic out of you. Yeah. No way.

Now, what do you say? We let this thing back on the ground after we sent everything down that way we can rock this joint with another pass on the

dyno Jet. All right.

Yeah, there it is 228.2 horsepower

at the rear wheels. Of course, those are horses that all hit the ground. Well, we started out today with about 210 horsepower and picked up another 10 with the throttle body and cold air kit and about another eight or so with the exhaust modifications. But I gotta tell you testing here in the shop doesn't tell the whole story when it comes to making your machine breathe better. In fact, once you get on the road or at the strip, you're gonna see a lot more benefit. Thanks to air that's cooler and denser. Plus you're gonna get that ram air effect good points. Plus the dyno Jet does not measure what you feel in the seat of your pants or what you hear in your ears, man. I tell you that dog's got a bark to go with its bite.

Well, hey, that reminds me we're gonna take a bite out of your mustang's hood here when we come back. Now, it's guaranteed to shake you up. So stay with us.

What was hot in 1969 is hot again for late model ponies, we'll show you an upgrade for your mustang's hood. That'll make you the talk of the hood.

Plus a customizing trick that will help turn an old pickup into a super cool retro

rod.

Hey, welcome back. If you're like me, you've been a Mustang fan for a long, long time.

You know what one of my favorites of all time has to be the 69 mach one. You know, the one with a whole lot of shaker going on.

It was a wild tie where all muscle machines sported crazy colors, bold stripes and one of the biggest eye grabbers of them all a scoop that poked prominently through the hood.

Yeah. In the case of the mach one, it not only made a powerful visual statement,

it also helped make more power under the hood by feeding cooler air to the engine.

Those days are long gone, but the Mustang lives on

and thanks to a new kit from classic design concepts. So does the classic shaker hood man. I am pumped about this deal. Well, you should be

now this is a fairly faithful reproduction that'll fit most contemporary Mustangs and of course, it comes with all the trim accessories and hardware that you need to make it work. But I gotta tell you this scoop is the centerpiece in more ways than one.

In fact, the kit comes with this template right here. That's gonna help us find the center Joe's hood. And that's the first step in this installation

after removing the under hood insulation,

align the template and tape it securely to the outside of the hood.

Mark 10 screw hole locations noted on the template and drill with an eight inch bit.

Then under the hood, cut five holes with a one inch hole saw

using the eight inch pilot holes as your guide.

Next close the hood and enlarge the pilot hole,

use a saber saw to cut out the shaker opening.

Then attached the applique to the hood using tin screws and washers from the kit.

After reinstalling the insulation and cutting it to fit the opening.

Install the weather strip.

I know we installed a cold air kit on Joe's Mustang just a few weeks back. But for this set up, we have to go back to the stock pieces.

Now, the original air filter housing gets modified so that we can adapt this cold air ducting from the kit.

Of course, the kit also comes with a template that shows you where to make your cuts

while Chuck's making those modifications.

I need to remove the strut tower brace to make room for the shaker air box.

After removing this bracket from behind the alternator,

replace it with these support brackets from the kit.

Next, throw the four ball studs into the brackets

and with the lower air box in place,

install the upper air box and the hood scoop

finally close the hood gently so you can align the shaker scoop with the center of the hood man. This thing's gonna look cool. Now, next step is to center it up,

then remove the scoop, tighten those bracket bolts. And after Chuck does that, we'll remove both air boxes and assemble them with the scoop

as a unit.

While I was putting the shaker assembly together, Joe went ahead and attached this cold air duct to the original air box. Now, all we have to do is hook it up to this opening right here.

The last step is to slide the shaker assembly into position

and snap it down over the ball studs.

All right.

Classic design concepts. Got me and my mustang shook up over this deal. I love it. Stay tuned

next. A quick tech that'll make you a magician with metal as we do a disappearing act with a tire cut out on a truck, fender.

Horsepower T V's Quick Tech is brought to you by

Wyotech.

A lot of you guys are grabbing up these old fifties pickups and for good reason, just imagine this one eventually with a chop top and

well, another modification back here. You see

this cut out for the spare tire might have been practical back in the fifties,

but it ain't too pretty today. Never fear though. A solution is underway right over here.

Hey, Matt, what you got going on here?

Oh, well, Joe. Since we have that big gaping hole on the other fender,

we're gonna have to build some kind of patch panel.

But before we can build the patch panel, we need some type of template. So that's what I'm working on here. Well, this ought to be the right shape then. Well, it's gonna give us enough information to at least get us started.

Now that we've completed the paper template, we're gonna lay it out on a piece of 18 gauge. But what we have to remember we're working on the mirror image. So we're gonna flip it over

and flatten it out

and begin the tracing.

Next, I'll use these Beverly shears to cut out the patch panel.

Now I've come to the fabrication room where we're going to use the Poma

machine to begin the shaping process for this panel.

We're using a shrinking dye that gathers the metal together to give us the compound shape.

Then we will use the plen fishing hammer to smooth it out.

Well, there it is. Now we finished the plen fishing. We'll test fit it and see how it looks. What do you think

that's so you're uh over the hump. Oh Come on. Seriously. That's amazing work. I don't know how you do that. What's next? Well, we're gonna take this fender off and actually cut that hole out. I'll help you with that. All right,

we'll use the plasma cutter to remove the old spare tire. Well,

next, after removing the plasma slag, we'll clamp in place and scribe that line for the perfect fit.

Now, back to the Beverly shears to cut precisely along the scribed line.

Well, we've got it clamped and fit into place. But before we could get that far, we had to test fit it a few times, remove a few burrs with our file, but now that we've got it into place, we're gonna throw a few tack welds on there to secure it

and continue welding from there.

Since welding makes the metal shrink a little bit, we'll need to stretch it back out with a hammer and a dolly.

Finally, we can file the wel down.

Well, this baby's done ready to bolt back on the truck. That is nice.

I got one question.

Where are you gonna put the spare tire? Now, Jz Joe, don't you have to go back and do hot parts or something?

Horsepower T V's hot parts is brought to you by James. One call, gets it all. One click, gets it quick.

Well, here's something that'll help you. Put more rumble in your Rambler. This performer RPM, air gap intake from Edelbrock will fit 1970 later a MC engines.

Now it's got an open area beneath the plenum. That'll keep that incoming air and fuel charge cooler. And of course, that means more power while the dual plane design is gonna work best from 1500 to 6500 RPM. S

that's got a square carb plans that'll accept either a Holly or Edelbrock carburetor. And hey, if this intake fuels your interest, it'll cost you about 270.

Well, a dead battery can cause you racers a lot of aggravation, especially when you're trying to get to the lanes for eliminations. But you can eliminate that problem with this power charger from

moroso. It'll reenergize any 12 or 16 volt battery with a charge rate that varies from trickle to a 30 amp fast charge. Now, it features a automatic timer and an automatic shutdown in case of a reverse connection or shorten the battery. Of course, you'll need a little long green, about 400 bucks. Oh, that's it for this week. Come back and see us again next week.
Show Full Transcript