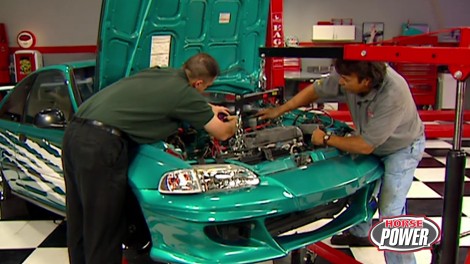
HorsePower Builds

Video Transcript

Welcome to the shop while Joe's covering a race. I'm gonna try something I've never done before. I'm gonna tackle the engine swap in our 94 Honda Civic.

Now, if you remember, we built this thing with an $8500 budget and we think it turned out pretty well with a header and cat back exhaust, a cold air intake, plus ignition and nitrous upgrades.

They turned our little 1.54 banger into a pretty decent performer. But, you know, gearheads are, we're always looking for a little more power.

One of the best ways to do it is with an engine swap. This one's a 1.8 twin cam GSR engine

out of a 95

acre integra

and this is my Honda

Honcho Matt Patrick, who's going to give me a hand today completing the swap.

Well, I'm more familiar with swapping out big block Chevys than I am high tech Hondas. But Matt, you've done this before. We ought to be able to get through this without too much difficulty. Well, Chuck out on a similar swap on my Honda Crx drag car. Uh, we've really made it easy on ourselves. We've got a complete swap over kit here. Uh, the complete engine wiring harness, the engine with all the sensors, the transaxle everything we need to make this really simple and easy. Uh Any competent mechanic should be able to do this and in a single weekend, that's the good news. Now, here's the bad news. This engine swap has become so popular that finding a good donor engine is probably gonna be the most difficult part of the whole job.

And you can expect to pay between three and $4000 depending on the year model. How many miles are on the engine and how complete the package is.

But like any engine swap, I guess the first order of business is to get the old engine out of there

after draining the coolant and disconnecting the battery

place, the vehicle on jack stands

so you can disconnect the exhaust,

remove the axles

and disconnect the shift rods,

then remove the air intake

and unplug the electrical connections,

the fuel and coolant lines

and remove the header.

The Honda uses a hydraulic clutch,

go ahead and remove the bottom two bolts, but don't worry about removing the top fluid line.

That way you don't have to worry about bleeding it later on

using an adjustable engine lift like this one from Trans DAPT. We're gonna attach these chains to either end of the engine.

Thanks Matt. Then we're gonna be ready for that cherry picker

with the engine supported by the cherry picker.

Remove the engine mount bolts

the vacuum line to the brake booster

and the AC compressor mount bolts,

be sure to tie the ac compressor out of the way with a heavy piece of wire before you lift the engine out. Now, that's gonna keep these connections intact and keep the Freon where it belongs.

We're also gonna remove our nitrous controller from back there on the firewall to give the engine a little more room to come out and to keep it from being damaged in the process.

We'll clear yet let it roll

before we built up our GSR engine. We're gonna add a few upgrades.

What I've got here is a pair of ZEC street strip cams. They've got increased lift and duration for increased power without affecting drivability.

One of the great things about these cam shafts, they're compatible with the stock vow springs and will not affect your ECU settings.

Wow, that will be a pretty cool upgrade and a pretty simple one to install

hall too.

Now, to help us hook up all that extra horsepower, we're gonna install a center force D FX clutch assembly along with their low inertia flywheel. Now check this out, this flywheel actually weighs the same as a stocker, but

it concentrates most of the weight right here in the center of the flywheel rather than out here towards the edge. And that is gonna help your engine grab a lot quicker.

The clutch assembly is a direct replacement for the original and even maintains the stock hydraulics, finger height and pedal pressure. But the pressure plate design uses a special face. In fact, let me show you the back side of this thing here. Now, this is gonna allow for a quicker release and helps double the clamping pressure.

Of course, we ordered the level one clutch assembly which is good for about 400 horsepower. But if that's still not enough for you, they got a couple more levels, they'll take it all the way up to 600 horsepower.

Now, I'm getting the transmission removed from the engine. That way we'll be able to remove the clutch easily. After that, we're gonna get the engine up on engine stand and we can start to do our camshaft installation.

Let's get it straight up. There we go.

Now, changing CAMS and a GSR engine is really pretty simple. First thing you wanna do though is bring the number one sonar to top dead center. Here's a little tip to help you find that,

stick your thumb down the number one plug hole and rotate the engine

and listen for the pressure.

All right, after that, remove the valve cover

the upper timing belt cover at that point, go ahead and break the cam gear bolts loose after you've done that loosen up the timing belt tensioner bolt. And the reason we wanna do that is we want to ensure the cam shafts don't turn as we're breaking the cam gear bolts loose.

Now, remove the cam gears

and the distributor,

then the camshaft plates

and caps.

Now the cam shafts come straight out

before installing our new cams. You wanna make sure that you transfer these oil seals from the old cams

to the new, otherwise you'll end up with a massive leak up there

and, you know, while we're at it now's a good time to replace that timing belt. After all, it's cheap insurance against bent

valves down the road.

But now we can go ahead and lube these things with this cam lube like we got from comp, we're just gonna spray it on here and coat everything liberally

on the lobes and the journals

and we can go ahead and drop the cams right back in there and begin reversing the process

properly. Torquing the cam caps is critical. So make sure the manufacturer's specs are followed.

Next, install a cam gears with the key way up,

then align the timing marks on the two cam gears

with a timing belt in place,

adjust the tensioner

finally torque the cam sprocket bolts.

All we need to do now is finish lashing the valves. Then we can go ahead and reinstall the distributor button up the front end. But hey, while we take care of that, why don't you check this out?

We'll be right back

coming up. We'll bolt up a new fly wheel

and clutch assembly

then we'll upgrade the electronics with a more compatible computer for Honda's V

tech. Don't go away.

Welcome back to the Horsepower shop where we're hopping up our Honda Civic here with a twin cam 1.8 GSR motor out of an accurate integra. Now, so far with the help of my buddy, Matt Patrick, we've managed to snatch the 15 motor out of the Civic and we put a set of performance cams from Z

in our new one.

But before we make the motor and transaction, it's time for us to bolt up that center force clutch and flywheel assembly. We showed you earlier.

Now we've moved this motor off the engine stand and set it on this table to get a lot easier access to the back of the block. Now, before we assemble anything, we've got to make sure we take some bright cleaner

thoroughly clean the surfaces of the fly wheel and the pressure plate to remove all assembly oils and Chuck's greasy fingerprints.

You gotta remind me of Joe. His hands never seem to get dirty on any of these projects either,

but

Matt does make a good point. Surely, dirt and grease will shorten the life of any clutch assembly and it'll probably chatter too before it dies. Now, in the meantime, I'm gonna take a look at this rear main seal area to check it for leaks and the pilot bushing for any unusual wear. Then we're gonna move down here and look at the transmission input shaft for any twisted spines here and any unusual wear here too.

If everything checks out both the flywheel to the crank flange

and torque the bolts to 80 ft pounds,

then use an alignment tool to position the clutch disk

and install a pressure plate on the fly wheel dowel pins,

use the pressure plate bolts that come with the clutch

and torque them to 20 ft pounds in a crisscross pattern.

Some people might cheap out at this point and reuse that old throt

bang. But trust me replacing it now is a lot better than having to remove the engine and split the transaxle later on.

Now, we got this new one from center force and here's a little tip for you

put a light coat of grease on the inside of it right here.

That way

it'll slide easily

on that transmission input shaft

carefully mate the transaxial to the engine

using the

dial pins on the engine as guides,

then install the five retaining boats

and torque them to 40 ft pounds

bolt up the starter next

then reattach the rear transmission brackets,

headers get bolted up later. So now is a good time to remove the factory manifold.

Then reinstall the half shaft.

How we looking matt looking real good. Let's uh push this table out of the way. All right.

Now our twin cam motor is ready to be bolted in,

you hold the engine, I'll drive the cherry picker. Ok.

All right. We got her in position looking all good. All right, here she comes. We're gonna go down with it.

You clear.

All clear.

All

right.

It takes some wrestling to line up the mounts, but the results will be well worth the effort.

What do you think, Chuck? Well, I guess if there was such a thing as a Honda Big block, that's gotta be it.

I sure hope that hood will close though. Now, once you get the engine mount cinched down, you just reverse the procedure that we showed you earlier. And wiring is a no brainer, especially if you

marked all your connections. But if you didn't check this out, Honda made things practically foolproof by shaping all their connectors. So they'll only plug in with their properly shaped mates.

Likewise, the coolant hoses are all right there and plug back right in where they used to be as well.

I'll tell you what if they're a little bit soft and spongy now might be a pretty good time to think about some replacements.

Now, we've got a couple of wiring issues we've got to deal with. You wanna extend the original wires to the intake air temperature sensor as well as the purge

solenoid.

Now, I like to go ahead and solder all my connections. But if you can't do that, at the very least use a real high quality crim connector, we don't need to stranded on the side of the road with a dead engine.

Great advice.

The GSR engine uses a two stage intake to generate more power at high RPM. S and how it does it is with an actuator that opens up a secondary set of runners

at about 5300 RPM at wide open throttle. Of course, the result is a solid kick in the pants that you feel all the way to red line.

But to make it all work, we need to swap our original computer for the one that came with the GSR engine.

Then wire the V

tech pressure switch,

solenoid and intake actuator directly to it.

Now, the 15 didn't come with a knock sensor, but the one on the new motor is gonna get directly connected to the ECU as well.

Of course, if you had to consult a manual, don't feel bad because we did too.

Plus the swap has become so popular that you can find just about everything that you need right on the internet.

Now, when we come back, we're gonna button this monster up. So stay with us.

Welcome back to the shop where we're putting the finishing touches on our Honda engine swap. Well, the hard part is done. We've got the engine in, we've finished up the wiring and connected most of the plumbing. Now, all that's left to do

is reinstall that clutch, slave cylinder

slide, the axles back in place,

reassemble, the front suspension

and bolt up the wheels.

Now, it's a good thing. We got all these extra parts with our GSR engine.

What we've gotta do is go ahead and replace the Civic shift rods with the GSR shift rods. Now, we've already taken out the old ones. All we've got to do is replace them with the new ones.

More horsepower means more heat. So we pop for this trick aluminum radiator from Flu

Aine. Now, it's not only gonna save us some weight but these high efficiency fins allow it to cool 20 to 25% better than the stalker.

Of course, it's a direct drop in replacements, which means that we're also gonna be able to retain the factory shroud and fan plus the original hose outlets.

After pulling the original radiator, remove the factory shroud and fan,

transfer them to the new radiator using the stock mounting hardware,

drop the new radar in

and secure it with a factory bracket,

then the original wiring plugs right up.

Now, if you remember we removed the stock exhaust manifold from our GSR engine. Now that gave us a little more room to work with while we maneuvered into the engine bay.

Now to take advantage of the GSR engines increased breathing capabilities, we've gone ahead and installed a set of

chaara step tube headers by Headman.

Yeah, these things are pretty cool. Now, let me show you how they work.

This cutaway shows how by stepping up the size of the primaries, these headers are tuned to help broaden the torque curve, which is especially important on any small engine.

And the design also reduces exhaust rev version which adds more power. Now, they also feature full mandril

bins, a durable HTC coding and the best part is they're 50 state smog legal.

Now, once we built up this extension pipe, we'll be able to check for fit to our cat bag system. And if we're lucky, we won't have to worry about pulling out that welder.

Well, we already got lucky when we came across this cool intake from XX. And here's what makes it so special. This fitting here allows you to plumb a dry nitrous system directly into the intake. And as a side benefit, spraying the nitrous in there adds another 50 CFM to the airflow capacity.

Now, this thing installs easy, adds power and it's cool. So don't you lose your cool while we take a little bit of a break? We'll be right back.

Want the latest on horsepower, check out our website at Horsepower tv.com.

Hey, hey, welcome back to the shop. Well, I guess we're a lot luckier with that intake than we were with the exhaust. But you know, a short splice right here behind the cat made it all work again.

Now, I'm glad I'm ready to see this thing on the

dyno Jet

before we make our power pulls, we're gonna give our GSR engine just a little more protection and maybe even a few more horsepower by draining the crank case and topping it off with some five w 30 royal purple synthetic oil. Now, I don't know about you, but I'm ready to make some noise.

Our old 1.5 engine maxed out at 100 and 30 horsepower with Nitrous.

We should equal that easily with our 1.8 GSR plus with all the parts available for it. The performance potential is much greater.

Oh,

man. Did you hear that V tech kick in

100 and 71 horsepower? Now, I'd say those are some pretty good numbers and I had a good time helping you put this motor in any time Joe is out of town. You just give me a call. That's cool.

And here are some cool tips for a successful engine swap. First. It's best to hear the engine run before you lay down your cash. Some salvage yards will do a hot start test for you on the premises. Either way it never hurts to ask about a warranty

check all fluid lines for contamination kinks or damage. And once they're connected, double check them for leaks,

make sure all your hoses, wires and belts are secured before starting the engine

and finally make sure you change the oil and filter before you fire the engine, then change them again. After running it for about 15 minutes. This will give the inside of the engine a good flushing.

Follow these tips and you'll be well on your way to making more horsepower

horsepower TV S hot parts is brought to you by Jags. One call, gets it all. One click, gets it quick.

Here's something that'll really make your Honda V tech suck more air. That is Edelbrock performance throttle body bolts right up to your stock intake manifold with a 25% larger bore. And of course, that's gonna mean more power. It also has provisions for stock sensors and vacuum lines and, well, it's also legal for use in all 50 states.

You can make a more powerful statement with your Honda for about 320 bucks. Now, let me show you a better way to light off that mix.

You'll find moroso blue max race wires on many of the nation's top running race cars. And, well, now they also make a custom fit set for Hondas too.

The spiral core maintains a maximum spark path while effectively suppressing RF interference. Now, that's something that's very important with today's high tech onboard electronics.

You can get them in red, blue or yellow or with the optional race sleeve like these have and the price, well, it ought to spark your interest too at about $80 a set.

Well, now that you've lit off that mix, you're gonna have to get rid of it. So here's something that'll help you pass that gas.

There are a number of Flowmaster exhaust systems for sport compacts already. But their latest American Thunder offering targets one of the hottest rides out there. The Subaru Wrx. Now this is a direct bolt in replacement that's gonna increase power and give you an authoritative exhaust note.

It also uses all this so

hanger locations and it comes with a polish stainless tip to finish things off.

Oh, and here's another tip for you

costs about $200.

Well, that's all for hot parts this week. If you'd like to see more of what you saw on the show this week, you can check us out at Horsepower tv.com. See you next week.
Show Full Transcript