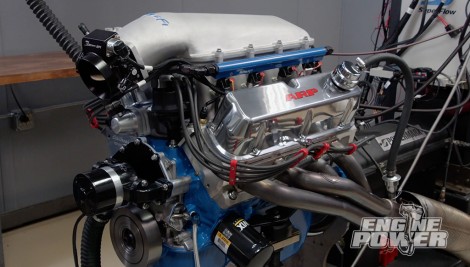
Engine Power Featured Projects

Engine Power Builds

Parts Used In This Episode

Summit Racing
Cometic MLS Head Gaskets
Summit Racing
Comp Cams Hydraulic Roller Camshaft
Summit Racing
COMP Cams Magnum Pushrods
Summit Racing
Comp Cams Timing Set
Summit Racing
Edelbrock Performer RPM Cylinder Heads
Summit Racing
Frostbite Electric Water Pumps
Summit Racing
Holley EFI LS Hi-Ram Intake Manifold Tops
Summit Racing
Holley Sniper Throttle Bodies
Summit Racing
Holley Terminator X Engine Management System
Summit Racing
MSD Ignition Distributor
Summit Racing
Permatex Ultra-Slick Engine Assembly Lube
Summit Racing
Summit Racing Coated Hypereutectic Piston
Summit Racing
Summit Racing Harmonic Dampener
Summit Racing
Total Seal Assembly Lube
Summit Racing
Total Seal Piston Rings
ARP
ARP Main Bolts & Assembly Lube
ARP
ARP Tapered Ring Compressor
ARP
Digital Rod Bolt Stretch Gauge
Goodson Shop Supplies
Gas-Fired Rod Heaters
Matco Tools
MATCO Tools are the Official Tool Supplier to PowerNation
Shacklett Automotive Machine
Schacklett Automotive Machine
The Industrial Depot
Tools, Hardware, Shop Supplies

Episode Transcript

(Pat)>> You're watching Powernation!

(Frankie)>> There's a lot of nice things about this particular small block Ford.

(Pat)>> Nicest of all it could be yours. [ MUSIC ]

(Pat)>> Hey everyone, welcome to Engine Power. Today in the shop we are working on a project that will once again benefit one of you lucky viewers. A while back we teamed up with our favorite fastener company, ARP, and gave away one of our repurposed dyno mules that we put some new parts on and it ran great. If you're not familiar with the project check this out. We took our 5.3 liter LS truck engine and converted it back to fuel injection using an MSD Atomic Air Force intake along with Holley's Terminator-X e-f-i system. ARP fasteners held it all together. In the dyno cell it made 447 horsepower and 410 pound feet of torque. That project was a lot of fun and it worked out well. So we wanted to team with ARP once again to do another, and this time we're gonna take care of all of you Ford fanatics.

(Frankie)>> We went through the shop and we found every single small block Ford we could. Turns out we have a bunch including some very nice slightly used parts and even some brand new parts that we haven't got a chance to run yet. All we have to do now is figure out what we're gonna use.

(Pat)>> Alright let's talk this out. We have a bunch of parts. Now this is what's left of Scavenged Small Block, that other project, and obviously Scavenged Small Block's been scavenged again because it's all apart.

(Frankie)>> This is a fully machined block and I measured it. It's already 60 over. We have pistons for it, and I'd feel a little better starting with this one just starting fresh. So whoever gets it in the end we know it's a good engine.

(Pat)>> Right, there's a fresh set of pistons for it and I think there's even a set of rods for it. So we can still use anything we want off this because half the valvetrain stuff is over there, but if we need anything else we can go get it cause I'm gonna drag this out and we're gonna start on that one.

(Frankie)>> Sweet! To get this project going we'll start out measuring the main bearing oil clearances. The block has already been align honed using ARP main bolts. So we're ready to lube up the fasteners and get them torqued down. Following ARP's instructions they are torqued to 70 pound feet using Ultra Torque lube. The main bearing oil clearance checks out between 25 and 27 ten thousandths.

(Pat)>> The stock crankshaft is laid into place. Because we are using different rods and pistons with this assembly we had the crankshaft balanced by our favorite Nashville machine shop, Shacklett Automotive Machine. [ MUSIC ] Before we hang the pistons on the rods they also need to be checked for vertical oil clearance. We use our ARP digital rod bolt stretch gauge to determine the proper torque value needed to achieve ARP's specified rod bolt stretch, which is between 40 and 45 ten thousandths. Vertical oil clearance is measured and it is 21 ten thousandths on this rod. All of the rods fall between 21 and 23 ten thousandths.

(Frankie)>> The pistons we're using off our shelf are from Summit Racing. They're a hyper eutectic design with a press fit wrist pin. They have a negative three c-c effective dome volume and Teflon coated skirts. The rods are heated in our Goodson propane rod heater just enough to slide the wrist pins in by hand. [ MUSIC ]

(Pat)>> For longevity and simplicity we're running a hydraulic roller camshaft from Comp. It has an off the shelf grind designed for e-f-i applications. Duration at 50 thousandths lift is 236 degrees on the intake and 248 degrees on the exhaust with 114 degrees of lobe separation. Lift on both the intake and exhaust is 579 thousandths. We'll mock up the Comp Cams timing set so we can check the cam's intake center line later on.

(Frankie)>> One thing we ordered especially for this project is a set of piston rings from Total Seal with a gapless top ring. Gapless rings have several benefits including better ring seal, which is crucial on the intake and compression strokes.

(Pat)>> Alright what did we decide to gap these to?

(Frankie)>> Well I was looking at the instructions in case somebody decides to get a little rough on it I was thinking 30 on the top and 25 on the bottom.

(Pat)>> I would agree with that. [ grinder buzzing ]

(Pat)>> You know I got fired from my last job.

(Frankie)>> For what?

(Pat)>> Well I worked at a juice factory.

(Frankie)>> What?

(Pat)>> Yeah I worked at a juice factory but I got fired from it. I just couldn't concentrate. [ Frankie laughing ]

(Frankie)>> Oh my gosh!

(Pat)>> Up next, the small block gets gapless piston rings, electronic fuel injection, and a high ram intake manifold. Then it runs the gauntlet in the dyno cell.

(Pat)>> Whether you're working on a stock rebuild or a high performance engine project sealing it up is one of the most important things you have to consider. There is a ton of technology in gaskets and sealants, and we're gonna go over a few of them right now starting with head gaskets. The three most common types of head gaskets are composite, multi layer steel, and dead soft copper. A composite gasket has a compressible metal core that's covered with graphite. These are great for o-e-m and mild street machine applications because they are very forgiving and have good conformability. Next up is a multi layer steel gasket, or more commonly known as an m-l-s. This type of gasket has a much more rigid construction and is able to handle the heat and pressures of increased combustion. Also it is customizable in thickness so engine builders can set their compression ratio where they want. Last but certainly not least is a dead soft copper gasket. These are used in extreme cylinder pressure applications. Top Fuel, Funny Car, blown turbo and nitrous. These are usually used in conjunction with a fire ring that is embedded in both the cylinder head and the block. This gasket conforms around them to seal it up tight. Typically you have to use a spray gasket on top of it to keep it from leaking water if you have a water application, but the nice thing about these. They are very, very customizable for thickness and bore size. Even though most intakes now days are sealed with O-rings old school stuff still requires a paper style gasket, and they come in a couple of varieties in both thicknesses and styles. From plain to an embossed one that helps sealing. Exhaust, they have the same technology as the head gaskets with composite, multi layer steel, and dead soft copper depending on how much power your engine makes. Moving on to the gaskets like the valve cover and oil pan, cork is still a good option but it does have some limitations. A better option is to have a steel gasket with a silicone outer coating and compression stops so you can tighten the gasket up and it doesn't come squirting out. As fare as sealants are concerned there is a wide variety of products available for whatever you are sealing up. If you have any questions on what to use for your project the technical experts at Summit Racing can get you straightened out. [ MUSIC ] First to go on our piston is a reduced tension oil ring. It's rated for 16 pounds. This helps reduce friction while maintaining good oil control. Next the second compression ring followed by the gapless top. The gapless top is assembled in two pieces with the ring spacer fitting into a machine grooved section of the top ring. When installed the spacer goes on the bottom side of the ring. The gaps are installed 180 degrees apart, which gives the top ring the gapless effect. [ MUSIC ]

(Frankie)>> The thoroughly cleaned bores receive Total Seal assembly lube before the pistons are installed. This promotes proper ring break in. [ MUSIC ] We're installing the number one piston assembly first with our ARP tapered ring compressor. The rod bolts are torqued up and the cam shaft is degreed. We wanted to install the cam advanced for good street manners, and it comes in at 109 degrees of intake center line, which is five degrees advanced.

(Pat)>> The wrist pins and bearings get lubed with Permatex Ultra Slick, which is a high pressure lube. The rings receive Total Seal lube just like the bores. Make sure to work the lubricant into the ring lands. [ MUSIC ] Our final torque of 47 pound feet gives us the correct bolt stretch on the ARP fasteners, which is 40-45 ten thousandths. We check all of the fasteners.

(Frankie)>> ARP offers accessory bolt kits for a wide selection of engines. For ours we chose a 12 point stainless kit, which has everything we need to complete the engine assembly, and that starts with our timing cover. [ MUSIC ] A Summit Racing harmonic dampener is next. [ MUSIC ] After cinching down a block off plate we'll install a Frostbite electric water pump. Because we're not running a mechanical fuel pump we will block off the opening in the timing cover. [ drill humming ] [ MUSIC ]

(Pat)>> After taping it off and giving it a nice coat of primer we'll return the engine to its roots with a few coats of Ford blue. [ MUSIC ] A standard volume oil pump is equipped with an ARP chro-moly driveshaft. Then it's bolted into place. The oil pump pickup is also held by ARP fasteners. With the oil pump pickup clearance checked a Fox body oil pan is tightened down. This is one of the most versatile oil pans around for doing engine swaps. With a one piece oil pan gasket in place the 12 point stainless fasteners can be tightened against the compression stops.

(Frankie)>> Because of their tall body construction our Comp Retro Fit hydraulic roller lifters must go in before the cylinder heads are installed. The great thing about ARP is that they offer their fasteners in several different materials depending on your application or your needs. Because we want our small block Ford to look great we went for one of their 12 point stainless head bolt kits. They have 180,000 p-s-i tensile strength and the heads are polished to make them really stand out. before we can install them we have to apply some ARP Ultra Torque underneath the heads. The fasteners come with high quality parallel ground stainless washers, but since we are using hat washers in the cylinder heads and we need to maintain proper thread engagement into the block we aren't going to use them. We are going to save these washers for another project. [ MUSIC ] For sealing the cylinder heads to the deck we have a set of Cometic m-l-s head gaskets with a 27 thousandths thickness.

(Pat)>> Edelbrock Performer RPM cylinder heads drop on next. They have a 170cc intake runner and 1.900 intake and 1.600 exhaust valves. The stainless ARP fasteners get torqued in three steps with a final torque rating of 70 pound feet. This entire combination gives us a measured compression ratio of 9.76 to one. Perfect for pump gas.

(Frankie)>> Up next, sequential port e-f-i for our small block Ford.

(Pat)>> We could have just as easily put a carbureted intake manifold on this project and sent it down the road but we wanted to do something a little more special. So we decided with a full fuel injection system from Holley. It starts with their high ram intake manifold. This one is specifically designed for 8-200 deck small block Fords and like all other high rams the bolt pattern on the top is the same. So if you want to run a front facing or an old school side facing intake, maybe even carburetors, this manifold will allow you to do it, and also to control the fuel and spark we are going with a full Terminator-X system. Now we've run Terminator-X's in the past on LS' and they run flawlessly. This one is specifically designed for small block Fords. It comes with its own e-c-u, a complete wiring harness, and a hand held. There is no laptop required to tune this one. It is self learning as well. Also we will run one of their dual sync distributors. This requires both a cam and crank signal to run the fuel injection, and the nice part about this particular unit it is designed to fit on this particular intake manifold. All of the air will be through one of their 102 millimeter Sniper throttle bodies, and we also have some 42 pound injectors to run. This may seem like overkill for this project but the owner of this engine, if they want to make any future upgrades this system will handle anything that they want to do.

(Frankie)>> We're using a set of 6-250 long five-sixteenths diameter Comp pushrods that we got from Summit Racing. We already had a dyno proven set of Pro Form 1.6 ratio roller rockers in the shop. We'll install them in the firing order setting lifter pre-load as we go. After applying some black r-t-v to the china walls our high ram manifold base is ready to go on. [ MUSIC ] We'll apply thread sealant to all the stainless ARP bolts to ensure even torque values across the board. [ MUSIC ] The fasteners are torqued to 24 pound feet. [ torque wrench clicking ]

(Pat)>> Before installing the manifold top we'll drop in our MSD dual sync distributor. [ MUSIC ] The top is then torqued to 140 pound inches. Before installing the injectors we'll apply assembly grease to the O-rings. [ MUSIC ] Once the 102 millimeter throttle body and the valve covers are installed the engine makes it way to the cell block. [ MUSIC ]

(Frankie)>> Wiring harnesses can look pretty intimidating but Holley's o-e-m quality harness has the connections clearly labeled for ease of installation. The hardest part is mounting the e-c-u. [ MUSIC ]

(Pat)>> If you are familiar with racing then you are probably familiar with Red Line racing oils. They have been making high performance oil for the racing industry for years and now they have taken that technology and put it into a new line of high performance oil for passenger cars and hot rods. This is a full synthetic ester based oil that has high amounts of ZDDP for anti-wear capabilities and has a high amount of detergent in it to keep the inside of your engine clean. It is also a recommended oil to replace a-p-i certified oils in several domestic and foreign applications. There are several different varieties depending on what you want for your application. We will be using some 10-30 for our engine. My favorite thing is the easy pour bottle. [ MUSIC ] Up next, we squeeze every bit of horsepower we can from our small block Ford.

(Pat)>> Alright here comes fuel. No leaks?

(Frankie)>> We're good.

(Pat)>> Clear up front. [ engine starting ]

(Pat)>> Yeah baby! What do you have fuel and timing at it?

(Frankie)>> Timing's just at 30. Just start there and fuel's at a safe 12-8.

(Pat)>> I like that because no sense in getting crazy with it right off the bat. I'm gonna make a pull from 2,500 to 6,000 at 300 a second for our first pull just to make sure everything looks good. I don't think the intake manifold's gonna be a restriction on this particular application. So the cam's gonna be a little big maybe. That's nice! Wow that was really nice!

(Frankie)>> Super smooth! [ engine revving ]

(Pat)>> Right through the pull!

(Frankie)>> That's awesome!

(Pat)>> 373.8 horsepower right at 6,000.

(Frankie)>> It's still going up too.

(Pat)>> Maybe turn it a little higher. 340.6 pound feet of torque. Because it only has 30 degrees of timing in it put some timing in it. Something like this go with 33 right now. I don't know how much more it's gonna take than 35, 36 because we've got a decent chamber flat top. I'm not even gonna shut it off. Get in there. I'm gonna have some coffee though. [ MUSIC ]

(Frankie)>> There's no need to turn the distributor on an e-f-i system. The handheld unit makes on the fly timing adjustments super simple. [ engine revving ]

(Pat)>> Well 375, 340. It didn't really care that much right, which is fine. This is why we do this. I think now let's lean it out. It's tracking good on air fuels but that is gonna be a little on the rich side.

(Frankie)>> Don't need to go crazy.

(Pat)>> That's gonna help maybe a little bit. 13-3 on air fuel. Just like the timing adjustment there's no need to touch the engine to adjust the air/fuel ratio. Alright did a little jet and air bleed change. This thing loads up nice.

(Frankie)>> Very smooth! [ engine revving ]

(Pat)>> It actually was maybe on the leaner side on that one, 371, 339.

(Frankie)>> I think it lost a few there.

(Pat)>> You don't want an engine that's so lean that you start melting stuff. At this power level it'd be a little bit harder to do because you'd really have to get it lean but I think you could actually get it lean enough where it'll just barely start to drop power. I mean we're in the 370 mark. Okay you ever have been at a dragstrip before you see guys hyper cooling their stuff. There's a reason for that. If the oil temperature is very hot and the combustion chamber very cool it will make a little bit more power. So here's what we're gonna do. We normally don't show something like this but go in there and I'm gonna shut the engine off. Go open up the tank and cool the water tank down. We're gonna get an operating temp down and we're gonna see if it affects power.

(Frankie)>> Okay, cool!

(Pat)>> This is like an old racer trick you do at the track.

(Frankie)>> I'm down to try it.

(Pat)>> We have a coolant temp of 80 degrees. I know it seems low. In racing you'll get the oil temp as hot as you pretty much can and the water as cool as you can cause by the time you go up there, you do your burnout, and you roll up you're still at a water temp that's not gonna hurt anything. This will keep the combustion chamber a little bit cooler. It keeps everything a little bit more under control as far as detonation wise. [ engine revving ]

(Pat)>> Now is that a difference or is that a difference? Watch what it does right here. Okay now we are at 391.7 horsepower at 6,100. Torque is up at 354. 21 horse at peak r-p-m. So pretty cool, and the best part of all I think we have every available fastener for this engine through ARP.

(Frankie)>> They're all 12 point stainless. They look really good.

(Pat)>> They not only look good, ARP, they make a great product, and I don't care what it's for they have it, and if you need something special they will custom make it for you.

(Frankie)>> Another good dyno day.

(Pat)>> Dyno days are the best days.

(Frankie)>> For more information on anything you've seen today go to Powernation TV dot com.
Show Full Transcript