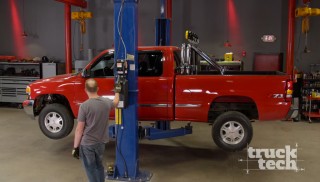
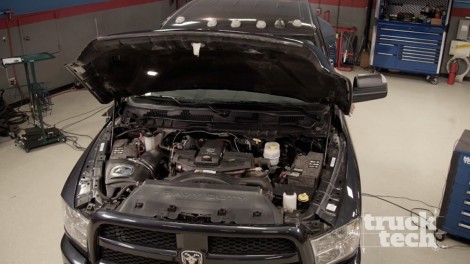
Truck Tech Builds

Parts Used In This Episode

Summit Racing
Hamilton Cams 103# Valve Springs
Summit Racing
McGaughy's Traction Bars
American Force
American Force Draft Dually Wheels 22x8.25" rear & 22x10" front
Matco Tools
Matco Tools are the Official Tool Supplier to Truck Tech
The Industrial Depot
Tools, Hardware, Shop Supplies
Trend Performance
TREND Performance Duramax Pushrods

Episode Transcript

(Narrator)>> She's big, she's heavy, and after today our one ton Ram dually will have plenty of power to pull. LT dives into the six-seven Cummins for the last of its stage two engine mods, and we'll crack the diff to make sure all the power gets to wheels. Here it is, Truck Tech! ♪ ♪

(LT)>> Hey guys, welcome to the shop. Today we're gonna be paying attention to our 2016 Ram 3500. We are slowly transforming it from a no nonsense work truck to a no holds barred high performance play truck. We picked up this truck in bone stock condition, which just isn't good enough. We started out with the basic upgrades that a lot of guys do to their diesels. We added a programmer, a cold air intake, a larger intercooler, and charge pipes, and threw it on the dyno where we made 100 horsepower over the baseline, landing right at 451. That's a good starting point for a daily driver and all but we have a need for speed. So next the stock v-g-t turbo and manifold was removed, and in its place we installed a Steed Speed second gen manifold and a Fleece S-467, which should provide just enough air flow for 800 horsepower and still have good drivability and spool up. On the fuel side of things we started out by removing the bed. We then removed the stock lift pump from the tank and replaced it with a Fleece dual in-tank lift pump. That'll get plenty of fuel up to the engine but the stock injection pump is the next limiting factory. So we added another, which brings our fuel system to about 1,200 horsepower working capacity. We didn't just want a race truck. It had to look the part as well. So along the way we threw on some Road Armor Identity Series bumpers front and rear along with their headache rack. And to light up the night we filled them with some Quake l-e-d's. We need to make sure that we're putting all the power the Cummins makes down to the ground, and all four rear tires are gonna spin. So we'll start by taking apart that axle. Our Ram is equipped with the American Axle Manufacturing, or AAM, 11.5 full floating rear axle. It can be found the GM 2,500 HD's from 2001 onward and the Ram HD's from about 2003. It features a 30 spline axle shaft and a massive 11.5 inch ring gear to deal with the massive torque coming from the diesel. The GM version of the axle is usually fitted with the G-80 gov lock, which is a clutch style limited slip but tends to wear out clutches with higher miles, leaving only one wheel receiving power. The Ram version of the axle was fitted with a track right helical limited slip, which works a little better on the street and it has no clutches to wear out, but its performance still suffers off road and under high power conditions. Uh, heavy! With the stock carrier out of the rear axle we'll separate the ring gear, which we're going to reuse. When it comes to selecting a differential for your pickup there are a lot of different options out there, and it all comes down to the intended use of the vehicle. Whether you spend a lot of time off road, on the street, or at the track. We went to Nitro Gear and we picked up a couple parts to show you guys. If you spend a lot of time on the street, got a daily driven truck, probably the Detroit True Track is the best option. This is a helical gear style limited slip differential, and it will smoothly and evenly split power between both rear wheels, but it still allows for a nice differential of speed between the inside and outside wheels for nice cornering and street manners. Our truck is no longer gonna spend any time on the street. In fact we're making a dedicated drag racing and sled pulling truck. So we're gonna step up to the bulletproof Detroit locker. This is a 100 percent mechanical locking differential, and what that means is any time wheel slip is sensed it will lock up and have a perfect 50/50 split of power between both rear wheels for maximum traction. And the best part about going with a mechanical locker is there are no air compressors, switches, or wiring that you have to deal with when you're working with a selectable locker. So Nitro also sent us a complete bearing setup to get the differentials installed, a cast aluminum differential cover that'll hold more oil and it's made from aluminum so it'll help dissipate heat. And we also picked up a complete set of lube. ♪ ♪ With the old 342 ring gear cleaned up we'll install it with a little high strength thread locker on the ring gear bolts, and evenly pull the ring gear onto the carrier. Then we'll move over to the shop press and install both new bearings making sure to press on the inner race. Now the carrier goes back into the axle housing, and the caps are loosely bolted in place. Then we can start to adjust the backlash. We're shooting for six thousandths, which was exactly where it was before. Plus since we're not regearing we don't have to mess with the pinion depth. [ drill spinning ]

(LT)>> Now the higher capacity cover gets some r-t-v, and gets bolted to the back of the housing. The axle shafts are slid into the locker and bolted to the hub. Finally we'll finish up the rear by adding some oil. And with this style of locker there's no need for any sort of friction modifier, just straight gear oil. ♪ ♪

(Narrator)>> Next, traction bars mean wheel hop no more!

(LT)>> We've wrapped up the installation of the Detroit locker on the rear end of our Ram. You combine that with dual rear tires and the massive torque coming from this Cummins engine. This is going to be one exciting truck to drive. Whenever you accelerate on a solid rear axle leaf sprung vehicle the pinion actually wants to climb up and put some twist into the leaf springs. This is known as axle wrap, and if you ever lose traction sometimes the tires can rapidly skip up and down on the surface of the road. That's known as wheel hop, and it introduces a tremendous amount of shock load through the drivetrain, which can actually damage components like the ring and pinion, U-joints, transfer case, or even the transmission. So to keep this rear end planted we're gonna be installing some traction bars. This is a unique new design of traction bar that we picked up from McGaughys. It'll completely kill the axle wrap and wheel hop but it will still allow your suspension to freely cycle, giving you a nice, smooth ride. It starts out with a bracket that attaches to the rear axle. It bolts right around the tube, and attached to it will be this fabricated laser cut and box welded together link. On the other end this is where the magic happens. There's a swing shackle with a rubber snubber. Now as the link pushes forward the snubber makes contact with the frame, which will completely kill any twisting motion but the swing design will still let you have a nice smooth ride when you're just cruising down the roads. We got ours powder coated in Illusion Cherry to match the theme of accent colors we have going on with the rest of the truck. We'll get started by bolting on some brackets. The first thing to go on are the axle brackets, which simply bolt around the tube just inside the leaf springs. Then the bar is slid into the bracket with the angled side up for maximum ground clearance. Now we'll install the swing shackle and snubber, and get a rough idea of where we'll land on the frame. Our application is going to require a little trimming of the cab mount. So with it marked up... [ saw spinning ]

(LT)>> ...we'll use the cutoff wheel to remove the extra metal. [ saw cutting metal ] [ hammer hitting metal ]

(LT)>> And a 60 grit flap wheel to grind down the welds. There were a few cuts that went just a little bit too deep, but a quick pass with the mig welder fills them in and the flap wheel erases any evidence. [ grinder spinning ]

(LT)>> Then a quick coat of chassis black seals everything up. Next we have to lower the truck and put all the weight on the suspension to install everything in its proper operating range. With the holes marked, the truck goes back up in the air... ♪ ♪ ...and they are drilled out. Since this is a boxed frame with no way to put a nut on the back side threaded inserts are pressed into place. ♪ ♪ And the bracket gets installed, keep this rear axle firmly planted on the ground during launches.

(Narrator)>> Next, delving deep inside a diesel.

(LT)>> The last power upgrades that we do to the Ram will be underneath the valve cover, and we're gonna start with valve springs. The increase in engine r-p-m, boost pressure, and exhaust drive pressure can actually cause the valves to stay open when they're not supposed to be, which will definitely kill power and potentially could kill your engine. So to prevent that we'll be installing some Hamilton 103 pound valve springs. They'll be able to better control the valve motion without apply too much pressure to the cam that might damage it. To go along with the increased spring pressure we'll be installing some stronger Freedom Racing stage two push rods that are three-eighths inch thick. You hear us talk about head studs on a diesel all the time. The engine makes so much pressure inside the stock head bolts can actually stretch, lifting the cylinder head off and causing a gasket failure. So to prevent that from happening we installed some stronger ARP head studs that'll firmly keep that cylinder head clamped down to the block. And the very last piece of the puzzle are these S&S 80 percent over stock injector nozzles. We all know that more fuel equals a whole lot more fun. So together all these parts will give us more power and allow us to safely spin that engine much faster. So let's get started tearing it down. ♪ ♪ First we'll have to remove the upper valve cover, p-c-v cover, and disconnect a few plugs and hoses, and then the lower valve cover can come off. Next take a picture for reference and unscrew the electrical connectors to all six injectors, and remove the injector harness assembly. Next the valve cover adapter can be removed. Even though the Cummins has four valves per cylinder there are only two rocker assemblies. So a pair of valves are connected by a rocker arm bridge. The push rods are quite long. So in order to remove the last few on the rear a rubber body plug in the cowling has to come out, making room for the push rods to slide up and out of the block. Next the intake horn is removed, followed by all six fuel lines. Then the fuel tube nuts come off, and the fuel connector tube is slid out of the head. Once all six tubes are out the hold downs are removed and the injectors can be popped out and removed from the head. So there are two things to keep in mind when you're working on injectors on a Cummins. One, make sure that the copper sealing washer comes out with the injector. If not just make sure you pull it out of the cylinder head later on. And number two, the most important, make sure that you keep track of which injector goes to which cylinder because each has its own specific offset and if you don't put them back where they came from the truck won't run properly. You'll need a special tool to hold the injector in the vice, and a 15 millimeter wrench to crack loose the nozzle nut. Then pull off the copper washer and remove the stock nozzle. It is very important that you don't lose the tiny puck that's inside. It can sometimes stick to the old nozzle. So very carefully set it back inside the injector body. Then line up the larger nozzle onto the injector body... ♪ ♪ ...thread on the nut and torque it to 50 foot pounds. Finally I like to dab on a little grease to keep the new sealing washer from falling off. There are a few ways you can install head studs, and you'll get different opinions depending on who you ask. Ideally you'd remove the head and have it cleaned up, and install new gaskets but since our truck is only two years old we're using the one at a time method, which we've seen work with good results. In the reverse order of torqueing we'll remove a stock bolt, thread in a new stud, install a washer and nut both coated with ultra-torque, and torque to the first step of 40 pound feet. Once all the bolts are replaced with studs we'll do the final torqueing from the center out, going first to 80 pounds, then 125. ♪ ♪ Dang!

(Narrator)>> Next!

(LT)>> Hey Pat, how are you?

(Pat)>> Hey!

(Narrator)>> Pat checks on our progress.

(LT)>> Just doing a little valvetrain work.

(LT)>> Hey guys, welcome back to the shop. We're making great progress on the Ram, getting it much closer to screaming down the race track. So far we've got the rear end locked up and some traction bars installed. Some larger nozzles on our injectors, and the head is fully secured to the block with some ARP studs. So now we're gonna talk about valve springs. The process involves rolling the motor over until a piston is at top dead center. Then we'll use this tool to compress the springs and swap out four at a time. The neat thing about the Cummins is you'll have two pistons at top dead center at the same time. Just remember they have to add up to seven. So we'll start with numbers one and six, move on to two and five, and then at the middle at four and three. ♪ ♪ A screwdriver shows us when the piston reaches top dead center. Then install the compressor where the injector hold down attaches. Then using the disc press the valves down just enough to remove all eight locks. Then back off the pressure, remove the stock springs, and replace them with the stronger Hamiltons. Reinstall the disc and compress the new springs, and install all of the original valve keepers. Now we can remove the tool and repeat the process five more times.

(Pat)>> I heard some engine work was going on and I had to come check it out.

(LT)>> Hey Pat, how are you?

(Pat)>> Oh, valve cover's off!

(LT)>> Yeah, you know, just doing a little valvetrain work.

(Pat)>> Well it's looking. Now aside from that distinct diesel smell like an old garage, this is pretty similar to kind of the stuff I work on. Adjustable valvetrain, little bity valve spring. This looks like it's on a hit and miss engine.

(LT)>> Briggs and Stratton actually. You we're kind of doing the same stuff that you do. You know, strengthen the valvetrain so we can spin it faster, bigger injectors, head studs, clamp the head down.

(Pat)>> You've got some ARP hardware in there. The thing looks great. Last time I worked on something like this it was in the headache rack of a semi. But they make a lot of power, but do you know why diesels need turbos?

(LT)>> Oh goodness, here we go.

(Pat)>> Because they refuse to make power without them. No these things are pretty impressive and looks like you're doing a great job.

(LT)>> Well I'll tell you what. I'll get you on the diesel bandwagon one of these days.

(Pat)>> Let's not get too crazy.

(LT)>> Here, fix that up for me.

(Pat)>> No I'm not touching it.

(LT)>> Ah, come on!

(LT)>> Installing a power adder is a great way to pump up the power and torque of your car or truck but there are a lot of different options out there, and it can be hard to decide which type you want to add. So today we're gonna talk about the different kinds, how they work, and the pros and cons of each. A supercharger, in general terms, is a device that bolts onto your engine and is usually mechanically couple by a belt. Its basic function is to suck in air from the atmosphere and pump it into the engine, filling the cylinders with much more air and fuel than they would be able to draw in by themselves, therefore increasing power and torque. A positive displacement, or roots style, blower moves a fixed volume of air for every rotation. So the faster it spins the more volume of air it's gonna pump. In theory they'll produce the same amount of boost in the manifold regardless of how fast the blower is actually spinning. Now they're very common on factory cars. You can find a roots blower on ZROnes, CTSV, the Audi S-fours, and a whole lot of different cars. Now they're really drivable. They make great low end torque, and have response at nearly any r-p-m. Another popular option is the centrifugal supercharger. They're also driven by a belt from the engine but they operate quite a bit differently. The faster you spin a centrifugal blower the volume of air per revolution increases. If you watch a boost gauges you'll notice that a centrifugal blower increases boost with engine r-p-m, usually peaking at red line. Because of this they have peakier power band, and they're usually found at home on an engine that loves to spend more time at high r-p-m's or on a lighter weight vehicle. Now a centrifugal supercharger is much less complex to install than a roots style and the best part is they product a lot less heat, which everybody knows, colder air is better. A turbocharger and centrifugal supercharger look nearly the same, and on the compressor side they functional almost exactly the same, but the biggest difference is a turbocharger is driven by your exhaust. There are more and more cars coming from the factory equipped with a turbocharger, and for good reason. There's no parasitic loss on the engine like you'd get from spinning a supercharger. The boost curve on a turbo is somewhere in between that of a centrifugal and a roots style blower. So they can be very fun to drive. Now when it comes to installing an aftermarket turbo system though that's kind of where the disadvantage is because it is very complicated. You have to get in and modify the exhaust system, the intake system, the oil system for lubrication, and in some cases even the cooling system. And finally we have nitrous oxide, or the chemical supercharger. It is by far the low cost leader of the group and the easiest way to install a whole bunch of extra power. So if you need to get down the race track in a hurry or just get to the grocery store faster you can install one or even all of these power adders.

Today is finally the day that our Ram gets to put on some new shoes. If you've been paying attention to our show, you'll remember we originally were gonna run a 37 inch tall mud tire on this truck, but the more we thought about it the less it made sense because this truck will spend a lot of its life at the drag strip, and a 37 is just not the ideal tire. So instead we picked up some 305/45 22's and mounted them up to our American Force Draft super duallies. ♪ ♪ These wheels and adapters are a hub centric design, which means the center of the hub and the wheel supports the weight of the truck rather than the lug studs. [ drill spinning ]

(LT)>> Made from forged aluminum and polished for a really clean look, these American Forces transform the look of our truck and make it stand out from the crowd. And with four tires on the ground this truck has 1,220 millimeters of rubber for maximum traction at the drag strip. For more information on this or any of our projects be sure to check out Powernation TV dot com.
Show Full Transcript