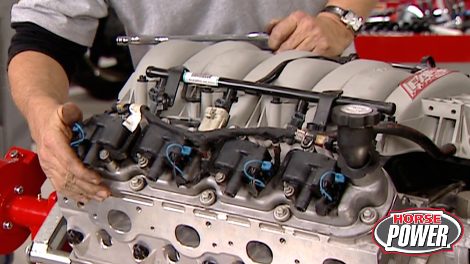
HorsePower Builds

Video Transcript

Hey, welcome to the horsepower shop and the return of our project Ls Gun.

A few weeks ago, you might recall. We had to remove the engine from our 98 Camaro to do some troubleshooting before we could add some performance upgrades.

Now, I got to tell you this was one unique exercise in engine extraction.

The LS one comes out from the bottom.

So using the two post lift in the truck shop, we got the car in the air and went to work, bringing up the motor on top

and on bottom

before we could roll it out from under the body.

Then back in the horsepower shop, we completely tore down the engine

and we discovered a spun rod bearing.

Now, since we want our motor to be in perfect condition for the power upgrades we got planned.

We sent it off for professional machining at a place called wheel to wheel.

That's where the LS one block gets completely machined

and the reciprocating assembly fully balanced

and here's our block back from the machine shop and ready to be reassembled. Now, oiling is really critical on an LS one. So we're using bearings that feature a grooved upper half rather than a three quarter, a full groove set.

Now, we're using clevite 2190 nines in standard

and a thousands oversize, which allows us to mix and match these bearing halves to get the 1.5 to 2 thousands clearance that we're after.

Now, that dimension is really crucial here on the center thrust bearing,

which is where it's located here on the LS one. Now, if those dimensions sound a little bit tight to you, well, they are. And that's because we're using an aluminum block that expands and contracts at a whole different rate than the cast iron one does.

We had planned to just get our stock crank ground. But after we miked it, well, we discovered it was too far gone. So we're gonna replace it with this GM piece that's been balanced along with the rest of our rotating assembly

and check out how the journals have been polished

and the oily hose champed.

Now, if Chuck's done his job over there with the bearings, I brought this baby in place.

Well, I've got the assembly lube on the bearings. Okey doke. Here she goes.

Now, we're gonna install the main caps

over the A RP studs.

We're gonna torque those studs to 60 on the inners,

50 on the outers.

Now, the rest of the reciprocating assembly from wheel to wheel includes a set of these molly forged aluminum pistons.

Now, they've got a nine CC reverse dome here to help get that compression ratio down for the blower that we're gonna be using later.

And they also have a special coating here on the skirt to help reduce friction. And another one up here on the face of the piston to help hold heat inside the combustion chamber. And of course, that is gonna help us make more power. Now, the ring pack, well, it's a low friction set also from Molly.

Since we're adding boost later, we're gonna set the gap a little on the loose side at

23,000 on the top ring,

25,000 on the second

and on the oil ring. And

while my partner finishes gapping those rings for our pistons, let me show you the rods we're gonna hang them on. Now, these are Cali's H beams that have been profiled and pined and the small ends have been bushed for a floating pin.

The big ends are held together by a RP CAP screws for strength and reliability and they'll be torque to 50 ft pounds. Hey, that sounds like a pretty bulletproof combination, huh? Now, for

bran, we went with crane all of the way, starting with this billet roller here. Now, this in specs out at 551 lift on both sides with a 216 duration on the intake 224 on the exhaust. And of course, both of them are measured at 50 thousands lift. Then we added a set of their hydraulic roller lifters

and for rockers, hey, you know what? It's pretty hard to beat these crane gold rollers here and we specked them out with a 18 ratio. Finally, we added a set of the compatible springs and a set of their titanium retainers. Now, these things are pretty cool. What they're gonna do is take a little bit of mass out of the valve train, give us a couple of 100 more usable RPM. Now, we're gonna show you how everything goes together right after the break. So, stick around.

Well, we are back to work on the LS gun build up on our way to making a potent street fighter out of this popular small block.

Well, with the bottom end all buttoned up, we can move on to installing this roller cam shaft, which has a more aggressive grind than our stocker to match the power plants we have for this engine down the road.

You know, our new valve train includes stiffer valve

spring. So we need a high quality timing set like this one from crane. Now, check it out. It's a double roller piece that uses billet steel sprockets here. In fact, the top one is adjustable.

You can run it up to four degrees advanced or retarded.

Now, let me show you something else. This is our stock timing set just compared to the crane set up here. And when you say that's a worthwhile upgrade. Yeah, let me have that

now to adjust the timing. All you gotta do is loosen up these bolts right here. You move the cam to wherever you want

it and you cinch them back down again

on the backside, the crane set up uses a Torrington bearing. And what that does is keeps the camshaft from walking and it keeps the sprocket from gouging out your block. Now, I've already made the adjustments that we need to install our camshaft straight up

oiling is critical with the LS one. So anytime you make power upgrades, you also need to upgrade your oil pump. Now, we did that by first removing this plug

and adding a 70,000 she M under the spring inside here to increase the pressure.

Then we got busy with the

high grinder, imported the pickup side

and the outlet to ensure maximum oil flow. Oh, also to make this thing work, we need to use some of these shes that came with our timing set

and that's to compensate for the extra thickness of that double roller

to fit the pump to the block. We remove the outer cover.

Then the GEO rotor.

Then after bolting the housing down, loosely check for two thousand's clearance between it and the driver all the way around.

Then with the feeler still in place, snug the mounting boats down,

then reassemble the pump

and replace the cover,

then remove the mounting boats one at a time.

Apply some red thread lock

and torque them down

to 18 ft pounds.

Now, this is a very important step because if the housing is not centered,

well, the geo rotor will self destruct, metal grinding will get in the oil and well, the engine will be making strange noises again.

Now, with the pump properly located, we can reinstall the windage tray

and the pump pick up.

Next. I'm gonna loosely install this front cover

along with the harmonic balancer to center of the front seal. Now, after this, we can torque the front cover bolts to 18 ft pounds.

Hey, we're just about ready to bolt up that back cover. But before we do, uh

we need to reinstall this little oil control valve. First, I know this thing looks small, but it's very important because without

it, you just don't have any oil pressure.

We're gonna give a little bit of oil

to help it slide in place.

There we go. Now, you also want to make sure that the O ring end goes in last.

Now we can bolt up the rear cover

the oil pan.

Then after rolling the engine over, we can install the valley pan.

Hey, here's another tip that'll help you with the oil control on your LS one. You know, these lifter boxes keep a lot of oil trapped up inside them, especially at high RPM. So what I like to do

is drill half inch holes here on the side of the boxes that'll let the oil drain back out and down in the pan. Keep that stuff in circulation.

That is an important tip. And here's another one for you better stick around because after the break we finish up the bullet.

All right. Well, let's go.

Welcome back to the shop where we're just about to finish up the engine, build up for our project LS gun.

Now, with the short block completed, hey, we're ready for the cylinder heads which we also had sent out to the LS one experts at wheel to wheel. Now, they've developed AC NC program that ports these heads. So they'll flow 292 CFM with a 2 24 CC port.

They also installed new larger 202 intake and 157 exhaust valves and the new springs and retainers from crane that I showed you earlier.

Now, while they were at it, they also machine the heads back here to clear those big rockers.

Well, I got the lifters and those modified boxes installed, but you know something since we're gonna increase the cylinder pressure with the blower installation later,

we're also adding a set of a RP studs. Now, here's an important tip for you,

make sure you blow out the head bolt holes

to get rid of any fluid.

Otherwise when you install boats or studs, those fluids will be compressed and you could crack your block.

Now, to make sure we get a really good seal, we're gonna use a set of these composition gaskets from

Mr Gaskets, man. You're just right on time. Chevy boy.

Hey, I want to show you something. The stock LS one uses a net lash rocker set up that we're replacing. Of course with our crane rollers. Now, this kid also comes with studs to make the rockers adjustable and guide plates plus a set of new hardened push rods.

Well, our intake comes from fast. now, it's called the LSX and it's a modular design made of space age composites. Now check this out. It's been engineered to accept a larger than stock throttle body. Plus it has dedicated bosses to accept nitrous nozzles. And here the really cool part, the planum volume has been increased by 25% over stock. So this thing will have absolutely no problem feeding a larger higher RPM engine. Plus the module design

allows us easy access for reporting

and other modifications.

Of course, it's a direct bolt on with provisions for the stock fuel rail, sensors and brackets.

Yeah. Well, speaking of that, all I've gotta do over here is remove the stock fuel rail,

some brackets and sensors and transfer them to the new intake.

Well, this thing's really starting to look like an engine now,

but it still looks a little ugly here. We got to come up with some cool valve covers for this thing, man. I'm with you 100% on that. I gotta admit though, you know, I am kind of glad now that Mike did pop the motor doing those burnouts, gave us a good excuse to get our hands on one of these things. Yeah. But you know, for a guy who cut his teeth on a traditional small block Chevy, like I did this thing's a real step forward. For instance, those six bolt mans man, that bottom end is practically bulletproof in those heads. They breathe like crazy.

Well, the aluminum heads, aluminum block and lightweight roller valve trainer, good examples of how new engine technology is lending itself to a good old high performance. Yeah, but you know the best thing about all that aluminum.

Well, it gives us a way to recycle all those Budweiser cans. No comment there, man. Seriously though, I can't wait to get this thing back in the Camaro in a couple of weeks.

That way we can check out the real performance. We're gonna get out of this thing. Now,

don't go anywhere though. We're gonna be back with more horsepower right after the break.

Horsepower T V's Quick Tech is brought to you by

Wyotech.

If your daily driver was built in 1996 or later, it's at least got a driver side air bag

and no matter how much you know about cars, these things can be a little mysterious. So

here's a little heads up on how the bag can save your neck.

Well, Eric, I guess most people know why an airbag works and hope it never does

how it works. So, what's the basic theory?

Well, the basic theory is this before, anything

that's airbag related is gonna work properly. What's gonna happen is you have to have your seatbelt fasten first.

Ok. These are known as supplemental inflatable restraints, which means it's a supplement to

your primary restraint, which is going to be a seat belt.

The first component we're going to see is we're going to see the airbag assembly itself.

Everybody's seen this side, but most people don't get to see this side.

Ok. So what we have here is we have our horn contacts.

So

every time we hit the horn button, we still have the horn working even though it's an airbag in the way

the next component we have is an SI R coil. Some people call it the clock spring,

this thing rotates like this. So every time that we turn the steering wheel,

we maintain electrical contact with the airbag assembly itself.

So we never lose contact with this in case of deployment.

Next, we have an impact sensor which is located in the front of the vehicle.

This thing basically just tells the airbag system and shows a deployment going on when this thing is triggered

right here, we have the control module of the airbag system.

What goes on inside here is it stores the trouble codes and every time we have an airbag light coming on in the dash,

you can access this computer and it can talk to us and tell us what's wrong.

This also has an impact sensor stored in it as well

right here. What we have is we have a seat belt assembly. But what most people don't see is they don't see this assembly here as well.

This is part of the seatbelt assembly. This is a pre tensioner,

the pretension actually tucks the seat belt tighter to the driver.

So in case of an impact, what happens is he doesn't slide underneath the seatbelt in case there may be a little bit of slack. So it pulls a tighter keeps the guy where he's supposed to be.

All right, let's say I get a warning light saying the bag is malfunctioning how the serviceman gonna know which part?

Well, a lot of manufacturers have been using tools such as this,

this actually just simulates the airbag assembly itself.

So this aids and diagnosis because what happens is

instead of checking the airbag, which are very sensitive,

we use something like this so we can eliminate the airbag out of the system and we look at the wiring or another component.

Then again, there's only one. Sure way to tell if the bag is really going to work on.

Kids. Don't try this in your home garage.

Hey, here's a couple of pointers for you and they just happen to be attached to auto meter's new street rod gauge kit.

Now the kit comes with a five inch speedometer

and a matching quad gauge with readings for bolts, oil pressure, water

and fuel. Now you can even order them with different needles and backgrounds. This one's called the old time. And

the kit also comes with sending units for fuel,

oil pressure and a sending unit for the electronic speedometer plus hardware to make it for easy mounting. Now, the price is pretty easy to handle too about 450 for the whole deal.

If he's the number one enemy of your car's transmission, this could be its newest ally. It's B and M's new high tech cooling system for automatics.

And each one features a built in 12 volt fan that's activated by this thermal switch. When the temperature reaches 175 degrees. Each one pressure tested up to 200 P SI, they feature half inch MP T fittings and these mounting brackets built in for an easy installation. Now they come in two sizes to fit a variety of applications and

well, this is pretty cool insurance for your tranny with prices starting at about 250.

Well, here's a way to add some color under your hood. Mr gasket now has these G Lex fluid transfer systems to help you create your own custom look.

Now, the hose replacements are flexible allowing you to shape them any way you want

and they're made from corrosion resistant 300 series stainless steel with a tough powder coating

for long life and good looks.

The kit also includes these matching adapters for a clean leak proof installation

and you can get them in sizes for your heater and radiator hoses. Even fuel lines like to get a line on a set for your ride where prices start at about 50 bucks,

you know, seven could be your lucky number, especially if you need a ratcheting wrench set that'll allow you to work in tight places. Now, the seven piece set from craftsman features a unique gear release to temporarily disable the ratcheting mechanism.

Just applying pressure to the side of the handle allows the wrench to rotate freely without the clicks release the pressure and the ratch mechanism

is reen engaged. Now, these wrenches also feature a large tooth profile for maximum gear contact and strength plus minimal parts that can wear out.

Now, the best part though is the price. It's about 50 bucks for this set right here. Well, I hate to throw a wrench into your plans there. Uh, ratchet mouth, but time for us to leave, I'm afraid,

hey, I'll tell you what we'll see you back here again next week.

Ratchet mouth.
Show Full Transcript