MuscleCar Builds

Parts Used In This Episode

Dupli-Color
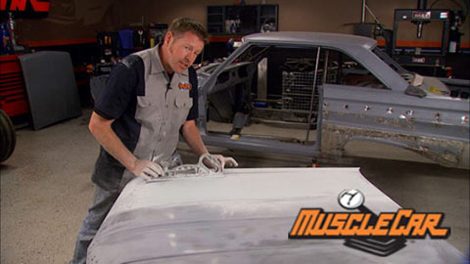
Dupli-Color Guide Coat provides a perfectly smooth finish for contouring repair areas. The fast drying easy to sand formula exposes surface low spots and imperfections.
Evercoat
Auto Body Metal Glaze Professional paint results with Evercoat.
Evercoat
Evercoat Rage lightweight body filler is formulated with the finest resin available for easy sanding and unmatched adhesion to galvanized steel and aluminum. Plus, it's stain-resistant for use with base coat and clear coat paints. Evercoat Rage body filler comes complete with blue cream hardener.
Evercoat
Grill-Brick or Stink Rock Body sanding, prepping and painting. Specially compounded to disintegrate during use to expose an unused surface.

Video Transcript

Today. It's the muscle car body work special from Filler and stink rock to dollies and hammers learn the secrets from a Pro Plus. Brent gives a tight new look to red sleds bumpers and a 66 Mustang with the hypo glow.

Hey, welcome to muscle car. Red sled here has gotten quite a bit of sheet metal work done. We've even got a jump start on the body work and it's time to finish smoothing out the rest of it.

Now, the tribute trans Am, what's that about the same stage in progress? And even though it looks pretty menacing in this flat black, we can't paint over it and that means that it's gotta get stripped and smoothed out as well. So get ready for a muscle car body work extravaganza

when the 61 and Paula rolled in, it looks

like it came right out of a swamp after frame makeover and acres of sheet metal. It's well on its way to becoming red sled.

The 69 Firebird didn't look quite as bad at first. Then we got it back from the blaster because of the horrors hidden under the paint. About 90% of the steel had to be replaced with its custom honeycomb wheels and roll bar in place. It's starting to look more like year one's vision for the tribute Trans Am.

Now two whole cars worth of body work to do. You gotta start somewhere and I figure the Impala hood is as good a place as any.

It's in pretty good shape, but it does still have a couple of issues. We've got dents and a couple splits here that need to be taken care of. But before we can do that, we got to strip it down the metal

three MS clean and strip disk makes short work of the primer because I need to see bare metal before I bring in the stud gun

studs come in several sizes designed for working on different thicknesses of sheet metal. These are medium studs and after attaching them, I'll start working from the outside of the dent to the center.

If I could reach the backside of the hood, I'd use a dolly. But since I can't, the studs will allow me to put pressure on the sheet metal where I need it.

The life of the stud is glorious but short. Once they've served their purpose, I'll cut them off and grind them down

the corner of the hood has some metal fatigue probably caused by rusted spot welds. This may look like a minor area but it needs to be fixed now or it'll just keep growing later.

There's one more dent that needs to be straightened out before I can start blocking. That means one more stud meets its face.

Uh, dents are pretty easy to find by hand, but waves are a whole another story. That's where guide code comes in. Usually if you guide coat the whole panel, then hit it with a long board, it'll kind of show you where you're at.

Guide

is available in powdered or sprayable forms. I prefer the spray because when it's applied, it's stuck.

Powdered guide code doesn't adhere to the surface and can come off when you don't want it to.

But it's really just a matter of personal preference.

Nice straight hood doesn't look too straight anymore. Does it?

Now, if you notice here, I'm using a flexible block. So as I sand over the front of that hood, I'm actually grabbing this block and bending it down to conform. So I don't make this thing look like a golf ball

right now. I'm gonna teach you guys a lesson here that me and a lot of other guys have had to learn the hard way

any time your body work in a hood, make sure it's sitting on the rack with a framework directly on it, not the back of the hood skin. If the hood skin comes in contact with the rack and your body work over it, it can actually create a high spot though, when you pick it up, it'll make a low spot that'll ruin your whole day

time to mix up some plastic. Since I'm covering a large area with a very thin coat, I'll thin it out with some metal glaze. This will allow the plastic to spread more consistently and will also help self level,

try to keep the filler as smooth and even as you can and keep the pressure consistent on your spreader, the closer you get it now, the less sanding you'll have to do later.

And if you notice here, I'm not standing straight up and down along this body line, I could technically do that and blend in this area right here. But if I did, what's gonna happen

is I'm gonna cut a low spot all the way through here. Now, there's two ways you could deal with that. You could either prime over that, fill it in. But then later on as it dries, you'll actually see that shadowing back through your paint. The best way to do it is as you're standing, kick the back end of your block out that way, you're taking that edge and blend it off into the face of the, of the hood.

Well, now that I got most of the sanded out and you can see through a lot of it, you might be asking yourself, ok, why didn't he just prime it and then block it out?

Well, I tell you

the waves may be barely there, but if you were to fill them in with primer. You're basically gonna end up with primer like this and the waves primer like that on your high spots. But when the primer shrinks down, you're gonna end up with a wave in the face of your hood, the filler is a whole lot more stable.

Ok? I'm gonna leave the impala in Brent's hands and get back on the Firebird. Now, after we got all the new sheet metal put on it, we could have sent it back to the blaster and had it all stripped off. But honestly, it probably just be more trouble than it's worse. So I'm gonna hand strip it

once it's stripped down. It's a good idea to hit it with some reducer to clean the surface. Before you start the body work, you can use a degreaser, just make sure the product won't leave a residue.

And now this is a perfect example where stink rock will work. Perfect. I've got this weird curve coming down here. I've got a curve coming in this direction.

I've got a weird high spot or

something going on right here.

This is perfect for stink rock.

Some of you probably remember stink Rock from the Nova face lift for those who missed it. The real name for it is grill brick. It's great for bodywork compound curves because it forms to whatever surface you're sanding.

Why do I call it stink rock? Just buy some and try it. You'll find out quick. Enough, the stink rocks, put on hold for a few minutes so I can work the flat areas with the long board.

Let me show you what I'm looking at here. A lot of the time on these aftermarket parts. It's real common that the stampings aren't exactly perfect.

You can see here where I've got the filler. I've been trying to blend this in,

but it's actually a low spot in there and I'm running into a high spot over here. So what I need to do is completely blend this in and eliminate that disc.

Well, guys, it's time for a break and I got a lot more quality time to spend with the old stink rod here. So you keep working on the groove in your sofa. I'll keep working on the groove and his fender

after the break, a bumper mod that gives the impala some smooth style.

Hey, we're back. I'm making some pretty good progress here in the trans. Am I still got a long ways to go? Now, if you remember earlier in the season, we told you we had some cool plans for the bumpers and the impala. So I'm gonna hang out over here and keep making dust. Brent's gonna show you how to take a five piece bumper and make it into a one piece

and many other cars of this era came with multi piece bumpers.

It simplified the stamping process and made it easier to replace one section if you ran into your neighbor's Edsel,

but we're after a more streamlined look and smoothing them out is the way to go

modifying bumpers isn't a new concept. It's an old custom trick that's becoming popular again.

So Brent grabbed his rod and tig welder and started by filling in the gaps between the three main pieces.

The clearance on these bumpers is pretty wide and we think it'd look a whole lot better if it was tucked in a little tighter.

So 387 inch on each side is heading to the scrap heap.

Perfect.

Once the excess is trimmed out and the edges are dressed up a few more passes with a tig, brings it back together.

Brent's pulling the bumper off to make it easier to get to the areas that need to be finished up.

Even the bumper rats are being molded in

if you're gonna go through this much trouble, hey, you might as well go all the way

Brent's dressing up the welds. But if you do this, talk to your chrom or first, some shops prefer to dress the welds themselves to avoid having to fill in dips created by over grinding

and lastly make sure to test fit it before you send it off. If you end up having to modify it later, the chrome shop may love you, but your wallet won't.

The difference here is subtle, but it really adds to the overall look of the car.

Yeah.

I just about got the mud work done on the Trans Am and just in time too because with those bumpers done, it's time to finish at the body work on red sled now. Hang tight because after we show you some classic muscle, I'll give you the low down on some metal working tools and techniques.

Coming up, saddle up in a 66 mustang that breaks loose from the herd

today on flashback, a 1966 Mustang gt 289 high

Paul

the mustang hit the market in 1964 and quickly became an American legend. By 1966 close to a million had been sold. One of the most coveted cars of that year, the 289 hypo and this numbers matching beauty,

but it ain't just a show pony. It's rare in its head and ready to break out of the stable.

Mustangs came with three different breeds of engines to choose from in 66. All of them 289 V8 small blocks, there was the G code which only made about 200 horse and then you had the A code which made another 25.

But if you really wanted to break away from the,

you could get the K code high performance. 289

it was nicknamed the hypo and was the most powerful engine available in a factory Mustang. This little pony could gallop up to 271 horsepower at 6000 RPM and boasted 10.5 to 1 compression.

The hypo debuted in the 63 fairlane and it was first dropped in a Mustang in 65.

Many people feel it was Ford's greatest small block engine.

The secret to its power was a larger four barrel auto light carburetor, free flowing exhaust manifolds and solid lifters.

The camshaft was specially ground for high lift given the hypo its unique sound,

everything got beefed up in this engine to handle the extra power from the rod bearings and bolts to the harmonic balancer as well as the larger four blade fan and alternator pulley.

It also had a dual point distributor with a mechanical advance saddling up in this Mustang is like a day at the races. A set of rally pack gauges on the steering column and a close ratio, four speed told you this horse was ready to run wild.

66 was the first year seatbelts were mandatory. You were going to need it

to smooth out the bumps on the trail. All the hypo Mustangs came with heavy duty shocks and springs front and rear and a larger front sway bar.

The rear axle came in three sets of gear ratios. 3 53 89

or the one that's in this stallion

411,

the 66 Mustang was virtually identical to the 65.

Why mess with success. This coup also sports the GT package which features front fog lamps, side stripes,

dual trumpet exhaust

and badges on the front fenders and gas cap.

The engine also got spruced up with a chromed air cleaner and valve covers and you got front disc brakes.

But when you got to say whose

out of over 600,000 Mustangs built in 1966 only 5469 hypos were sold,

that's less than 1%.

Maybe this was due to the options. Hefty $433 price tag.

You also couldn't get air conditioning, power steering or power brakes.

And because Ford, new buyers were probably going to be racing these high performance cars. They only came with a 90 day, 4000 mile warranty.

67 was the last year for the hypo Mustang. Ford wedged a 390 big block in the Mustang that year and from then on the engines only got bigger and badder,

but this whole horse ain't gonna be put out to pasture anytime soon. You can bet on it

up next. Rick takes the mystery out of hammer and dolly work.

Hey guys, welcome back. You know, we've all seen guys on TV, including myself smacking sheet metal around with a hammer. A few good whack. And suddenly through the magic of television, it's perfect.

I figured it was about time I shed some light on some of the different tools that are out there and show you some basic metal working techniques. You notice these all have two faces. Now they come in a lot of different combinations. But if you're just starting out, you're gonna wanna make sure you get some basic features. Now, this one has a waffle face on it. It's designed for shrinking metal. It actually pulls it together. When you strike it,

the other end here, you're gonna need that for working on body lines.

Now, another feature that you wanna look for is a pick. These come in a lot of different shapes and sizes and they're basically designed for moving small areas of metal

on the face of this one. If you notice it's actually flat, this is a finishing hammer and it's not to be confused with a round faced shaping hammer.

Now, if you got a little bigger budget, you can start investing in some more specialty type hammers. This hammer is designed for rolling on door skins. This one, well, it's got a finishing face on either side of it and it's basically just got a longer reach.

This hammer is a square face, finishing hammer and it's for getting into those hard to reach areas.

Now, the other part of the equation is dollies and spoons. They're used for backing up sheet metal while you're hammering, they come in all kinds of different shapes and sizes to fit just about anything you're gonna be working on.

Now, before I can show you how to fix a dent, I need a dent to fix. If I can take care of that.

Now, when sheet metal gets dented, it stretches and the key to fixing a dent is putting the metal back where it's supposed to be. Seems pretty simple. Right?

If you can reach the backside of the panel, it'll make your life a whole lot easier than you can use a dolly and a shrinking hammer to shrink the metal back into shape. This is called on dolly. Hammering.

A dolly is used for support as the hammer pushes the metal back into position

on dolly. Well, it means exactly that striking directly against the dolly with the metal sandwiched in between.

Another technique you can use if you can reach the back of the metal is off, dolly. Hammering

off. Dolly means that the hammer is used around the circumference of the dent instead of in the center.

As you apply pressure to the center, the metal surrounding the dent is pushed up tap in the high area. It'll relieve the stress and allow the low area to come back. This technique is used more for larger dents.

I'm gonna finish it out with a stud gun. What a lot of people don't know is you can use these things for heat shrinking also just make sure to have a cup of cold water and a rag handy.

Now, we've barely scratched the surface on metal working today and we could do an entire series on the finer points if you wanna keep learning more then keep watching Muscle Car because there's always plenty of metal work to be done around here. But for this week we're out of time. So until next time we're out of here.
Show Full Transcript