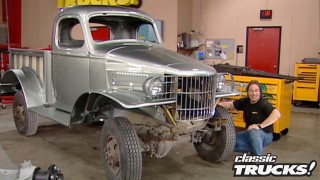
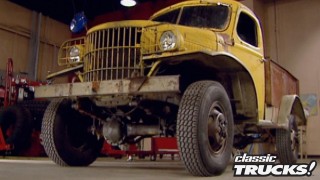
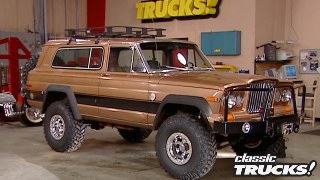
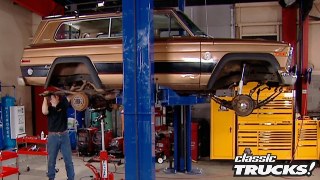
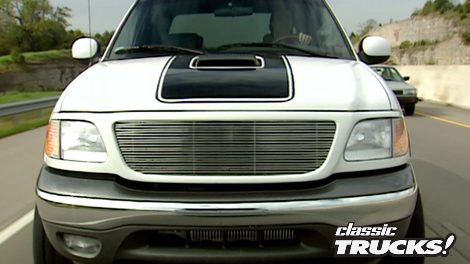
Classic Trucks! Builds

Video Transcript

Hey, welcome to trucks. It's good to have you back this week now, just in case you're wondering. No, I have not forgotten about project Crazy Horse or Copperhead or the Hairy Hauler.

Their bodies are in the paint shop. Now, as soon as those are done,

I'm gonna roll them back in here. We'll finish them up for you. But in the meantime,

started another project called Sportsmen. Now, this is a much simpler project than those started it last week and I'm gonna finish it up today.

Now, this is a 2002 Ford F 150 Super Crew four wheel drive. And the idea here is just because this is a late model four wheel drive doesn't mean that it won't benefit from some aftermarket parts. So the first thing we did last week is put on an A T I pro charger.

This will give us plenty of power to tow a trailer or thrash down a muddy trail or

just haul some booty.

Now, this week we're gonna deal with the rest of the truck, make it look and sound like this thing's gonna perform. First thing we're gonna deal with is this hood

now,

there's nothing wrong with the stock hood. It's just,

well, it's just stock so we're gonna change that. Come on over here.

One of the coolest new hoods to hit the market has got to be this one from Keystone Restyling products called the Ford Shaker Good Hood. And this is a nice thick fiberglass hood. It's fully finished on the top

and underneath

an installation is just the four factory bolts. Now, your eyes are not deceiving you. There is a huge hole in the center of the hood.

That's because this really cool scoop

that looks just like it came off of a 69 mach one Mustang

slides underneath, seals up against the hood when you close it guys, this is a fully functional shaker hood.

Now, Keystone ships these things fully prepped, ready to paint, they don't paint them for you.

So we sent this off to our buddies at Pro Glass, had them put on this really cool mock one style stripe.

Be prepared to spend a little bit of time with a file here opening up the holes in these hinges. That way you've got plenty of adjustment to get this hood to fit just perfect. Now, the idea here is to have a nice straight line on both sides just like the factory.

Now, once you have it, how you want it, go ahead and tighten up your hinge bolts

and then follow that up with your windshield washer lines.

Now, we're ready for the fun part. And that's the scoop. Now, here's how this thing works.

Air goes in here, goes down into the air box, comes out here, goes into the hood and comes over to the square area where you cut out a hole

and then this piece seals up against it and delivers that air down to your stock air inlet. However,

our truck is not stock anymore. We've got a supercharger on there

and we've got supercharger tubes running all the way underneath here. So as you can see, I am gonna have to come in here and modify this air box a good bit to where this will sit down the way it's supposed to.

Unfortunately, that happens sometimes when you mix and match parts, you have to kind of make them fit, but

end results definitely worth it,

ok. You can see what I had to do here. I had to cut out a pretty good chunk of this air box to let these intercooler tubes come through,

but to make this, so it's still functional, I'm gonna bend up a piece of sheet metal that'll lay across the top of these tubes rivet into the sides and that way the air will still flow out and everything will still work. Now, once you have it, how you want it,

go ahead and close the hood down. Take a look at this thing,

man, that is awesome.

The last thing we'll put on the hood is a stock hood latch

that has got to be one of the coolest hoods I've ever seen.

Now, while we're messing around here on the front,

it's time to do something with this grill because this stock grill is not getting it anymore. And one of the best ways to upgrade the front of your truck is with a custom grill and trends make some of the best ones out there. Now, a Trends grill has nice aluminum bars that are real thin and really close together. It gives you a nice smooth clean look

and your mounting brackets are all on the grill. So, putting one of these things on is fairly simple. Here's how you do it.

The first thing we need to do

is pop off this shroud

and then take off these Philip screws that hold this shell on.

Remember you have to take off your turn signal lights to get to the screws behind them.

A

couple of clips

and wrestle that sucker off of there.

Next, we'll get rid of this stock mesh

and throw that away.

Now, we're ready for the new grill. Now, a little point here, a lot of times these grills come in and they're a little bit bent from shipping. Now, that doesn't mean you got a bad grill and you got to send it back. All you have to do is come in straight and with your fingers, stuff's real soft

now to install your grill, it's real important that it sits down flush against the grill shell. So any of these plastic tabs or anything they're in the way you'll need to cut those off.

And once you have the grill, exactly how you want it.

All you have to do is come in drill holes and riveted on,

then reinstall the grill shell and step back and take a look at this thing.

Man.

What a difference. A simple hood and grill installation does to the attitude and the look of your truck. And I'm not done yet. I've got more to do after the break.

Welcome back to trust before the break. Put on a shaker hood and a bill of grill and project sportsman totally change the look of the truck.

Now we're gonna deal with the way this thing sounds. Now, keep in mind

we've got a super charger under the hood. It's huffing a lot of air into that engine.

It'd be nice to get some of that air huffing back out. Of course, having a nice throaty sound is always a good thing.

I'm talking about putting on a performance exhaust system

for our new kit. We went to Flowmaster and got one of their Force two cat back systems for that particular model Ford. Now we want dual exhaust sticking out the back. So this kit comes with the famous Flowmaster Muffler. It's got dual outlets,

then we've got all the tail pipes that we're gonna need plus all the hangers are already welded on the pipes where they need to be.

You get two really nice polished stainless steel tips

and of course, you get all the hardware to put this thing on

to install the kit

first, put on your intermediate pipe.

Follow that with the muffler

and make sure you're using some sort of a jack stand back here to support this weight when you're putting this together. Because if you don't,

all that weight can cause your front exhaust manifolds to crack or give you some sort of leak up there. And believe me, you don't wanna have to mess with that.

The tail pipes slide right into the muffler

and then they're held in place by the factory rubber hangers.

The driver's side tail pipe makes a really nice bend here around the spare tire

and you're gonna wanna make sure you got a good inch of clearance all the way around the pipe that allows for heat and expansion and vibration and stuff. Now also make sure that your clamps are only finger tied at this point because once everything's installed, then you can go back and adjust it.

The last parts we'll put on are these poly stainless steel tips. Now, you can put these wherever you want,

but they generally look the best nice and close up against the body

and stick it out just a little bit. So when you look down, you can see them sitting there

once you have everything sitting where you want it, tighten up all your clamps starting at the front, working your way to the back

and that takes care of the exhaust system.

Wait a minute, not quite

an exhaust system is never quite done until you start it up and hear what it sounds like. And that is sweet. And those tips.

This is awesome. And we're gonna finish up this project, but

after the break

just can't get enough of trucks, check us out online at trucks, tv.com.

Welcome back to the shop and the final steps on project sportsman before I take it out and drive it.

Now, if you'll remember when I started this project last week, I told you I wasn't gonna do any kind of suspension lift or modification and I'm not,

that doesn't mean we need to keep these little

weenie tires on this thing. The F 150 will handle a lot more rubber. So that's what we're gonna throw on it.

First, the wheels these boys are from we racing

and they are fittingly called the Stone Crusher. This is a forged aluminum wheel, so it's very strong and the size is 18

by 10.

Now, one of the most unique things about this wheel is this bead lock looking rim.

I know a lot of you hardcore wheelers are probably sitting there going. Oh man, it's a fake bead lock. What are you doing with a fake bead lock?

Well, the truth is a real bead lock is not dot Approved, which means it's not street legal. It's a competition wheel. These on the other hand are street legal. They look good and they're really strong. Perfect for our application

for tires. We needed something aggressive but also something that had some good road manners. So we made a call to NTO, got a set of their all terrain terra grapplers size 3 25 60 R 18,

which puts these guys right at 33 inches tall, which is the biggest tire you can put on an F 150 without a lift. Matter of fact,

you can see, I'm gonna have to trim some plastic, both front and rear for these tires.

Now, these have a good aggressive tread for any kind of muddy road that an outdoorsman will run into,

but they also won't howl and whine on you on the highway drive. You crazy.

The last thing we're gonna put on are some gauges. So we know what's going on with that super charger.

Now, for those who went to auto meter picked up a couple of gauges from their Phantom series, this is for boost, this is for fuel pressure. Now, both are very important when you're running the supercharger and of course they come with the sending units and all the hardware to hook them up.

Now to mount these things,

we also got this really slick pod from auto meter and it allows the gauges to be mounted up on the A pillar for a nice clean, smooth look.

Well, that takes care of project sportsman. Now we put on a super charger and an exhaust system to make this thing perform better. Then we put on a really cool hood and grill to make it look better and we put on some bigger wheels and tires to give us more traction and to make it look better, this would be a great truck to take hunting or fishing because it'll get the job done. But at the end of the day,

you take it, clean it up, you got a great truck for the street.

Now, I know you're tired of sitting looking at this truck just sitting still. So

what do you say? We fire it up

and go see what she'll do.

The first thing that you and everybody else will notice is the unique hood

that coupled with the grill, definitely make this rig stand out,

the bigger wheels and tires, make the truck feel more stable and it definitely looks better,

but it also gets far better traction,

which is important when you're trying to see how close you can get to the photographer.

The Super Charger, uh, definitely brings this thing to light,

making the truck a blast to drive both on road and off.

Of course, the sportsman is not a truck. You would necessarily try to get muddy.

But thanks to the Super Charger, any surprise mud holes within reason, shouldn't be a problem,

which makes this a perfect vehicle for any outdoor enthusiasm

coming up next. No matter how tough you build them,

every truck has its limit. The bun is finding it

engines. I'm talking big engines. These aren't little weenie things. Matter of fact, this is something that you would find in an 18 wheeler truck

talking 855 cubic inches, over 500 horsepower and over 1600 ft pounds of torque. Now, following something like that

is an equally massive transmission.

So the question becomes,

how do you connect the two together other than using some pretty serious bolts? Well, the answer is a pretty serious clutch system. Now, how does it work together? Uh How do you keep from burning things up? How does it last? How does it compare to what you use in your street truck? Well, we're gonna answer all those questions because we are gonna show you how it works.

Oh, it works,

brought to you by Wyotech.

Now, any clutch, no matter what kind of vehicle it's in, is subject to some serious stress

whether it's just from normal use or flagrant misuse.

All right. Yeah, this is a huge clutch assembly. What is it out of? And how does it work? Well, what you're looking at here is a double disc clutch assembly out of a

class a tractor trailer truck.

Um, this here is the fly wheel assembly that is bolted to the engine and would rotate with the engine.

The orange items in there are the clutch disks,

twin disk set up and this is your floater plate in the middle that is driven

by the flywheel assembly via these drive pins.

And this is your pressure plate assembly that's gonna clamp those disks together

to disengage the clutch. What do you have? Well, this is a, uh your typical

release bearing, uh or a throw out bearing is what it's also known as uh the used to pull the clutch apart,

allow everything to float together and allow those disks to rotate independently of each other.

Ok. The big question that everybody has on a, on a big rig clutch like this, you've always heard about them burning clutches up. How do they keep from doing that? You got 80,000 pounds here.

Uh The key thing is adjustment, making sure everything is adjusted to factory specs. Ok. How do you adjust something like this? This is adjusted right here on the clutch assembly. Um uh

This adjust your pedal

to the clutch disc where

so that we get maximum clamping force.

Um The only difference between this and your street rod truck would be, this is adjusted here. Your street rod truck is adjusted on the external linkage. Very cool. Now, something to remember no matter how well you keep it adjusted. A clutch is consumable. So you will eventually have to replace it. But that'll easy because now

you know how it works

in the world of exhaust. Most of you will recognize the name of Doug's headers. They make awesome headers and X pipes and fangs and stuff like that.

But you're gonna love their new product. This is an electric exhaust cut out mounts in the exhaust pipe after a while. Now, this has an electric motor in it

that slides a stainless steel door inside the pipe to close it off. So when you're running down the road, want everything nice and quiet pipes are closed. When you go on the drag strip or

wanna make a point at a stoplight, you open up the pipes. This bypasses your muffler and runs straight pipe.

You can have more fun with these than you can imagine. And Doug sells

for 450 bucks a pair.

You know, putting custom seats in your project is real popular. There is no question where these are gonna go. But

have you ever gone out on a cold morning, sat in your seats and throw your butt off because the material is so cold.

Yeah,

I bet that you wish that you had a Cadillac or Mercedes or something that had those fancy seat warmers. Well, now you can,

because roster precision control has got this universal seat heater kit, it's got these heating elements that go underneath the upholstery and warms the material.

Now, the kit also comes with a control panel and all the hardware to put it in

and the best part is now, you don't have to sell your truck and get a Cadillac just to keep your butt warm.

One of the most popular aftermarket parts to come along in probably the last decade has got to be the crate engine. You know, you go down, you buy the engine of your choice. It comes to you fully assembled, ready to run.

Well,

almost ready to run.

Very few crate engines come with the carburetor, which means you get to go hunt and shop and find the carburetor that's gonna work on that engine.

Well, Barry Grant has a solution to that

with the speed demon crate motor carburetor. Now, this thing comes fully jetted and set up for your crate engine. So you literally take it out of the box, bolt it on and

the engine runs the way it's supposed to no guess work. No fooling around. That is nice. Truck up.

When things don't go as planned

in this shot, you've got a driver that's determined to push his custom Bronco to the ragged edge

and that's great, stands it up on its hand and great recovery.

Of course, that's not the only thing that makes a successful racer.

You also need to know how to ride that ragged edge

and not go over the other side of it.

Oh,

it all goes bad for this guy when he hits this first hay bale

from there on out. Who knows?

Oh,

tip of the week. Always check your hood latch before your race. Check out the height of these jumps.

But the hood does happen to fail the heck with it. Do like this guy did win the race.

Of course, having the hood come up during a race would be bad enough. But if you forget to bulk the body down,

you're gonna end up on TV.

That's enough truck ups for today. We'll see you next week.
Show Full Transcript