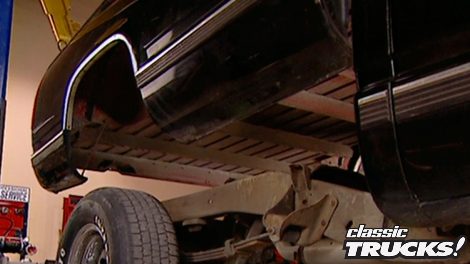
Classic Trucks! Builds

Video Transcript

Today on trucks. Stacey and I show you how to turn your pickup into a dump truck with a bolt on kit you can do in your own driveway.

We'll also take a look at a 91 Chevy show truck complete with hydraulics and custom body work. Then we'll quicken the pace on our classic 66 with a manifold and carburetor upgrade. That's all today on trucks.

Very cool. Very cool.

Hello, everybody. And thanks for joining us, Stacey and I have a project for you this week. It's gonna blow your mind. Not only is it totally cool, but it brings a whole new meaning to the word functional.

You know, there's not a person alive that hasn't loaded up the bed of the truck with dirt or rocks or whatever and stood there with a shovel and wish there was some way they could get that sucker to dump. Think of the time it would save. Not to mention you're back in the midst of all that wishful thinking comes the answer from Pierce sales out of Henrietta Texas. What they've done is come up with a kit for about $750. That'll turn your hauler into a dump truck without changing the sock appearance, which is exactly what we're gonna do to this 88 Chevy

you can easily do this project in about a day. It's just a variation of a standard hydraulic system found on a commercial dump truck.

You have your electric hydraulic pump that powers the lifting ram that actuates the lifting scissors.

You've got your upper and lower mouse for support and your rear hinge arms.

First thing you need to do is disconnect the wiring harness while we're down here, I'll take this sharpie and make a mark at the end of the bumper mount. We'll explain why. A little bit later.

Once all that's done, go ahead and remove the bumper.

The bed itself is held to the frame of the truck by eight bolts. So you'll need to back those off as well.

Don't forget to remove your gas filler neck from your bed.

You'll need to remove the metal elbow, but you can leave the rubber hose because it'll clear the bed when you left it.

Now, we're ready to pull the bed off. Most of you won't have a lift, but that's no problem. Just get yourself a buddy to help you lift it up and put it out of the way on some saw horses.

That's good bill. Now, since we have a lift, we're gonna rig up some hooks in our steak pocket holes,

then we can lift the bed straight up

and drive the truck out from under it.

Now we're ready to turn this thing into a dump truck. First thing we need to do is notch the frame to make room for the rear hinges. Go ahead and take a measurement from the rear carriage bolt location to the rivet on the cross member,

then set the new hinge arm in place and outline it with a sharpie.

After that, take your hinge and bring a line down diagonally. So the bearing nut rests on the cut in the frame.

Now take a cut off wheel or torch and make your cut. Make sure you plug the gas tank with a rag. So you don't boil yourself up

once you have your notch, clamp the hinge to the frame and drill the four holes before hooking it up.

The lower support bracket is a direct bolt in.

Just use your existing holes. You will need to disconnect your gas tank straps but only do one side at a time unless you wanna dance with a gas tank.

The only modification we need to make is a single lock nut to the mounting bolt to hold the lower bracket.

Remember, you can mount this plate up to two inches either side if there's clearance problems with the gas tank or the exhaust. Next, we need to mount the scissor support cable. Let's go ahead and grab that space.

We'll measure about 16 inches from the back of the mounting plate

to the cable,

mark the frame and drill your holes. Be careful not to drill through the electrical or brake lines, then run your cable.

Once the cable secure, set your scissors in place, grease your pin

and slide it through.

It's important to make sure that your scissors and your frame rail are. Even

while Stacey gets ready to hook up the pump, I'll go ahead and connect the hydraulic hose to the ram cylinder

word to the wis

here. Make sure to use Teflon tape

or you're gonna have fluid leaking all over the place

before you mount the pump. It's a good idea to make all your connections down here on the ground where you have some room

also disconnect your battery before you do this.

Now, in a bigger truck, like a three quarter ton or a one ton, this pump can usually be mounted under the bed on a half ton.

You'll need to mount it either behind the seat

or on the passenger side frame rail with this bracket that's supplied with the kit.

Once you've decided where you're gonna mount your control switch, the hookup is really easy. The two black wires go to the outside poles and the red one goes to the center. We're gonna connect ours to a constant power source, so we don't have to have the key turned on to use it.

We're gonna do that with a 10

in line fuse and go directly to the battery.

We're about to test this thing. So stay with us. We'll be back right after the break.

Later on trucks. We've got a 91 Chevy sports truck that's definitely worth showing off. But up first we'll finish that bolt on kit. That'll help you get the most out of your half ton work truck.

Man, that thing fits in there. Nice, doesn't it? This is really gonna be cool. Let's go ahead and give it a shot. See if it works, man.

Welcome back to the shop. Everybody. As you can see the lift on our project is ready to go, which means we're just about ready to bolt on the bed and turn our stock pick up into a full on dump truck.

Now, before you even think about crawling under this bed, make sure it's secure. You're gonna be pushing on it and drilling on it and it'll squash you like a bug if it falls. Now, having said that we need to mount our hinge arms to our bed before we drop it all down on the truck,

they bolt right to the stock holes in the rear,

but you will have to drill in the front, mount this bracket to the cross member and the hinge arm itself, leave the arms loose for alignment later on

with the bed of the truck still off. I went ahead and made some modifications to the fuel filler. You will have to shorten the hose here on GM. Vehicles. Pier sales also supplies a goose neck and a bracket so we can reroute the filler into our wheel. Well, now the reason we need to do this is because Chevy's truck bed curls under too much. Well, that looks good. That ought to clear that bed with. No problem should be. All right, man. We'll lay it in there when we put the bed on. Let's go ahead and back the truck up, man. Sounds good.

You need to be real careful when you lower the bed back down, especially if you're doing it by hand. It's really easy to get this thing on crooked and bend up these corners and then you have a big mess.

Hooking up the hinges is really easy, just grease up your bolt and slide it through.

Now, before you tighten the rear bolts, make sure the bed is in alignment with the body.

There we go.

Once you have it lined up, you can tighten your hinge arm bolts

as well as your hinge pins.

Now that you've secured the rear of the bed, you need to tip it up so you can make the final connections underneath.

We're using four by fours to prop ours up. But whatever you use, make sure it's good and sturdy.

We've already measured where the mounting plate goes on the bed. All we have to do now is mark through the existing holes onto the cross member,

drill the holes

and mount the play.

Now we'll get mel to lift the scissors. I'll go ahead and connect it to the upper mounting plate.

It's good.

Make sure to grease your pin because it makes it easier to slide through.

All right. It's time for the moment of truth. Let's lower this thing and make sure we have the right clearance between the scissors and the bed.

Ideally, the scissors should rest a few inches below the bed. As you can see, we're good to go.

Of course, the beds mounted securely in the rear, but to keep it from moving from side to side in the front,

we're gonna use these angled brackets that bolt directly to the bed.

These will slide inside the frame rail when the bed is lowered

to eliminate any bed squeaks, install the rubber bumper to the frame

again, we had to reroute the gas filler, but you will have to get some extra hose to connect it to the goose neck. Now, I know a lot of you guys are gonna be tempted to do away with this vent,

but don't do it. Your gas tank needs to breathe.

The bumper needs to be welded to the hinge arm, so it'll dump with the bed. Now, remember those marks we made earlier,

we're gonna use those as a reference point to make a cut line on the hinge bracket.

Now, the hinge arms hang back from the frame about an inch.

So cut an inch toward the bumper from your reference point. This will tuck the bumper right up against the bed like it should be.

Here's how this bracket originally went. A neat trick is to take the brackets, switch sides,

notch it for clearance and it'll weld right up there to the hinge arm,

use your stock bolt holes and you can still use a class one hitch on your bumper

with the bumper in place. We can connect the wiring harness and we're ready to put our dump truck to work.

This kid will handle a 4000 pound payload. That's more than your truck will even handle. Believe me, it's better than breaking your back with a shovel.

Yeah, that's for sure. Don't go away, chase and I have more trucks to dump on you after the break

up next on trucks. We'll show you the lowdown on a 91 Chevy low rider.

That's quite a lift on the Boulevard.

Thanks for staying with us for those of you into the sport truck scene. We're about to show you what it takes to win some first place trophies. That's right. This 91 s 10 is owned by Herbie Allen of Nashville, Tennessee. And let's just say he's pretty familiar with the winners circle. But before we show you what's under the hood, the hood itself was worth taking a look at.

It's got a fiberglass cow induction

and you won't find any windshield wipers on this low rider because he took three wiper panels and spliced them together to give it a real smooth clean look.

Let's pop the hood and see what kind of goodies are in the engine compartment. Now, the motors basically stocked. But as you can see, he's done a really good job of trimming it out with chrome and matching paint.

The body of the truck has been channeled down on the frame three inches and if you haven't guessed by now, it's got a full hydraulic system.

You can see where the upper a arms have been cut for clearance. When it all slams down,

the radiator had to be modified as well. It sits in an angle like a Corvette for clearance. The stock fan has been done away with and dual electrics are used instead.

Now this is really cool, shaved door handles and remote celling noises to open the doors.

Now, once you get inside,

the first thing you notice is a 95 C 28 Camaro dash that's been sectioned four inches for a perfect fit.

Of course, the room behind the seats reserved for the thump and stereo. You heard at the start of the show

in the rear, you've got a welded roll pan and smooth tailgate. But lurking under the hard tunnel cover is what this truck is all about.

3, 12 volt batteries wired in a series for 36 volts. That's what makes this truck jump

the four inch step notch here in the frame rail and a four bar system rear end is what makes the show possible

and to make this show possible, we need to take a break. Don't go away. We got more trucks to show you after this

up next on trucks. It's time to quicken the pace and efficiency on our classic 66 with that manifold and carburetor upgrade.

Welcome back to the shop. Our 66 project truck has a built 350 Chevy in it. Unfortunately, the builder made every mistake we've seen 1000 times. Yeah, he did. You know, there's no doubt whoever built this motor spent plenty of money on the guts. But as you can see here on this old manifold, there's a crack right by the water outlet

and without a complete rebuild, this old quadrajet will never run right bottom line. The guy short changed himself to save a few bucks. Let's face it. No performance cam in the world will do you any good if you have restricted fuel flow.

So, what we're gonna do is bolt on some Edelbrock upgrades like this dual plane performer manifold along with this matching 600 CFM carburetor while we're at it. We'll also dress things up a bit with moroso chrome air filter and valve covers

before we can really dig into this project. We need to prep the motor. First thing we're gonna do is drain the radiator

and then pull the hoses,

remove the fuel and vacuum lines. Not always easy. If somebody's rounded off the nut

and remove the battery cable

on a small block, Chevy, you have to take the distributor out to remove the intake. So you need to mark it to get it properly back in.

Otherwise your timing is gonna be a mess.

Make a point of reference to the distributor body, then make a mark on the distributor body itself at the tip of the rotor on both the distributor and as you pull it up, you'll notice that the rotor will move just a little bit, make a second mark on the distributor where it stops.

Now, here's a tip for you. If you're not replacing your plug wires, mark them before you take them off. That way, they'll be easy to reinstall

undo the rest of your linkage and pop off the valve covers.

Next comes the carb,

then the old intake.

Now before you bolt on the intake, it's a lot easier to mount the fittings with it off. I've already done the water and vacuum fitting. It's real important to use Teflon tape on these two. I've also put on the thermostat as well as the housing. And since the intakes aluminum, I use

anise to prevent galling

before you set your gaskets in place, you'll wanna make sure all your manning surfaces are clean.

You'll also wanna check down in your lifter valley for any junk that might have fallen down in there

after that. Use some silicone to hold the side gaskets in place.

Now, if you use the stock rubber gaskets in the front and the rear, give them a big dab of silicone here in the corners to make them seal. Better

be real careful when you set the intake in place. You got it, man. I got it. You wanna try to drop it straight down so the gaskets won't move on you.

This dual plane intake is great for the street because it gives you good low end torque and will increase your factory red line.

Now, we can torque it down.

You'll wanna use a cross pattern starting in the center and working out toward the ends. Our intake has a 30 ft pound torque. We're gonna do that increments of 10 to keep from warping it

while the car's still off. I went ahead and put the distributor back in by aligning the marks.

Next, we can rewire our plugs

and when you bolt down the carburetor,

make sure you don't over tighten the nuts or you could crack the housing

you got ready for this. I bet you, man,

the biggest mistake people make when they swap carbs is they go too big. This 600 CFM carburetor matches that intake. Perfect.

Now that the hard work's done, let's slap on this chrome.

We've already connected all the hoses and linkage. One last modification we made was to the fuel line here, we cut it down and put a seer filter on it because it's easier to clean.

Well, what we started off with looked and ran pretty ragged. There's no doubt about that, but for about 300 bucks, we not only improved the looks but picked up some major performance gains as well.

Let's see what Stacey has for us in this week's quick tip.

How many times have you wanted to hold a part in a bench vice? But knew the steel teeth of the vice would mess the part up. Well, here's how to fix that problem. Cut a couple of pieces of wood about the size of the teeth of the vice.

Then go down to your local hardware store and pick up some of this magnetic strip.

It's adhesive back so you can stick it right to the wood.

Now, when you have a delicate part, simply stick the pieces in place and go to work.

Stay with us. We'll be back with more trucks after this.

And now truck gear, parts, tools and equipment for pickups and sport utilities.

It's time for this week's edition of truck here. Let's face it. Nobody wants to be stranded with a flat tire. Number one, it's a hassle, not to mention it can be real dangerous. One way to avoid this problem is with Uniroyal's nail guard tire, it has a special substance inside that provides an airtight barrier. If something sharp like a nail or screw penetrates the tread and for about $10 more than regular tires. It'll give you and your family more peace of mind on the road.

Here's another really cool item from Ringer's racing gear. You NASCAR truck fans have probably seen the pit crews use these to protect their hands. Good idea for a weekend ranch too.

They've got a split palm for complete freedom of movement.

Plus extra padding there for a wrench or a ratchet and a real thick pad here on the palm to cushion an air tool.

They're also heat resistant up to 320 degrees, but the perforated backing won't let your hands sweat. You can get the job done with ringers for about 30 bucks.

Finally, today, there's nothing worse than dirty stain looking carpet in your truck or SUV. And since everyone uses their vehicle for work or carting the kids around town,

there's really no getting around it. Unless you have a set of husky liner floor mats, they won't slip and are guaranteed not to crack under heavy use.

The exact fit will protect your carpet from snow, mud and water. Husky liners go for about $80. That's gonna do it for this week's truck here. Let's see what we have for you next week on trucks,

Stace and I show you how to get better traction off road by installing a locker in our 96 Chevy. Then we'll take you step by step through the installation of an air adjustable shock system on that same K 1500. After that, we'll spin the wheels off a Dodge Dakota RT and tell you if it's worthy of the famed RT badging before we trim it out with some Mopar accessories. That's all next week on trucks.

Well, that's gonna do it for this week's show. But remember whether you're high or low trucks are the only way to go let's ride, man. All right.

Trucks is an RTM production.
Show Full Transcript