XOR - Xtreme Off-Road Builds

Want more content like this?
Join the PowerNation Email NewsletterParts Used In This Episode
Lincoln Electric
Lincoln Electric is the official welding supplier to XOR
Lincoln Electric
Tomahawk® 1000 Plasma Cutter with Hand Torch
Matco Tools
MATCO Tools are the Official Tool Supplier to XOR
The Industrial Depot
Tools, Hardware, and Shop Supplies
Episode Transcript
(Narrator)>> Today on XOR our Ford Ranger gets straightened out with an in shop alignment. Plus Eliza talks racing safety. Then we'll move over to the Tacoma so we can lift its spirits. Right now on XOR!
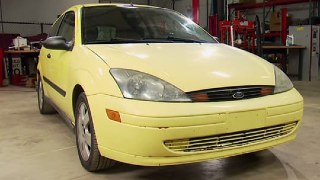
(Eliza)>> Hey welcome to XOR. Today is all about the front ends. We'll be working on two completely different setups, starting with the IFS of our Ranger and moving on over to the solid axle swap of our Tacoma.
(Jeremy)>> That's right. We're gonna be putting the Dana 44 underneath this truck. Hooking it up, adding some coil overs, mounting some wheels and tires, and then measuring for some driveshafts. We're also gonna be going over our personal safety equipment cause when we're out running this thing through the desert we're gonna wanna make sure we're as safe as possible.
(Eliza)>> Yep, let's get this bad boy aligned.
(Jeremy)>> Alright, get the hood.
(Eliza)>> Ready?
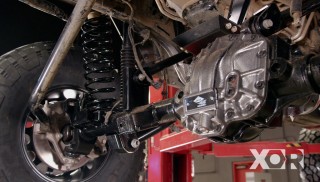
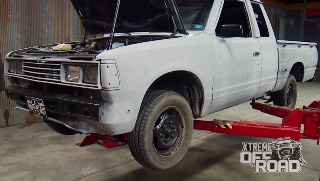
(Jeremy)>> The front suspension we got from LSK is quite a bit wider than stock but it's built to be fully adjustable for proper wheel alignment. Now we're not sure how this thing's gonna handle when we're out in the desert. So we're gonna do just a base alignment on it for now to get a starting point. Then we'll take it out, thrash on it quite a bit, and make some adjustments from there, but first things first. Before we even get started we've got to make sure all the weight's on the truck and that the tires are all aired up. We'll set the tires evenly at about 30 pounds, and we'll definitely make sure we put the spare tires in the back because they weigh a ton. There we go. To do the alignment on the Ranger we'll be using a castor/camber gauge that we got from Summit Racing dot com. This is completely adjustable and will allow us to do our own alignment right here in the shop. Plus it'll fit tires from 13 to 17 inches. First thing we've got to do is make sure it's level with the Earth. Then just install it onto the wheel. The first of the three settings we're gonna be doing on the Ranger is called camber. Now camber is the measurement of either inward or outward tilt at the top of the tires. Now we're gonna be running two degrees negative, or inward tilt. That way this thing will handle way better in the corners. Now I've just got to adjust these before I take my first measurement. We want the rod ends all the way in to make our first adjustment because we won't be using the original slotted holes on the mounts. We'll use the heim joints to do all the adjustments. With the weight of the truck on the ground we'll check out first measurement and make adjustments from there. We'll start by turning our rod ends out about four turns.
And we got lucky. That's about two degrees. Now the next adjustment we're gonna do is castor, and for that I'll need the steering wheel. Castor is the setting of the upper and lower pivot points in a vertical line. This is used in ease of steering and to make the tires return to center while you're driving. For our Ranger we want about six degrees of positive castor. That means the upper pivot, or mount, is back or rearward of the lower mount. So to do that we'll start by turning our driver's side tire out about 15 degrees.
The angled tip of the block represents a 15 degree angle. So all we need to do is line this up with the rocker or the side of the truck. That's about 15 degrees. Then from there we'll set the castor side to zero. Then turning the tires 30 degrees the other way will give us our initial castor reading. And after a quick adjustment we'll go through the steps one more time to land at six degrees.
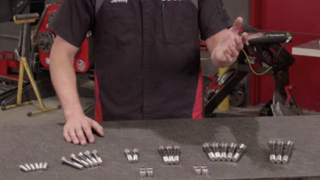
Now the last of the three settings we're gonna be doing is called toe, and toe is the easiest out of all three of those. That just means the front angle of your tire is either turned in or turned out, and for us and our Ranger we're gonna have ours turned in about an eighth of an inch. Now to set toe we need to come up with two common points on each of the tires, and for us we just happened to have a red line that wraps all the way around the driver's and the passenger's side tire. So what we need to do is take a measurement from the front of the red line from driver's to passenger's and then take that same measurement from the back of the tire on the driver's to the passenger's side. Then we're gonna make sur that the front measurement is about an eighth of an inch less. That'll give us the toe in that we need, and to make those measurements it's pretty simple. We'll come down to the tie rod bar and either turn it in or turn it out. When you guys think of ARP bolts I'm sure you think of strength and safety, and your mind probably goes to a beautifully dressed engine or front drive assembly, but did you know that ARP bolts is much more than that. ARP thrives on the challenges of developing fasteners to solve any problems, and they can help solve for the custom bolts for almost anything on your project. We called them for some help on our Prerunner Ranger, and they came through with some custom made bolts for the front and rear of our suspension. From bolts that have six and 12 point heads in standard and metric threads. They also have nuts and washers. Plus they only use premium grade materials, and they're all made in the ARP facility right here in the USA.
(Narrator)>> Up next what you'll need to be safe on the trails. Plus fashion fails.
(Eliza)>> Hey!
(Narrator)>> Coming up on XOR.
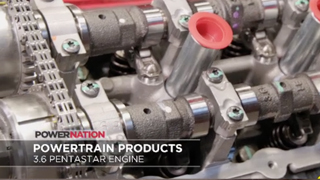
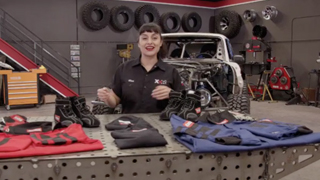
(Eliza)>> When it comes to racing we all think about the one piece suit and our helmet, but we never really question why. So we're gonna go over our race gear and maybe give you a couple of tips on what you should be wearing when trailing. Under garments, such as athletic compression style clothing and moisture wicking materials all can become molten when ignited, and are not permitted in the racing community. We pick up this race quip gear from Summit Racing. It's made of fire retardant cotton so that if there is a fire it won't melt to your skin. So if you're looking for proper race gear you want to make sure to look for the SFI certified patch. Something you may not think about when you're trailing or racing is eye protection, even with vehicles that have windshields. On the trail and on the race course there's a lot of flying debris. So you want to take care of those eyeballs. Other things one might forget are arm and neck restrains. These keep your arms from coming out of the roll cage and this keeps your neck from over extending. Both are vital to the race community. In off road racing reflectors, lights, and colored lights carry a lot more weight than just illumination. Flood lights are used to better seeing conditions in the dusty cloud plumes, which can bring visibility down to only a couple of feet in front of the truck. Depending on your sanctioning body, colored lights and specifically place lights can communicate to officials and other racers. The blue light identifies slow classes of vehicles. That way if a faster class is approaching they can maneuver around them safely. Amber lights are put in the rear of the vehicle so that other races can see you when approaching from behind. And last but not least are the things that you have to have out on the track as well as out on the trail, such as fire extinguisher, breakdown kit, first aid kit, and especially water. Breakdown kits should have a battery operated red flashing beacon or can be glow sticks or red reflective device like ours, and most important of all is water. Sanctioning bodies require that you carry a quarter of water per participant, and that's a good rule of thumb for trailing too. We outfit our rigs to be as safe and as reliable as possible but racing and trailing can and will leave you stranded. So it's best to prepare for the worst when racing your best. Hey JK lovers your jeep is coming up on the 10 year mark, and if you need to keep your pride and joy on the trails Powertrain Products has you covered. Powertrain Products offers rebuilt, used, and surplus three point six Pentastar replacement engines, and they've addressed some of the factory issues that the three point six had. The o-e design was prone to failure due to excessive wear that resulted in misfires and excessive knocking, which caused a whole slew of problems. All the Pentastar engines from Powertrain Products come with the corrected cylinder head to fix that issue, and you know that their stuff works because they back it up with a warranty, keeping you and your Jeep trailing for many years to come.
(Jeremy)>> Now we know there's a lot of you guys out there that are running fiberglass parts on your cars, your trucks, your SUV's, heck even on your side by sides, and I know that those parts usually show up in every color except for the color you need to match your rig. Well for us and our Pre-Runner Ranger we need to paint our hood white. And yes I know that it looks like it's white already but it's not the white that matches our Ranger. So we need to prep this so we can lay down the correct color, and being that it's fiberglass we're gonna take a couple of extra steps to make sure that the paint that lays down on this is gonna be absolutely perfect. Now the hood's been in the shop for quite a while. It's full of dust and we've moved it a lot with our greasy hands. So the first thing we're gonna do is give this whole thing a really good wash. Now we don't want to use just any old soap, especially the car wash soap you can get at your local parts store. This store is strong enough to clean your car or your truck but it's not quite strong enough to clean the panel that we want to paint. If we were to use this soap it might actually drive some of the contaminants down into the part that we want to paint, and that could give us some pretty interesting results when it comes time to laying down some paint. So we'll use your average dish soap you can steal from the kitchen. It washes off clean, doesn't leave any residue, and will get rid of all the contaminants on our hood. Plus the better half might like it that your hands are finally nice and clean.
Well now you guys are one step closer to washing the panel, and you could just use some rags and your soapy water to get this thing nice and clean, but we're gonna take this one step further. We need to sand the hood anyways. So we're gonna be using some red scuff pads to get us there. That way all that hard elbow grease we're gonna put into washing will do us some good cause we'll be sanding as well. So we're gonna get this dunked in the water and we're actually gonna start sanding. A wise man once told me using short strokes kind of a waste of time. If you're there working on the panel anyways you might as well be using long sweeping strokes. That way you just use way less energy and the panel gets done a whole lot quicker.
And when you're all done just give it a good rinse with some nice clean water.
Well now that the hood's all nice and dry we've got one more thing that we've got to be concerned about. Fiberglass and plastic parts will have some static electricity in it, and to keep that down we're gonna be using a little bit of alcohol and water mixture. We'll just spray this over the top of the hood, let it air dry. Then we're one step closer to getting it in the booth and ready for some color.
(Narrator)>> Our Tacoma gets a new set of legs to go with a new pair of shoes next on XOR.
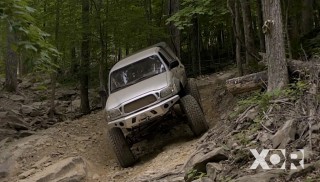
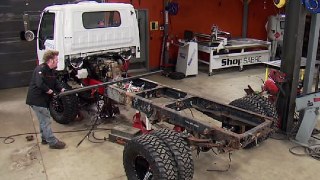
(Jeremy)>> Hey guys, welcome back to the shop. Now we moved over to the solid axle Tacoma cause we're getting this thing ready to be set on the ground with some wheels and tires. Now our suspension system is almost done but we'll need some tires to make sure this thing can go anywhere and everywhere.
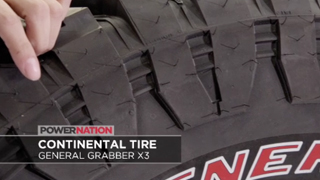
(Eliza)>> So we are going to with General Grabber's XThree. We chose the XThree because of its durability and because its sidewall tread offers more grip off road and protects the sidewall from damage. It has a multi-pitch design for a smooth and quiet ride, and they also have a sight tread design to improve wet and winter handling. They come with a load range "D" rating for heavy hauling, and General says that this is the perfect combination of on road and off road performance, and they're gonna look great under our Tacoma. Can you take that Jeremy?
(Jeremy)>> Yes ma'am.
(Eliza)>> Thank you. We want our wheel base to be just perfect so that our truck goes straight down the highway, and we're looking to be at about 122 inches. Looks like we're pretty much there. All we've got to do is set our link arms and get our brackets welded in.
(Jeremy)>> Now we want our links to be in the center of their adjustability. So what I did is went half way up on the threads and I put a mark. Now what I'll do is turn that into the mark, bring my jam nut in, give that a little twist. Then I can put my bracket on that welds on to the axle, slide this all up, and install.
(Eliza)>> Alright let's get this castor set.
(Jeremy)>> Okay.
(Eliza)>> Come up a bit. A little bit more.
(Jeremy)>> Tell we when.
(Eliza)>> Right there, perfect. Six degrees!
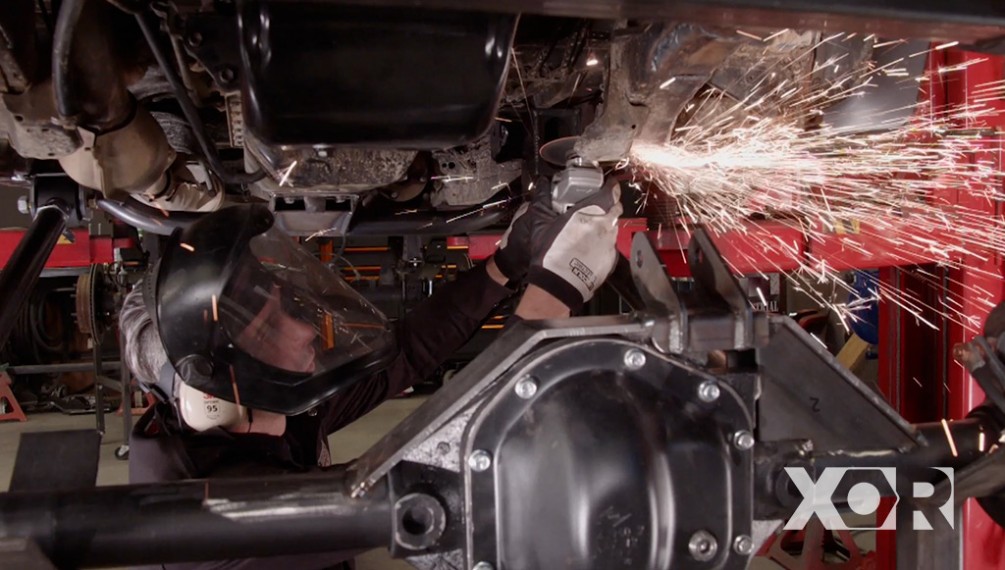
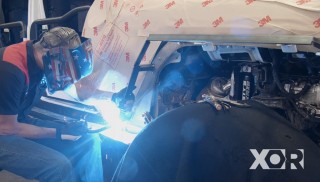
(Jeremy)>> We need to cut the stock JK upper bracket off our Dana 44 because the All Pro kit comes with its own bracket. We want the lower link brackets parallel to the ground. Now it may look like it reads about five degrees but from straight on they do read zero. [ welder crackling ]
(Jeremy)>> Now the All Pro kit came with its own upper link bracket, and we need to make a truss so we can weld this to it, and that starts with pulling a measurement. We'll lay down a mark at three inches, which is the width of our truss. Using our Lincoln Electric Tomahawk 1,000 plasma cutter we'll get started. We'll use a straight edge as our fence and follow it for a straight cut. A quick trip over to the Iron Worker, and then to the bender.
We'll get our truss where we need it.
With all the parts cut out it's time to put this puzzle together. To get started we'll tack the truss in place. [ welder crackling ]
(Jeremy)>> Then piece by piece... [ welder crackling ] ...it all comes together.
Well now that we have the truss and the gussets in place we can go ahead and install the upper link bracket. Now we noticed when this was here that there's another bracket up here on the chassis that we're gonna have to get rid of. So we'll go ahead, tack this bracket in place, get rid of the link arm, come back, and cut this one off. First things first, let's tack the one in place. A couple of good tacks holds everything in place for when it's time to cycle our suspension. [ welder crackling ]
(Jeremy)>> While I get rid of this bracket you guys can go ahead and take a break. [ saw buzzing ]
(Narrator)>> Up next all our hard work pays off. We'll cycle the suspension for the first time, coming up on XOR.
(Eliza)>> Hey the front end's looking good.
(Jeremy)>> It's gonna look great when it's sitting on the ground.
(Eliza)>> It definitely is. Our Tacoma is gonna need some long travel coil overs to tie in all of our suspension. So we went to Summit Racing dot com and picked up these remote reservoir coil overs. They have 16 inches of travel and are going to do perfect for our rig, but first things first. We've got to get our coil over mounts that All Pro sent us burnt in.
(Jeremy)>> And to do that we'll first need to cap off the top of the motor mounts that we had to cut away during disassembly.
Following the manufacturer's instructions we'll mount the coil over towers on to the chassis. And because we plan on cycling our suspension we'll do a little more than just tacking this on. We'll lay down some nice beads.
That should hold that in place for now. Installing our empty coil overs will help us find the lower mount location.
Put that guy right about there. [ metal grinding ]
(Jeremy)>> The lower mounts came with the All Pro kit, and again we'll make sure that these stay in place so we can cycle that suspension.
Using the grade eight provided by All Pro, we'll install the coil overs so we can see how this thing flexes its muscles. Alright Eliza, let's see how this thing travels.
(Eliza)>> Alright going down.
(Jeremy)>> Looking good.
(Eliza)>> Everything's looking good over here.
(Jeremy)>> Keep going.
Almost!
And stop! Well now it's time to install the pan hard bar and brackets. Now the pan hard bar keeps the axle from moving from left to right underneath the truck as you're going down the trail, and I already went ahead and pulled the measurement to make sure this was centered. I went right off of the chassis, and then used the ball joints on either side to make sure we were 100 percent in between the frame rails. Now all I have to do is burn all the brackets in and put the bar in. We'll tack the frame side bracket onto the frame just ahead of where the axle will sit because the lower side bracket has an offset built into it for clearance. And after we pull a measurement... Three feet exactly. ...We'll cut the bar that came in the kit, weld on the rod ends, and then just slide it into place.
Perfect!
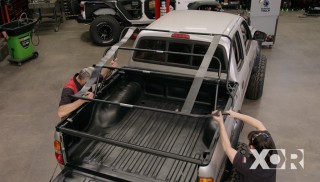
(Eliza)>> Now that Jeremy has got the suspension buttoned up we can get our tires put on. [ drill spinning ]
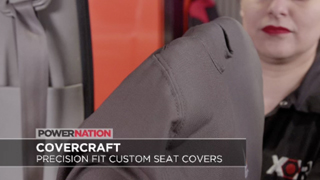
(Eliza)>> One of the quickest ways to spruce up an interior is to get seat covers. So we called up our friends at Covercraft because they are the official car cover of the Powernation family. Our car covers were a breeze to install and only took a little under our hour to get them all in. The fit is awesome and they have tie downs to keep them in place.
Alright we're done. Well they look great. Now we have our seats protected and they'll be easy clean up after the trails.
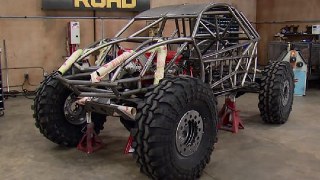
(Jeremy)>> Man this thing is way bigger than it was when it came into the shop, especially now that it's sitting on some 37's, but we still have a laundry list of stuff that we have to do to it.
(Eliza)>> Speaking of stuff, if you're interested in anything that we've used today in our build visit us at Powernation TV dot com.
(Jeremy)>> See you next time.
Show Full Transcript
(Eliza)>> Hey welcome to XOR. Today is all about the front ends. We'll be working on two completely different setups, starting with the IFS of our Ranger and moving on over to the solid axle swap of our Tacoma.
(Jeremy)>> That's right. We're gonna be putting the Dana 44 underneath this truck. Hooking it up, adding some coil overs, mounting some wheels and tires, and then measuring for some driveshafts. We're also gonna be going over our personal safety equipment cause when we're out running this thing through the desert we're gonna wanna make sure we're as safe as possible.
(Eliza)>> Yep, let's get this bad boy aligned.
(Jeremy)>> Alright, get the hood.
(Eliza)>> Ready?
(Jeremy)>> The front suspension we got from LSK is quite a bit wider than stock but it's built to be fully adjustable for proper wheel alignment. Now we're not sure how this thing's gonna handle when we're out in the desert. So we're gonna do just a base alignment on it for now to get a starting point. Then we'll take it out, thrash on it quite a bit, and make some adjustments from there, but first things first. Before we even get started we've got to make sure all the weight's on the truck and that the tires are all aired up. We'll set the tires evenly at about 30 pounds, and we'll definitely make sure we put the spare tires in the back because they weigh a ton. There we go. To do the alignment on the Ranger we'll be using a castor/camber gauge that we got from Summit Racing dot com. This is completely adjustable and will allow us to do our own alignment right here in the shop. Plus it'll fit tires from 13 to 17 inches. First thing we've got to do is make sure it's level with the Earth. Then just install it onto the wheel. The first of the three settings we're gonna be doing on the Ranger is called camber. Now camber is the measurement of either inward or outward tilt at the top of the tires. Now we're gonna be running two degrees negative, or inward tilt. That way this thing will handle way better in the corners. Now I've just got to adjust these before I take my first measurement. We want the rod ends all the way in to make our first adjustment because we won't be using the original slotted holes on the mounts. We'll use the heim joints to do all the adjustments. With the weight of the truck on the ground we'll check out first measurement and make adjustments from there. We'll start by turning our rod ends out about four turns.
And we got lucky. That's about two degrees. Now the next adjustment we're gonna do is castor, and for that I'll need the steering wheel. Castor is the setting of the upper and lower pivot points in a vertical line. This is used in ease of steering and to make the tires return to center while you're driving. For our Ranger we want about six degrees of positive castor. That means the upper pivot, or mount, is back or rearward of the lower mount. So to do that we'll start by turning our driver's side tire out about 15 degrees.
The angled tip of the block represents a 15 degree angle. So all we need to do is line this up with the rocker or the side of the truck. That's about 15 degrees. Then from there we'll set the castor side to zero. Then turning the tires 30 degrees the other way will give us our initial castor reading. And after a quick adjustment we'll go through the steps one more time to land at six degrees.
Now the last of the three settings we're gonna be doing is called toe, and toe is the easiest out of all three of those. That just means the front angle of your tire is either turned in or turned out, and for us and our Ranger we're gonna have ours turned in about an eighth of an inch. Now to set toe we need to come up with two common points on each of the tires, and for us we just happened to have a red line that wraps all the way around the driver's and the passenger's side tire. So what we need to do is take a measurement from the front of the red line from driver's to passenger's and then take that same measurement from the back of the tire on the driver's to the passenger's side. Then we're gonna make sur that the front measurement is about an eighth of an inch less. That'll give us the toe in that we need, and to make those measurements it's pretty simple. We'll come down to the tie rod bar and either turn it in or turn it out. When you guys think of ARP bolts I'm sure you think of strength and safety, and your mind probably goes to a beautifully dressed engine or front drive assembly, but did you know that ARP bolts is much more than that. ARP thrives on the challenges of developing fasteners to solve any problems, and they can help solve for the custom bolts for almost anything on your project. We called them for some help on our Prerunner Ranger, and they came through with some custom made bolts for the front and rear of our suspension. From bolts that have six and 12 point heads in standard and metric threads. They also have nuts and washers. Plus they only use premium grade materials, and they're all made in the ARP facility right here in the USA.
(Narrator)>> Up next what you'll need to be safe on the trails. Plus fashion fails.
(Eliza)>> Hey!
(Narrator)>> Coming up on XOR.
(Eliza)>> When it comes to racing we all think about the one piece suit and our helmet, but we never really question why. So we're gonna go over our race gear and maybe give you a couple of tips on what you should be wearing when trailing. Under garments, such as athletic compression style clothing and moisture wicking materials all can become molten when ignited, and are not permitted in the racing community. We pick up this race quip gear from Summit Racing. It's made of fire retardant cotton so that if there is a fire it won't melt to your skin. So if you're looking for proper race gear you want to make sure to look for the SFI certified patch. Something you may not think about when you're trailing or racing is eye protection, even with vehicles that have windshields. On the trail and on the race course there's a lot of flying debris. So you want to take care of those eyeballs. Other things one might forget are arm and neck restrains. These keep your arms from coming out of the roll cage and this keeps your neck from over extending. Both are vital to the race community. In off road racing reflectors, lights, and colored lights carry a lot more weight than just illumination. Flood lights are used to better seeing conditions in the dusty cloud plumes, which can bring visibility down to only a couple of feet in front of the truck. Depending on your sanctioning body, colored lights and specifically place lights can communicate to officials and other racers. The blue light identifies slow classes of vehicles. That way if a faster class is approaching they can maneuver around them safely. Amber lights are put in the rear of the vehicle so that other races can see you when approaching from behind. And last but not least are the things that you have to have out on the track as well as out on the trail, such as fire extinguisher, breakdown kit, first aid kit, and especially water. Breakdown kits should have a battery operated red flashing beacon or can be glow sticks or red reflective device like ours, and most important of all is water. Sanctioning bodies require that you carry a quarter of water per participant, and that's a good rule of thumb for trailing too. We outfit our rigs to be as safe and as reliable as possible but racing and trailing can and will leave you stranded. So it's best to prepare for the worst when racing your best. Hey JK lovers your jeep is coming up on the 10 year mark, and if you need to keep your pride and joy on the trails Powertrain Products has you covered. Powertrain Products offers rebuilt, used, and surplus three point six Pentastar replacement engines, and they've addressed some of the factory issues that the three point six had. The o-e design was prone to failure due to excessive wear that resulted in misfires and excessive knocking, which caused a whole slew of problems. All the Pentastar engines from Powertrain Products come with the corrected cylinder head to fix that issue, and you know that their stuff works because they back it up with a warranty, keeping you and your Jeep trailing for many years to come.
(Jeremy)>> Now we know there's a lot of you guys out there that are running fiberglass parts on your cars, your trucks, your SUV's, heck even on your side by sides, and I know that those parts usually show up in every color except for the color you need to match your rig. Well for us and our Pre-Runner Ranger we need to paint our hood white. And yes I know that it looks like it's white already but it's not the white that matches our Ranger. So we need to prep this so we can lay down the correct color, and being that it's fiberglass we're gonna take a couple of extra steps to make sure that the paint that lays down on this is gonna be absolutely perfect. Now the hood's been in the shop for quite a while. It's full of dust and we've moved it a lot with our greasy hands. So the first thing we're gonna do is give this whole thing a really good wash. Now we don't want to use just any old soap, especially the car wash soap you can get at your local parts store. This store is strong enough to clean your car or your truck but it's not quite strong enough to clean the panel that we want to paint. If we were to use this soap it might actually drive some of the contaminants down into the part that we want to paint, and that could give us some pretty interesting results when it comes time to laying down some paint. So we'll use your average dish soap you can steal from the kitchen. It washes off clean, doesn't leave any residue, and will get rid of all the contaminants on our hood. Plus the better half might like it that your hands are finally nice and clean.
Well now you guys are one step closer to washing the panel, and you could just use some rags and your soapy water to get this thing nice and clean, but we're gonna take this one step further. We need to sand the hood anyways. So we're gonna be using some red scuff pads to get us there. That way all that hard elbow grease we're gonna put into washing will do us some good cause we'll be sanding as well. So we're gonna get this dunked in the water and we're actually gonna start sanding. A wise man once told me using short strokes kind of a waste of time. If you're there working on the panel anyways you might as well be using long sweeping strokes. That way you just use way less energy and the panel gets done a whole lot quicker.
And when you're all done just give it a good rinse with some nice clean water.
Well now that the hood's all nice and dry we've got one more thing that we've got to be concerned about. Fiberglass and plastic parts will have some static electricity in it, and to keep that down we're gonna be using a little bit of alcohol and water mixture. We'll just spray this over the top of the hood, let it air dry. Then we're one step closer to getting it in the booth and ready for some color.
(Narrator)>> Our Tacoma gets a new set of legs to go with a new pair of shoes next on XOR.
(Jeremy)>> Hey guys, welcome back to the shop. Now we moved over to the solid axle Tacoma cause we're getting this thing ready to be set on the ground with some wheels and tires. Now our suspension system is almost done but we'll need some tires to make sure this thing can go anywhere and everywhere.
(Eliza)>> So we are going to with General Grabber's XThree. We chose the XThree because of its durability and because its sidewall tread offers more grip off road and protects the sidewall from damage. It has a multi-pitch design for a smooth and quiet ride, and they also have a sight tread design to improve wet and winter handling. They come with a load range "D" rating for heavy hauling, and General says that this is the perfect combination of on road and off road performance, and they're gonna look great under our Tacoma. Can you take that Jeremy?
(Jeremy)>> Yes ma'am.
(Eliza)>> Thank you. We want our wheel base to be just perfect so that our truck goes straight down the highway, and we're looking to be at about 122 inches. Looks like we're pretty much there. All we've got to do is set our link arms and get our brackets welded in.
(Jeremy)>> Now we want our links to be in the center of their adjustability. So what I did is went half way up on the threads and I put a mark. Now what I'll do is turn that into the mark, bring my jam nut in, give that a little twist. Then I can put my bracket on that welds on to the axle, slide this all up, and install.
(Eliza)>> Alright let's get this castor set.
(Jeremy)>> Okay.
(Eliza)>> Come up a bit. A little bit more.
(Jeremy)>> Tell we when.
(Eliza)>> Right there, perfect. Six degrees!
(Jeremy)>> We need to cut the stock JK upper bracket off our Dana 44 because the All Pro kit comes with its own bracket. We want the lower link brackets parallel to the ground. Now it may look like it reads about five degrees but from straight on they do read zero. [ welder crackling ]
(Jeremy)>> Now the All Pro kit came with its own upper link bracket, and we need to make a truss so we can weld this to it, and that starts with pulling a measurement. We'll lay down a mark at three inches, which is the width of our truss. Using our Lincoln Electric Tomahawk 1,000 plasma cutter we'll get started. We'll use a straight edge as our fence and follow it for a straight cut. A quick trip over to the Iron Worker, and then to the bender.
We'll get our truss where we need it.
With all the parts cut out it's time to put this puzzle together. To get started we'll tack the truss in place. [ welder crackling ]
(Jeremy)>> Then piece by piece... [ welder crackling ] ...it all comes together.
Well now that we have the truss and the gussets in place we can go ahead and install the upper link bracket. Now we noticed when this was here that there's another bracket up here on the chassis that we're gonna have to get rid of. So we'll go ahead, tack this bracket in place, get rid of the link arm, come back, and cut this one off. First things first, let's tack the one in place. A couple of good tacks holds everything in place for when it's time to cycle our suspension. [ welder crackling ]
(Jeremy)>> While I get rid of this bracket you guys can go ahead and take a break. [ saw buzzing ]
(Narrator)>> Up next all our hard work pays off. We'll cycle the suspension for the first time, coming up on XOR.
(Eliza)>> Hey the front end's looking good.
(Jeremy)>> It's gonna look great when it's sitting on the ground.
(Eliza)>> It definitely is. Our Tacoma is gonna need some long travel coil overs to tie in all of our suspension. So we went to Summit Racing dot com and picked up these remote reservoir coil overs. They have 16 inches of travel and are going to do perfect for our rig, but first things first. We've got to get our coil over mounts that All Pro sent us burnt in.
(Jeremy)>> And to do that we'll first need to cap off the top of the motor mounts that we had to cut away during disassembly.
Following the manufacturer's instructions we'll mount the coil over towers on to the chassis. And because we plan on cycling our suspension we'll do a little more than just tacking this on. We'll lay down some nice beads.
That should hold that in place for now. Installing our empty coil overs will help us find the lower mount location.
Put that guy right about there. [ metal grinding ]
(Jeremy)>> The lower mounts came with the All Pro kit, and again we'll make sure that these stay in place so we can cycle that suspension.
Using the grade eight provided by All Pro, we'll install the coil overs so we can see how this thing flexes its muscles. Alright Eliza, let's see how this thing travels.
(Eliza)>> Alright going down.
(Jeremy)>> Looking good.
(Eliza)>> Everything's looking good over here.
(Jeremy)>> Keep going.
Almost!
And stop! Well now it's time to install the pan hard bar and brackets. Now the pan hard bar keeps the axle from moving from left to right underneath the truck as you're going down the trail, and I already went ahead and pulled the measurement to make sure this was centered. I went right off of the chassis, and then used the ball joints on either side to make sure we were 100 percent in between the frame rails. Now all I have to do is burn all the brackets in and put the bar in. We'll tack the frame side bracket onto the frame just ahead of where the axle will sit because the lower side bracket has an offset built into it for clearance. And after we pull a measurement... Three feet exactly. ...We'll cut the bar that came in the kit, weld on the rod ends, and then just slide it into place.
Perfect!
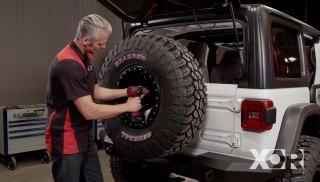
(Eliza)>> Now that Jeremy has got the suspension buttoned up we can get our tires put on. [ drill spinning ]
(Eliza)>> One of the quickest ways to spruce up an interior is to get seat covers. So we called up our friends at Covercraft because they are the official car cover of the Powernation family. Our car covers were a breeze to install and only took a little under our hour to get them all in. The fit is awesome and they have tie downs to keep them in place.
Alright we're done. Well they look great. Now we have our seats protected and they'll be easy clean up after the trails.
(Jeremy)>> Man this thing is way bigger than it was when it came into the shop, especially now that it's sitting on some 37's, but we still have a laundry list of stuff that we have to do to it.
(Eliza)>> Speaking of stuff, if you're interested in anything that we've used today in our build visit us at Powernation TV dot com.
(Jeremy)>> See you next time.


