


More Square Body Tow Truck Episodes
Carcass Featured Projects


Carcass Builds


Want more content like this?
Join the PowerNation Email NewsletterParts Used In This Episode
Matco Tools
MATCO Tools are the Official Tool Supplier to PowerNation
The Industrial Depot
Tools, Hardware, Shop Supplies
Episode Transcript
(Jimmy)>> You're watching Powernation.
(Jeremy)>> Today on Carcass we recreate the rear section of the chassis on our junkyard find tow truck.
(Jimmy)>> How we rebuild this crusty C-channel, giving this tow truck a second chance at life.
(Jeremy)>> You're watching Carcass. [ MUSIC ] [ tires squealing ] [ MUSIC ] [ engine revving ] [ MUSIC ]
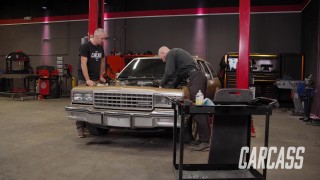
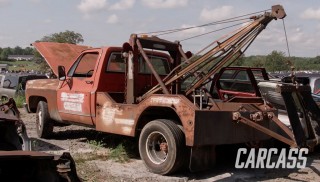
(Jeremy)>> We picked up this 1977 C-30 tow truck in a local junkyard. It was mostly together with a few things missing under the hood and a flat tire out back.
(Jimmy)>> We fell in love with this rusty old work truck, and with a little work getting it started we decided this patina'ed money maker would be our next project vehicle.
(Jeremy)>> When we brought this thing back to the shop we tore right into it looking for the problem areas. Yep, and boy did we run into every car guy's nightmare. Not only did we find cosmetic rust but we also found some structural rust. Jimmy and I were just glad this thing didn't break in half as we rolled it into the shop.
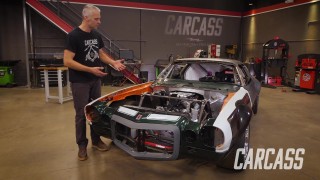
(Jimmy)>> We thought long and hard about what to do with this chassis and we agreed. The rust, it had to go. So we fired up the torch and nixed the rear section of this frame. We made cuts on either side just behind the cab dividing the truck in two.
(Jeremy)>> Now we have two halves of a truck. We kept the rear half so we can pull a measurement later and as for the front if the truck wasn't road worthy before it certainly isn't now.
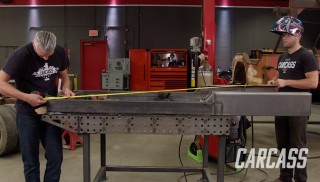
(Jimmy)>> The plan is to rebuild the back end of this chassis, and that involves us forming new sections of C-channel. The new sections will replace the old sections from about here to here. Everything behind that we're gonna use four inch tall rectangular tubing, and because the tubing is so much shorter than the new channel we'll have to gusset the tubing to the channel to ensure it's a strong joint. We plan on building the entire back end on a fixturing table to make sure everything is square and true. So the first step in this process is to grab some measurements and bend up our new C-channel. Alright let's see, seven and three-eighths, two and three quarter.
(Jeremy)>> To build our C-channel we're gonna be using three sixteenths sheet steel, and if you add up our measurements from the original chassis you get roughly 13 inches, and we're replacing 30 inches before we transition to the rectangular tubing. [ MUSIC ] We'll connect the dots giving us a cutting line to follow with the plasma torch. [ MUSIC ]
(Jimmy)>> We're gonna use a straight edge to help guide us along this cut. We'll line the tip of our torch up with our cut line and just clamp the straight edge in place. Butting our torch up against the edge of our yard stick we can begin cutting. [ torch hissing ]
(Jeremy)>> After our first cut we'll reset the straight edge... [ MUSIC ] ...and finish the cut. [ torch hissing ]
(Jeremy)>> We'll follow that up with a seven inch grinder to clean up the jagged edges that were left behind by the plasma torch. [ grinder buzzing ]
(Jimmy)>> While Jeremy cuts out another piece for our other piece of C-channel I'm gonna show you guys how we map out the bends. [ MUSIC ] For our new chassis section we're gonna be nesting a new piece of C-channel in the existing piece of C-channel on the truck, and to do that we're gonna need to know one very specific piece of information. That's the inside radius of the bend that comes off the break. The reason why we need to know that is because there's a specific amount of material taken up in each bend, and for us to accurately place our bend lines on our flat sheet we need to know what this radius is. So to figure that out we need to make a test bend and grab a set of drill bits. [ mechanical humming ]
(Jimmy)>> Now that we have the test bend made the best thing to do is just grab a really big drill bit and take the shank of the drill bit and put it on the inside radius of the bend. I'm gonna look up at the light, and the drill bit is so big that there's an air gap between the inside radius and the shank. So what you're gonna do is just keep going down in drill bit size until that air gap is no longer visible. I've already done this with our piece. So I know that a seventeen sixty-fourths drill bit closes that air gap. Again I know that because I look up at the light and the air gap is no longer visible, but this is a diameter and we need a radius. So seventeen sixty-fourths divided by two is seventeen one-twenty-eighths, and that's gonna help us figure out where to place our bend lines on the flat sheet. [ MUSIC ] We know that the height of our new C-channel can be no taller than seven and three-eighths of an inch. We know this because we took a measurement off the truck chassis earlier, but there's a couple of things we need to consider to get this right. The first being the thickness of our material. We're just using three-sixteenths sheet. So we know that each flange is three-sixteenths of an inch tall. The second thing we need to consider is the height of the bend itself. Now we used a drill bit to figure out what the radius of the bend was, and from that we can figure out what the height is, and now just using the information we know about this drill bit I'm gonna show you how to figure out the height of your bend and where to place your bend lines. [ MUSIC ] The diagram I just drew is a blown up version of the bend in this diagram right here. The circle in blue represents the drill bit we used to figure out the radius of the bend. We know that the diameter of the drill bit is seventeen over sixty-four, which means the radius is seventeen over one-twenty-eight, but what we're really interested in is the height of the bend, and by looking at the diagram it actually turns out the height of the bend is the same as the radius of the bend at seventeen over one-twenty-eight, but what we're interested in is figuring out where our bend line is. So what we actually have to do is take this value and divide it in half, and that will help us locate our bend line. Alright so now I'll actually show you how to lay out some lines on your metal, and remember, the total height of our channel can be no greater than seven and three-eighths but half that is three and eleven-sixteenths. That's a really important number for what we're about to lay down. We're gonna mark the center line on this piece of metal and make all of our measurements off of that. Using that center line we need to find our bend line. The total height from the center is three and eleven-sixteenths inches but we need to subtract the thickness of the metal and the height of the bend, which lands us at about three and seven-sixteenths inches for our bend line. [ MUSIC ] [ torch hissing ]
(Jeremy)>> Up next, we take what we learned and build a replacement chassis for our vintage tow truck.
[ MUSIC ]
(Jimmy)>> During the break we built one chassis rail of our back section using the C-channel we made, a straight piece of rectangular tubing, and we added a gusset for some strength, and currently it's sitting upside down on this table, and there's one thing I wanted to point out. This section is a straight piece of tubing. On a stock truck chassis there's a kick up to give clearance for the axle as the suspension travels. On a stock truck, at least on ours, it's about nine inches between the axle and the chassis. So by using this straight section we lose some of that room but there's still plenty for the suspension to travel, but this is only one half of the equation and we're gonna show you how to build the other half.
(Jeremy)>> For the straight section that will go over the axle we're using a piece of four by two eighth inch wall rectangular tubing, and we're cutting it to 56 inches. This will allow for some overlap when we weld it to our newly made C-channel.
(Jimmy)>> Now to determine how much of an overlap we'll need to pull a measurement on the original chassis. The leaf spring hanger has been cut on the old chassis. So we're gonna add a few inches to avoid doing this with our new setup.
(Jeremy)>> With our measurements in hand we'll adjust our overlap, and secure our pieces so they can lay flat against each other. [ MUSIC ] [ welder crackling ]
(Jimmy)>> As with any fabrication project we're gonna tack our pieces first making sure we're happy with how they sit. [ welder crackling ]
(Jimmy)>> Then we can make our straight section of tubing a permanent part of the C-channel. [ welder crackling ] [ MUSIC ]
(Jimmy)>> Now that we've attached our rectangular tubing to our C-channel we need to make some gussets. We're gonna make these out of three-sixteenths steel and cut them out on the band saw. [ saw buzzing ] [ MUSIC ]
(Jimmy)>> There's one!
(Jeremy)>> This process is a lot like a puzzle. We'll need to cut one piece at a time to ensure each subsequent piece fits perfectly against one another. [ MUSIC ]
(Jimmy)>> Making gussets is not an exact science. This gusset could have been twice the length. I think this length is fine but there's a few things to keep in mind. Triangles are strong and you should box things in if you can. We have all of our pieces laid out now and it's time to weld them up. [ MUSIC ] [ welder crackling ] [ MUSIC ] [ welder crackling ]
(Jeremy)>> With our gussets getting their final welds we'll need to line up our new frame rails so we can build out our crossmembers. [ MUSIC ] Now these are sized based on the original frame width minus the thickness of the materials we're working with. For our first crossmember we're using the same four by two tubing we've been using throughout the process. [ welder crackling ]
(Jimmy)>> We're adding a second one inside of the C-channel. So this will require a different length of tubing. [ saw buzzing ]
(Jimmy)>> Before we tack this crossmember in place we need to check our measurements to ensure everything is square.
(Jeremy)>> 91 and a half. [ MUSIC ] 91 and a half, weld it in. [ welder crackling ]
(Jimmy)>> There's one last thing we're gonna add before we can call this done. A gusset made from three-sixteenths steel that will help add some strength around the leaf spring hangers. [ welder crackling ] [ MUSIC ]
(Jeremy)>> Holy cats man, that looks pretty good.
(Jimmy)>> Yeah I'm done. So I need some help moving it for a test fit.
(Jeremy)>> That sounds good. Which way, left or right?
(Jimmy)>> That way.
(Jeremy)>> Wait my left is your right though.
(Jimmy)>> Sure! It all comes down to this. All the math, the measuring, cutting and welding just to get some weld gaps right.
(Jeremy)>> Not to mention you already prepped the chassis. So we know where we're gonna weld's gonna be nice and strong. We don't have giant holes in the frame rail. So it's gonna be a whole lot safer, and we've just got to pull a quick measurement to make sure that the front and the back are nice and straight before you weld it in.
(Jimmy)>> Awesome! [ MUSIC ]
(Jeremy)>> With our new frame section in place we'll pull a quick measurement to make sure that the back half of the chassis is straight with the front half. [ MUSIC ] 97 and three quarter, weld it up.
(Jimmy)>> The last thing to do is weld this chassis together, making it just as strong if not stronger than the original, and this gives us the perfect platform to set the wrecker body back on this truck and one step closer to getting it back on the road. [ welder crackling ] [ MUSIC ]
(Jeremy)>> Coming up, how we position four tires and a leaf spring suspension using one helpful measurement.
(Jeremy)>> Alright well the new frame section's in the back of the truck. Jimmy welded it up. It's a lot stronger than it was before, and it's nice and straight.
(Jimmy)>> So now all we have to do is get the front and rear leaf spring hangers on and we have to do shock mounts.
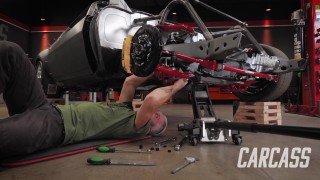
(Jeremy)>> We should probably put all the suspension on the rear axle before we slide it underneath here.
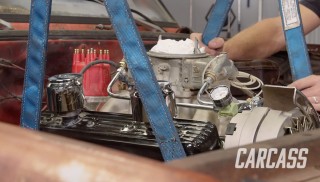
(Jimmy)>> I'll get the leafs and meet you back there. The new springs that we're installing on the tow truck are definitely heavy duty enough to tow a vehicle. These are nine pack leaf springs with a 3,500 pound rating for each spring pack.
(Jeremy)>> And we're installing these reusing the stock U-bolt plates but we're replacing the U-bolts and nuts and just snugging them up for now. We'll torque these to spec when everything is sitting pretty under our chassis. We'll also loosely install the shackle, which will help us install the axle later.
(Jimmy)>> With our axle prepped we can prepare the front and rear leaf spring hanger mounts for a test fit. We're doing this because we're gonna weld them to our new frame rails instead of riveting or bolting them to the chassis.
(Jeremy)>> Many hands make light work when rolling a giant dually axle under a truck. Now we' measured the wheel base prior to cutting off the rear and of the chassis. So we have a good idea of where to set this for now. [ MUSIC ] Okay what do we need, 22 and a half?
(Jimmy)>> 22 and a half to the center. We're measuring from the cut line to the center bolt hole of the leaf spring hanger. This will ensure that we tack the leaf spring hanger in the same area as our rusted out frame section. [ welder crackling ]
(Jeremy)>> Should we see if it fits? They're too narrow.
(Jimmy)>> I think these are for a four wheel drive truck. We've been trying to test fit the leaf springs into the hangers and we ran into a bit of an issue.
(Jeremy)>> And here's what we've found. They don't make every part for every vehicle. There's not a bunch of reproduction parts out there for a cab and chassis truck. So we couldn't find a set of front leaf spring hangers for our tow truck, but what we did find was a set of spring hangers for our four wheel drive three quarter ton truck. What we did is welded them on but then we found that there's an issue. This spring hanger is about an inch wider than the cab and chassis spring hangers. So that's just not gonna work for what we have to do. So what we're gonna do is take these back off. We're gonna end up cutting about an inch out of the spring hanger, and then we're just gonna weld them back right to the chassis cause that's what we were gonna do in the first place. [ saw buzzing ]
(Jeremy)>> With the bracket trimmed down we'll set these back at the 22 and a half inch mark that we had them at earlier.
(Jimmy)>> Going this way, yeah! [ welder crackling ] [ MUSIC ]
(Jimmy)>> Check that out. [ metal clanging ]
(Jeremy)>> That's perfect! Alright how close are we to the wheel base on the other side?
(Jimmy)>> That's pretty spot on.
(Jeremy)>> Nice! [ MUSIC ]
(Jimmy)>> 55 and a half, same as the original chassis.
(Jeremy)>> Okay, tack her on. [ welder crackling ] [ MUSIC ] [ metal clanging ]
(Jimmy)>> This actually wasn't as hard as I thought it was gonna be, and like everything fits pretty well.
(Jeremy)>> Yeah and it was way easier to just rebuild the back half of this than it was to just fix the old part of the chassis, but we better get this welded up because we've still got to get the box on it. [ MUSIC ] [ welder crackling ]
(Jimmy)>> Each of the leaf spring hangers are getting welded all along the outside. We're also gonna burn in as much of the inside edge as we can get to. This is probably overdoing it but over engineering this kind of stuff is always better than the alternative. [ MUSIC ]
(Jeremy)>> Up next, we re-install the towing rig on our patina'ed tow truck.
(Jimmy)>> You're watching Carcass!
[ MUSIC ]
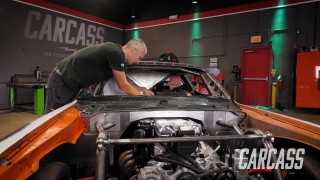
(Jeremy)>> While you guys were on break we went ahead and took care of the shocks. All we did was whip up a couple of brackets, welded them to the chassis, but now it's time to do a test fit to see how that wrecker body's gonna fit on here.
(Jimmy)>> And once we have the body on here we have to figure out how to attach it. Whether that be welding it directly to the chassis or making more brackets and bolting it.
(Jeremy)>> But we don't have a driveshaft. So I guess we've got to push it under there. [ MUSIC ] To mount the wrecker body onto our newly built chassis we're basically gonna mount it the same way it was before because let's face it. I'm sure this wrecker body had been on this truck its entire life and it held together that long. So in the rear we're gonna make some basic mounts kinda like they were before and in the front we're actually just gonna reuse the mounts like before, but I don't want to work in this tiny little area. So we're gonna roll the truck back, get rid of these tires so I can take some measurements. [ MUSIC ] [ drill humming ] [ MUSIC ]
(Jeremy)>> Alright let's go about nine inches tall and the plate on the top will be about eight and a half inches long and three and a half inches wide. Now to mount the bed to the chassis we're gonna be using two existing bolts in the towing assembly. Now essentially there's two sets of bolts that hold that towing assembly to the bed and then hold the bed to the chassis. Now the original chassis had a piece of angle iron that held this all together. Well that's not gonna work for us because our chassis is about a half of an inch narrower now, and there's a big piece of channeling that runs the length of the wrecker body. So if we were to use a simple piece of angle iron it would just merely contact that piece of channeling. So a simple solution would be to cut out a set of brackets like this that have a notch in it to go around that piece of channeling. Then we'll use a piece of steel, punch out a set of holes that match the holes in the towing assembly. [ saw buzzing ] [ MUSIC ]
(Jeremy)>> You want to hold the bolts for me Jimmy?
(Jimmy)>> We're bolting the top plate to the bottom of the bed first because we already have the bed sitting where we want it. This will ensure that when we go to weld everything together the supporting pieces will be located in the correct position. We're gonna wait to finish weld the rear mount so we can make sure the front mounts work like they're supposed to. We're gonna be using the stock mounting plates from the original chassis and some threaded rod to make sure everything lines up.
(Jeremy)>> The stock plates just hook to the inside of the C-channel and the threaded rods are fed through them and up through the floor of the bed. Then they're held down with a few washers and a nut. [ drill humming ]
(Jeremy)>> Well now that we know everything lines up we're gonna unbolt everything, pick the bed off of the chassis, weld up our rear mounts, and give everything a nice shiny coat of paint. [ MUSIC ] [ welder crackling ]
(Jimmy)>> With everything welded up we'll slap on a coating of paint to prevent rust, and reassemble the rear end of our tow truck, returning this crumbling work truck to a road worthy state.
(Jeremy)>> We have a lot more in store getting this tow truck back on the road. Follow along with us on this build at Powernation TV dot com.
Show Full Transcript
(Jeremy)>> Today on Carcass we recreate the rear section of the chassis on our junkyard find tow truck.
(Jimmy)>> How we rebuild this crusty C-channel, giving this tow truck a second chance at life.
(Jeremy)>> You're watching Carcass. [ MUSIC ] [ tires squealing ] [ MUSIC ] [ engine revving ] [ MUSIC ]
(Jeremy)>> We picked up this 1977 C-30 tow truck in a local junkyard. It was mostly together with a few things missing under the hood and a flat tire out back.
(Jimmy)>> We fell in love with this rusty old work truck, and with a little work getting it started we decided this patina'ed money maker would be our next project vehicle.
(Jeremy)>> When we brought this thing back to the shop we tore right into it looking for the problem areas. Yep, and boy did we run into every car guy's nightmare. Not only did we find cosmetic rust but we also found some structural rust. Jimmy and I were just glad this thing didn't break in half as we rolled it into the shop.
(Jimmy)>> We thought long and hard about what to do with this chassis and we agreed. The rust, it had to go. So we fired up the torch and nixed the rear section of this frame. We made cuts on either side just behind the cab dividing the truck in two.
(Jeremy)>> Now we have two halves of a truck. We kept the rear half so we can pull a measurement later and as for the front if the truck wasn't road worthy before it certainly isn't now.
(Jimmy)>> The plan is to rebuild the back end of this chassis, and that involves us forming new sections of C-channel. The new sections will replace the old sections from about here to here. Everything behind that we're gonna use four inch tall rectangular tubing, and because the tubing is so much shorter than the new channel we'll have to gusset the tubing to the channel to ensure it's a strong joint. We plan on building the entire back end on a fixturing table to make sure everything is square and true. So the first step in this process is to grab some measurements and bend up our new C-channel. Alright let's see, seven and three-eighths, two and three quarter.
(Jeremy)>> To build our C-channel we're gonna be using three sixteenths sheet steel, and if you add up our measurements from the original chassis you get roughly 13 inches, and we're replacing 30 inches before we transition to the rectangular tubing. [ MUSIC ] We'll connect the dots giving us a cutting line to follow with the plasma torch. [ MUSIC ]
(Jimmy)>> We're gonna use a straight edge to help guide us along this cut. We'll line the tip of our torch up with our cut line and just clamp the straight edge in place. Butting our torch up against the edge of our yard stick we can begin cutting. [ torch hissing ]
(Jeremy)>> After our first cut we'll reset the straight edge... [ MUSIC ] ...and finish the cut. [ torch hissing ]
(Jeremy)>> We'll follow that up with a seven inch grinder to clean up the jagged edges that were left behind by the plasma torch. [ grinder buzzing ]
(Jimmy)>> While Jeremy cuts out another piece for our other piece of C-channel I'm gonna show you guys how we map out the bends. [ MUSIC ] For our new chassis section we're gonna be nesting a new piece of C-channel in the existing piece of C-channel on the truck, and to do that we're gonna need to know one very specific piece of information. That's the inside radius of the bend that comes off the break. The reason why we need to know that is because there's a specific amount of material taken up in each bend, and for us to accurately place our bend lines on our flat sheet we need to know what this radius is. So to figure that out we need to make a test bend and grab a set of drill bits. [ mechanical humming ]
(Jimmy)>> Now that we have the test bend made the best thing to do is just grab a really big drill bit and take the shank of the drill bit and put it on the inside radius of the bend. I'm gonna look up at the light, and the drill bit is so big that there's an air gap between the inside radius and the shank. So what you're gonna do is just keep going down in drill bit size until that air gap is no longer visible. I've already done this with our piece. So I know that a seventeen sixty-fourths drill bit closes that air gap. Again I know that because I look up at the light and the air gap is no longer visible, but this is a diameter and we need a radius. So seventeen sixty-fourths divided by two is seventeen one-twenty-eighths, and that's gonna help us figure out where to place our bend lines on the flat sheet. [ MUSIC ] We know that the height of our new C-channel can be no taller than seven and three-eighths of an inch. We know this because we took a measurement off the truck chassis earlier, but there's a couple of things we need to consider to get this right. The first being the thickness of our material. We're just using three-sixteenths sheet. So we know that each flange is three-sixteenths of an inch tall. The second thing we need to consider is the height of the bend itself. Now we used a drill bit to figure out what the radius of the bend was, and from that we can figure out what the height is, and now just using the information we know about this drill bit I'm gonna show you how to figure out the height of your bend and where to place your bend lines. [ MUSIC ] The diagram I just drew is a blown up version of the bend in this diagram right here. The circle in blue represents the drill bit we used to figure out the radius of the bend. We know that the diameter of the drill bit is seventeen over sixty-four, which means the radius is seventeen over one-twenty-eight, but what we're really interested in is the height of the bend, and by looking at the diagram it actually turns out the height of the bend is the same as the radius of the bend at seventeen over one-twenty-eight, but what we're interested in is figuring out where our bend line is. So what we actually have to do is take this value and divide it in half, and that will help us locate our bend line. Alright so now I'll actually show you how to lay out some lines on your metal, and remember, the total height of our channel can be no greater than seven and three-eighths but half that is three and eleven-sixteenths. That's a really important number for what we're about to lay down. We're gonna mark the center line on this piece of metal and make all of our measurements off of that. Using that center line we need to find our bend line. The total height from the center is three and eleven-sixteenths inches but we need to subtract the thickness of the metal and the height of the bend, which lands us at about three and seven-sixteenths inches for our bend line. [ MUSIC ] [ torch hissing ]
(Jeremy)>> Up next, we take what we learned and build a replacement chassis for our vintage tow truck.
[ MUSIC ]
(Jimmy)>> During the break we built one chassis rail of our back section using the C-channel we made, a straight piece of rectangular tubing, and we added a gusset for some strength, and currently it's sitting upside down on this table, and there's one thing I wanted to point out. This section is a straight piece of tubing. On a stock truck chassis there's a kick up to give clearance for the axle as the suspension travels. On a stock truck, at least on ours, it's about nine inches between the axle and the chassis. So by using this straight section we lose some of that room but there's still plenty for the suspension to travel, but this is only one half of the equation and we're gonna show you how to build the other half.
(Jeremy)>> For the straight section that will go over the axle we're using a piece of four by two eighth inch wall rectangular tubing, and we're cutting it to 56 inches. This will allow for some overlap when we weld it to our newly made C-channel.
(Jimmy)>> Now to determine how much of an overlap we'll need to pull a measurement on the original chassis. The leaf spring hanger has been cut on the old chassis. So we're gonna add a few inches to avoid doing this with our new setup.
(Jeremy)>> With our measurements in hand we'll adjust our overlap, and secure our pieces so they can lay flat against each other. [ MUSIC ] [ welder crackling ]
(Jimmy)>> As with any fabrication project we're gonna tack our pieces first making sure we're happy with how they sit. [ welder crackling ]
(Jimmy)>> Then we can make our straight section of tubing a permanent part of the C-channel. [ welder crackling ] [ MUSIC ]
(Jimmy)>> Now that we've attached our rectangular tubing to our C-channel we need to make some gussets. We're gonna make these out of three-sixteenths steel and cut them out on the band saw. [ saw buzzing ] [ MUSIC ]
(Jimmy)>> There's one!
(Jeremy)>> This process is a lot like a puzzle. We'll need to cut one piece at a time to ensure each subsequent piece fits perfectly against one another. [ MUSIC ]
(Jimmy)>> Making gussets is not an exact science. This gusset could have been twice the length. I think this length is fine but there's a few things to keep in mind. Triangles are strong and you should box things in if you can. We have all of our pieces laid out now and it's time to weld them up. [ MUSIC ] [ welder crackling ] [ MUSIC ] [ welder crackling ]
(Jeremy)>> With our gussets getting their final welds we'll need to line up our new frame rails so we can build out our crossmembers. [ MUSIC ] Now these are sized based on the original frame width minus the thickness of the materials we're working with. For our first crossmember we're using the same four by two tubing we've been using throughout the process. [ welder crackling ]
(Jimmy)>> We're adding a second one inside of the C-channel. So this will require a different length of tubing. [ saw buzzing ]
(Jimmy)>> Before we tack this crossmember in place we need to check our measurements to ensure everything is square.
(Jeremy)>> 91 and a half. [ MUSIC ] 91 and a half, weld it in. [ welder crackling ]
(Jimmy)>> There's one last thing we're gonna add before we can call this done. A gusset made from three-sixteenths steel that will help add some strength around the leaf spring hangers. [ welder crackling ] [ MUSIC ]
(Jeremy)>> Holy cats man, that looks pretty good.
(Jimmy)>> Yeah I'm done. So I need some help moving it for a test fit.
(Jeremy)>> That sounds good. Which way, left or right?
(Jimmy)>> That way.
(Jeremy)>> Wait my left is your right though.
(Jimmy)>> Sure! It all comes down to this. All the math, the measuring, cutting and welding just to get some weld gaps right.
(Jeremy)>> Not to mention you already prepped the chassis. So we know where we're gonna weld's gonna be nice and strong. We don't have giant holes in the frame rail. So it's gonna be a whole lot safer, and we've just got to pull a quick measurement to make sure that the front and the back are nice and straight before you weld it in.
(Jimmy)>> Awesome! [ MUSIC ]
(Jeremy)>> With our new frame section in place we'll pull a quick measurement to make sure that the back half of the chassis is straight with the front half. [ MUSIC ] 97 and three quarter, weld it up.
(Jimmy)>> The last thing to do is weld this chassis together, making it just as strong if not stronger than the original, and this gives us the perfect platform to set the wrecker body back on this truck and one step closer to getting it back on the road. [ welder crackling ] [ MUSIC ]
(Jeremy)>> Coming up, how we position four tires and a leaf spring suspension using one helpful measurement.
(Jeremy)>> Alright well the new frame section's in the back of the truck. Jimmy welded it up. It's a lot stronger than it was before, and it's nice and straight.
(Jimmy)>> So now all we have to do is get the front and rear leaf spring hangers on and we have to do shock mounts.
(Jeremy)>> We should probably put all the suspension on the rear axle before we slide it underneath here.
(Jimmy)>> I'll get the leafs and meet you back there. The new springs that we're installing on the tow truck are definitely heavy duty enough to tow a vehicle. These are nine pack leaf springs with a 3,500 pound rating for each spring pack.
(Jeremy)>> And we're installing these reusing the stock U-bolt plates but we're replacing the U-bolts and nuts and just snugging them up for now. We'll torque these to spec when everything is sitting pretty under our chassis. We'll also loosely install the shackle, which will help us install the axle later.
(Jimmy)>> With our axle prepped we can prepare the front and rear leaf spring hanger mounts for a test fit. We're doing this because we're gonna weld them to our new frame rails instead of riveting or bolting them to the chassis.
(Jeremy)>> Many hands make light work when rolling a giant dually axle under a truck. Now we' measured the wheel base prior to cutting off the rear and of the chassis. So we have a good idea of where to set this for now. [ MUSIC ] Okay what do we need, 22 and a half?
(Jimmy)>> 22 and a half to the center. We're measuring from the cut line to the center bolt hole of the leaf spring hanger. This will ensure that we tack the leaf spring hanger in the same area as our rusted out frame section. [ welder crackling ]
(Jeremy)>> Should we see if it fits? They're too narrow.
(Jimmy)>> I think these are for a four wheel drive truck. We've been trying to test fit the leaf springs into the hangers and we ran into a bit of an issue.
(Jeremy)>> And here's what we've found. They don't make every part for every vehicle. There's not a bunch of reproduction parts out there for a cab and chassis truck. So we couldn't find a set of front leaf spring hangers for our tow truck, but what we did find was a set of spring hangers for our four wheel drive three quarter ton truck. What we did is welded them on but then we found that there's an issue. This spring hanger is about an inch wider than the cab and chassis spring hangers. So that's just not gonna work for what we have to do. So what we're gonna do is take these back off. We're gonna end up cutting about an inch out of the spring hanger, and then we're just gonna weld them back right to the chassis cause that's what we were gonna do in the first place. [ saw buzzing ]
(Jeremy)>> With the bracket trimmed down we'll set these back at the 22 and a half inch mark that we had them at earlier.
(Jimmy)>> Going this way, yeah! [ welder crackling ] [ MUSIC ]
(Jimmy)>> Check that out. [ metal clanging ]
(Jeremy)>> That's perfect! Alright how close are we to the wheel base on the other side?
(Jimmy)>> That's pretty spot on.
(Jeremy)>> Nice! [ MUSIC ]
(Jimmy)>> 55 and a half, same as the original chassis.
(Jeremy)>> Okay, tack her on. [ welder crackling ] [ MUSIC ] [ metal clanging ]
(Jimmy)>> This actually wasn't as hard as I thought it was gonna be, and like everything fits pretty well.
(Jeremy)>> Yeah and it was way easier to just rebuild the back half of this than it was to just fix the old part of the chassis, but we better get this welded up because we've still got to get the box on it. [ MUSIC ] [ welder crackling ]
(Jimmy)>> Each of the leaf spring hangers are getting welded all along the outside. We're also gonna burn in as much of the inside edge as we can get to. This is probably overdoing it but over engineering this kind of stuff is always better than the alternative. [ MUSIC ]
(Jeremy)>> Up next, we re-install the towing rig on our patina'ed tow truck.
(Jimmy)>> You're watching Carcass!
[ MUSIC ]
(Jeremy)>> While you guys were on break we went ahead and took care of the shocks. All we did was whip up a couple of brackets, welded them to the chassis, but now it's time to do a test fit to see how that wrecker body's gonna fit on here.
(Jimmy)>> And once we have the body on here we have to figure out how to attach it. Whether that be welding it directly to the chassis or making more brackets and bolting it.
(Jeremy)>> But we don't have a driveshaft. So I guess we've got to push it under there. [ MUSIC ] To mount the wrecker body onto our newly built chassis we're basically gonna mount it the same way it was before because let's face it. I'm sure this wrecker body had been on this truck its entire life and it held together that long. So in the rear we're gonna make some basic mounts kinda like they were before and in the front we're actually just gonna reuse the mounts like before, but I don't want to work in this tiny little area. So we're gonna roll the truck back, get rid of these tires so I can take some measurements. [ MUSIC ] [ drill humming ] [ MUSIC ]
(Jeremy)>> Alright let's go about nine inches tall and the plate on the top will be about eight and a half inches long and three and a half inches wide. Now to mount the bed to the chassis we're gonna be using two existing bolts in the towing assembly. Now essentially there's two sets of bolts that hold that towing assembly to the bed and then hold the bed to the chassis. Now the original chassis had a piece of angle iron that held this all together. Well that's not gonna work for us because our chassis is about a half of an inch narrower now, and there's a big piece of channeling that runs the length of the wrecker body. So if we were to use a simple piece of angle iron it would just merely contact that piece of channeling. So a simple solution would be to cut out a set of brackets like this that have a notch in it to go around that piece of channeling. Then we'll use a piece of steel, punch out a set of holes that match the holes in the towing assembly. [ saw buzzing ] [ MUSIC ]
(Jeremy)>> You want to hold the bolts for me Jimmy?
(Jimmy)>> We're bolting the top plate to the bottom of the bed first because we already have the bed sitting where we want it. This will ensure that when we go to weld everything together the supporting pieces will be located in the correct position. We're gonna wait to finish weld the rear mount so we can make sure the front mounts work like they're supposed to. We're gonna be using the stock mounting plates from the original chassis and some threaded rod to make sure everything lines up.
(Jeremy)>> The stock plates just hook to the inside of the C-channel and the threaded rods are fed through them and up through the floor of the bed. Then they're held down with a few washers and a nut. [ drill humming ]
(Jeremy)>> Well now that we know everything lines up we're gonna unbolt everything, pick the bed off of the chassis, weld up our rear mounts, and give everything a nice shiny coat of paint. [ MUSIC ] [ welder crackling ]
(Jimmy)>> With everything welded up we'll slap on a coating of paint to prevent rust, and reassemble the rear end of our tow truck, returning this crumbling work truck to a road worthy state.
(Jeremy)>> We have a lot more in store getting this tow truck back on the road. Follow along with us on this build at Powernation TV dot com.


