
XOR - Xtreme Off-Road Builds

Want more content like this?
Join the PowerNation Email Newsletter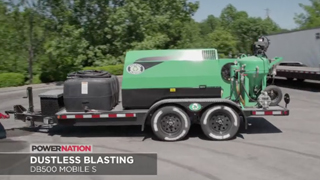
Episode Transcript
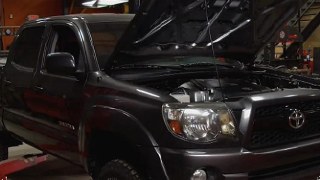
(Narrator)>> Today on XOR our Toyota Tacoma gets topped off and prepped for the trails. What you should pack. Plus we meet a young couple to help get them started on their restoration project right now on XOR.
(Eliza)>> Hey welcome to XOR. Today is a special day. We'll be working a half day here at the shop and the other half at a lucky viewer's driveway.
(Jeremy)>> That's right, we're gonna go work on a sweet square body owned by a young couple to do a Driveway Rescue, but before we get to that we've got some big plans for the back of the Tacoma to just kind of top this whole build off.
There you go.
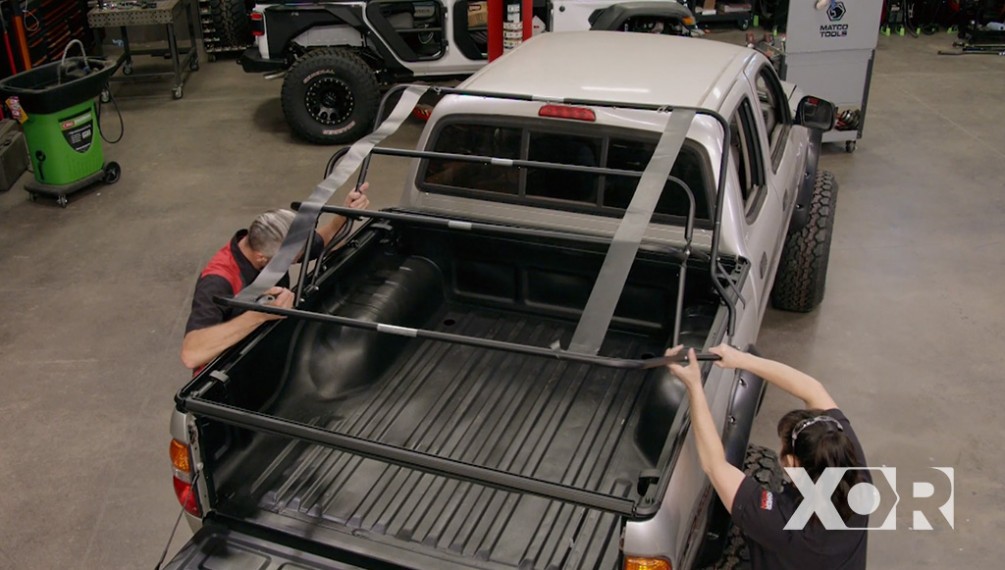
(Eliza)>> Thank you! Now it's no secret that we have a lot of gear to cart around when we go trailing, and we wanted to keep it out of the elements. So we reached out to Bestop for their super top for the Tacoma. The cool thing about this topper is that it's a non-invasive install. It's held together by clamps. So there's no drilling on the bed sides.
(Jeremy)>> That's right, the aluminum channels are pre-made to fit your truck, and they fit like a glove. Plus the back channel comes off so you can access the bed.
(Eliza)>> The super top calls for the bracket to be six inches from the front bed panel. Anchoring down the bedside frames is a two clamp system that comes with a rubber spacer to prevent indentions and scratches. [ ratchet clicking ]
(Jeremy)>> Now you guys are probably wondering why do we have frame work if we're putting a topper on the truck? Well this is a soft sided topper. It's just like the soft top you would have on your Jeep. So it's got its own frame work and its own canvas top. So we'll have to put all of that together. Then we'll have a soft top for the Tacoma.
Let's get the frame work in here. After the frame work's together all you do is snap...
...clamp...
...and lock it in place.
(Eliza)>> What, you know I'm not tall enough on the box.
(Jeremy)>> I guess that works.
There we go.
(Eliza)>> The canvas top stretches over the frame work. It fits perfectly around the corners. Jeremy will climb in the bed to secure the top to the frame work. While I tuck the plastic caps that are sewn into the canvas.
(Jeremy)>> The top, well that snaps on, and the sides, well they just zip on.
(Eliza)>> This thing will definitely keep our gear from getting wet, and it looks good.
(Jeremy)>> That's right, and when we are not using it we can fold the whole thing forward to get full access of the bed, but for now we're gonna leave it up because it changes the whole look of the Tacoma.
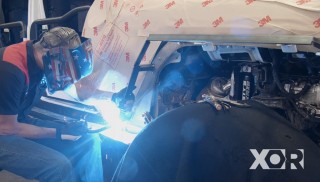
We stepped away from the Tacoma. Came down to the prep booth to give you guys a little lesson on welding. Well more of a lesson on grinding. Now you guys can lay down the perfect bead but sometimes you want to finish that weld off, or make it look like you didn't even weld at all, and grinding is a great way to finish off any project but you've got to be really careful how you grind so those two pieces stay stuck together. Now it all comes down to fitment. You want to make sure those two pieces are absolutely perfectly put together. That way when you go to pick up your grinder you don't get rid of too much of the material or the weld that you just put in it. That way your weld and your pieces stay nice and strong. Now when you fit your pieces together make sure you don't overlap them. Now it's really time consuming to get those pieces to fit just right, but when you go to grinding your fit is going to make your life a whole lot easier. Leaving a small gap or a "V" at the end of your pieces allows the weld to penetrate both parts, and if your welder is setup correctly you can fill the gap and give you some meat to grind off. And when you crank up the grinder you can feel confident that your parts are joined together and that they are nice and strong. Let me show you what I mean. It's a lot easier to draw it out than it is for you guys to see it on this little piece. Now when you put the two parts together make sure that you have the edges touching absolutely perfectly. Now this can be a long and lengthy process, especially if you have multiple edges, but just stick with it. You'll get it. When you're ready to fire up the welder all you've got to do is lay your weld in the "V" or in the gap. Make sure you put a lot of weld on because when you go to grind you're gonna cut some of that weld off but it'll leave you plenty of strength right there in the middle. When you're done welding it's time to grab the grinder, but pay attention to what you want to do because there's many different discs that can get you there. If you're looking to just knock down your welds go ahead and grab a hard disc. This will make short work of what you just did, but for me I like to kind of sneak up at it. So I like using a flap disc, or a sanding disc. Now you can get these in different types of grits. Anywhere from 40 grit to 80 grit. Heck you can even get up to 120 grit. They also have different options for your small die grinders. They've got big thick wheels that you can put on there, or they've got little sanding discs that you can run as well, and these will help finish that weld off absolutely perfect. When you go to grind make sure you hold that grinder perfectly flush with that piece of metal that you're working on. When you see grinding marks on the other two pieces get off of it. You're pretty much done, and at the very end you might actually be able to trick your friends into thinking that you didn't even grind or weld.
(Narrator)>> Up next it's trail time. All the tools, gismos, and gadgets you should pack when you go off road on XOR.
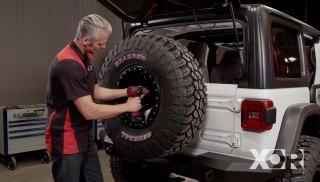
(Jeremy)>> Hey guys, welcome back to the shop. Now that the Tacoma is pretty much buttoned up in the back we've got some stuff that we're gonna bring with us because we're getting really close to taking this thing out on the trails. One of the first things that we're gonna take with us is a spare tire, and we don't have it mounted up yet but we'll get to that. We're gonna put that spare tire in the back of the truck and we'll just strap it down so it doesn't go anywhere. That's probably gonna leave a lot of room to bring some other things with us. So we're gonna put together a tool bag here on the floor, spread some tools out, and kind of show you guys what we think we need to bring when we're out on the trails. The very first thing we're gonna do is mount up our spare tire and get that in the back of the truck.
After we get rid of the ring we'll just slam the tire on.
Put a whole bunch of bolts in it.
[ drill spinning ]
(Jeremy)>> Now we'll torque them down.
We'll air this up to about 35 p-s-i. That way if we have to we can just let some air out.
Woo that's heavy.
And awkward. So now that we have the spare tire in the back of the truck we can see that we've got a little more room that we can use. We're gonna go ahead and put together a trail bag, or a couple of trail bags with some parts and some tools just in case something happens when we're out on the trail with the Tacoma cause let's face it. This is a brand new build. We're not quite sure what's gonna happen or how it's gonna act when we're out there. So we're gonna make sure we bring some tools along. Maybe even some parts along just in case something happens we've got everything we need.
[ metal clanging ]
(Jeremy)>> Well now that we have bag number one emptied out let's see what was in the bag so we know what we're gonna bring with us. Obviously we've got a mess of wrenches ranging in all different sizes in standard and in metric. Also not gonna forget to bring some big wrenches because there's specific parts on the suspension we installed that call for some really big wrenches. Got a bunch of bolts, miscellaneous sizes. We'll grab the nuts to go with them. That way if we run into an issue at least we've got those as a backup. Plus they're grade eight. So we know they'll be plenty strong. Hammer, screw drivers, safety glasses, which is always a big deal when you're underneath the truck. You don't want stuff falling on you, especially for you guys that play in the mud, or even for you guys that are out on the dusty trails. If you've got to crawl underneath your truck you don't want anything falling in your eyes. I'll throw the rest of the tools in the bag and then we'll move on to tool bag number two.
Well now that we got bag number one figured out let's move on to bag number two. We're gonna keep this one pretty simple. If you guys go wheeling at night we're gonna bring a flashlight so you can see what you're doing, bring some jumper cables. This may be for you or for somebody else. We're gonna bring some duct tape, got some stuff to patch some tires. We also have a winch on the front of our Tacoma. So we're gonna make sure we bring a snatch block and our tree saver. Now that we've got these bags packed up there is a couple of more things we're gonna bring along, but those are already in the back of the truck.
We are so close to getting ready to hit the trails. Got a couple more things we're bringing with us, and that's our fluids. We're gonna make sure and bring some straight water with us. That way if we blow a lower radiator hose we can at least fill our radiator back up. Bring some power steering fluid and some brake fluid. We'll bring some engine oil. Throw it in this nice, handy tote and we'll strap everything down. That'll get us really, really close to going wheeling. Dustless Blasting has a great saying. Restore your parts, don't replace them, and this machine is capable of blasting so many different things, from wood, to concrete, boats. They even get rid of graffiti and body filler, but what you may not know is that you can buy this whole setup and start your own business. Dustless Blasting makes their trailers right here in the USA, and they can send you a fully equipped trailer or they can just send you a compressor ready tank that's small enough to fit through a doorway. So if you guys are interested in starting your own business go to Dustless Blasting dot com and check them out.
(Narrator)>> Coming up we meet a young couple who needs some help getting started on their restoration project next on XOR.
(Jeremy)>> Hey guys, welcome back to the show. We are on the road today, and I've got Tom from Rock Auto, and we're going on a very special Driveway Rescue of some avid watchers of our show.
(Tom)>> I'm excited about this one. It's a Chevy K-10 1978 pickup. Fun vehicle, we have lots of parts for it, and it's really neat. It's a younger couple who's not only enthused about cars but they're in the repair business themselves.
(Jeremy)>> Yeah the cool thing about Payton and his fiancée Chanler is Peyton does the mechanical work and Chanler, she actually does the paint and the body work.
(Tom)>> Oh cool.
(Peyton)>> So me and my fiancée we really like working on the truck together. She teaches me a little bit about the paint and the body side of it and I teach her more of the mechanical side, and it works out well.
(Jeremy)>> This is their '78 Chevy K-10. It's a little worse for wear but the lovebirds have high hopes for their pickup.
(Chanler)>> Right now we're just working out all the mechanical kinks, and once we get everything running perfect, mechanically sound, it's going back down to the frame and my dad's gonna sand blast it for us. And it's going back to bare metal, and everything's getting 415 and painted, and it's eventually gonna be a show quality truck.
(Jeremy)>> Great it looks like Eliza's already here. Well there it is.
(Eliza)>> Hey guys. Just here talking to Chanler and Peyton about the truck. Tell us a little bit about what you guys want to do to it.
(Peyton)>> Yeah sure, let's take a step around here to the driver's side.
(Jeremy)>> You guys go ahead and do that. I'll go unload the van.
(Peyton)>> Well here's one side that we need a little bit of work on. We've got a front fender that's rusted, a door that needs hung, some handles and some interior pieces on the door. Around back here we have a homemade bumper that came with the vehicle. We'd really like to switch to an o-e-m style, and around here we have a few more things on the front and inside.
(Eliza)>> Okay let's take a look at the inside.
(Peyton)>> Sure.
(Eliza)>> We've got a dash and some door panels for you.
(Peyton)>> That's awesome. This thing could really use a little help in here.
(Eliza)>> This is a great truck, I love it! Hey Chanler, I heard that you work at a restoration and collision center.
(Chanler)>> Yes ma'am, I went school for collision repair and I work at Lovett Sergeants Body Shop now, and after we put in a new grill and a new hood we plan on repainting the entire truck burnt orange.
(Eliza)>> Awesome!
(Tom)>> It's so fun to come out and see one of these new projects Driveway Rescue does. Rock Auto dot com has so many parts for these old Chevys and I think this is gonna look great when it's done. We're so happy to help with this one.
(Jeremy)>> Well we sure do have a ton of parts for your truck, and while all that work doesn't start here it starts over there by taking it apart.
(Peyton)>> Sweet let's get started. How about taking that front fender off.
(Jeremy)>> That sounds like a good idea.
(Eliza)>> Alright Chanler pick your poison. What are we working on?
(Chanler)>> Let's start with the interior.
(Eliza)>> Sounds good.
(Tom)>> You've got the parts, and you've got the plan, and there's something I want to take care of. So I'll see you in a bit.
(Jeremy)>> Sounds good.
To replace the fender on these old square bodies you'll have to remove the hood since the hood hinge attaches to the inside of the fender.
You also have to remove any trim that's attached to the front end. And since we're removing the trim we'll go ahead and replace that beat up grille with one that Peyton and Chanler picked out on Rock Auto dot com.
To finish up our disassembly on the driver's side fender we'll need to remove the headlights and the marker light. Alright Peyton let's get the fender off. [ drill spinning ]
(Jeremy)>> Alright Peyton, let's get this off. You can go take the hood hinge off. I'll stay here and make sure we're ready for the new one.
(Peyton)>> Sounds good.
(Jeremy)>> Got it?
(Peyton)>> Yep.
Here you go.
(Chanler)>> Thanks babe.
(Jeremy)>> Meanwhile if you guys are wondering where Tom from Rock Auto went well he had to take care of some business.
(Narrator)>> Up next we tear out the old to make room for the new. What we find under the carpet coming up on XOR.
(Jeremy)>> We're back on a special Driveway Rescue. We're working fast under the threat of some weather. So Peyton and his fiancée Chanler are putting the front end of their '78 K-10 back together. Chanler it was a good idea to put this on. It might rain a little bit later. You're gonna take the new one into work to paint the underside anyways aren't you?
(Chanler)>> Yes sir, that's right.
(Jeremy)>> As they button up the front end we'll do a quick door swap so they can get started on some much needed upgrades for the interior.
(Eliza)>> As with any upgrade we tear out the old to make room for the new.
(Chanler)>> That's nasty! It's way more than dirty.
(Eliza)>> Alright you ready to get the seat out?
(Chanler)>> Yeah sure, let's go.
(Eliza)>> Let's go.
Ready?
Let's get your carpet out.
(Chanler)>> There you go. Just drag it out and dump it. Ew!
(Eliza)>> Come check this out. There's so many lady bugs. After we get rid of bug city it is time to make this interior look like it just drove off the lot. Rock Auto dot com sent Peyton and Chanler some replacement carpet that fits like a glove. Well it's a whole lot of adjusting, and pulling, and readjusting.
It's gonna look like a brand new truck.
(Jeremy)>> Alright, so the tricky part about doing carpet is you can't exactly use a drill bit when you're drilling into carpet cause it'll actually pull and fray parts of your carpet. So the easiest way to do it is if you can find the hole that the screw's gonna go into and drive that in from the back side. So now we know where the hole is, and we're actually gonna cheat. We're gonna heat up another punch. What that's gonna do is actually singe or melt part of the carpet right around that hole. So when we put the screw in it it's a nice, clean hole and we're not gonna fray anything on the way out. It's a quick, simple way. It may smell a little bit but it works really well. This is actually a trick an old guy taught me restoring cars. It's gonna singe a nice clean hole, and when you're done that's what it looks like.
(Eliza)>> Peyton and Chanler can now drop in their o-e bench seat, and we get their first impression of their faded maroon on a black color scheme.
(Peyton)>> It's sharp, Johnny Cash sharp.
(Chanler)>> It looks really good. It fits perfect.
(Eliza)>> All there is left to do is install the new dash panel and throw on the dash board cover that was shipped from Rock Auto dot com.
(Peyton)>> Looks good.
(Chanler)>> Good job!
(Peyton)>> Thank you, you too.
(Eliza)>> To polish off the interior we added door panels and upgraded their door handles to match.
(Chanler)>> What's taking so long Peyton?
(Peyton)>> Well as you would know, perfection takes time.
(Eliza)>> Perfection is right. All of the parts for this Driveway Rescue came from Rock Auto dot com, and they all came together for one swanky looking interior.
(Tom)>> It's great to see all you've accomplished in such a short time. This great old truck will be around for many more decades.
(Jeremy)>> Yeah thank you guys and thank Rock Auto dot com for all the parts because the truck really has turned out pretty good.
(Tom)>> Yeah happy to help.
(Eliza)>> And if you guys have any questions or you like what you see on today's build visit us at Powernation TV dot com.
(Peyton)>> So babe when you gonna paint it?
(Chanler)>> When you gonna cook me dinner?
Show Full Transcript
(Eliza)>> Hey welcome to XOR. Today is a special day. We'll be working a half day here at the shop and the other half at a lucky viewer's driveway.
(Jeremy)>> That's right, we're gonna go work on a sweet square body owned by a young couple to do a Driveway Rescue, but before we get to that we've got some big plans for the back of the Tacoma to just kind of top this whole build off.
There you go.
(Eliza)>> Thank you! Now it's no secret that we have a lot of gear to cart around when we go trailing, and we wanted to keep it out of the elements. So we reached out to Bestop for their super top for the Tacoma. The cool thing about this topper is that it's a non-invasive install. It's held together by clamps. So there's no drilling on the bed sides.
(Jeremy)>> That's right, the aluminum channels are pre-made to fit your truck, and they fit like a glove. Plus the back channel comes off so you can access the bed.
(Eliza)>> The super top calls for the bracket to be six inches from the front bed panel. Anchoring down the bedside frames is a two clamp system that comes with a rubber spacer to prevent indentions and scratches. [ ratchet clicking ]
(Jeremy)>> Now you guys are probably wondering why do we have frame work if we're putting a topper on the truck? Well this is a soft sided topper. It's just like the soft top you would have on your Jeep. So it's got its own frame work and its own canvas top. So we'll have to put all of that together. Then we'll have a soft top for the Tacoma.
Let's get the frame work in here. After the frame work's together all you do is snap...
...clamp...
...and lock it in place.
(Eliza)>> What, you know I'm not tall enough on the box.
(Jeremy)>> I guess that works.
There we go.
(Eliza)>> The canvas top stretches over the frame work. It fits perfectly around the corners. Jeremy will climb in the bed to secure the top to the frame work. While I tuck the plastic caps that are sewn into the canvas.
(Jeremy)>> The top, well that snaps on, and the sides, well they just zip on.
(Eliza)>> This thing will definitely keep our gear from getting wet, and it looks good.
(Jeremy)>> That's right, and when we are not using it we can fold the whole thing forward to get full access of the bed, but for now we're gonna leave it up because it changes the whole look of the Tacoma.
We stepped away from the Tacoma. Came down to the prep booth to give you guys a little lesson on welding. Well more of a lesson on grinding. Now you guys can lay down the perfect bead but sometimes you want to finish that weld off, or make it look like you didn't even weld at all, and grinding is a great way to finish off any project but you've got to be really careful how you grind so those two pieces stay stuck together. Now it all comes down to fitment. You want to make sure those two pieces are absolutely perfectly put together. That way when you go to pick up your grinder you don't get rid of too much of the material or the weld that you just put in it. That way your weld and your pieces stay nice and strong. Now when you fit your pieces together make sure you don't overlap them. Now it's really time consuming to get those pieces to fit just right, but when you go to grinding your fit is going to make your life a whole lot easier. Leaving a small gap or a "V" at the end of your pieces allows the weld to penetrate both parts, and if your welder is setup correctly you can fill the gap and give you some meat to grind off. And when you crank up the grinder you can feel confident that your parts are joined together and that they are nice and strong. Let me show you what I mean. It's a lot easier to draw it out than it is for you guys to see it on this little piece. Now when you put the two parts together make sure that you have the edges touching absolutely perfectly. Now this can be a long and lengthy process, especially if you have multiple edges, but just stick with it. You'll get it. When you're ready to fire up the welder all you've got to do is lay your weld in the "V" or in the gap. Make sure you put a lot of weld on because when you go to grind you're gonna cut some of that weld off but it'll leave you plenty of strength right there in the middle. When you're done welding it's time to grab the grinder, but pay attention to what you want to do because there's many different discs that can get you there. If you're looking to just knock down your welds go ahead and grab a hard disc. This will make short work of what you just did, but for me I like to kind of sneak up at it. So I like using a flap disc, or a sanding disc. Now you can get these in different types of grits. Anywhere from 40 grit to 80 grit. Heck you can even get up to 120 grit. They also have different options for your small die grinders. They've got big thick wheels that you can put on there, or they've got little sanding discs that you can run as well, and these will help finish that weld off absolutely perfect. When you go to grind make sure you hold that grinder perfectly flush with that piece of metal that you're working on. When you see grinding marks on the other two pieces get off of it. You're pretty much done, and at the very end you might actually be able to trick your friends into thinking that you didn't even grind or weld.
(Narrator)>> Up next it's trail time. All the tools, gismos, and gadgets you should pack when you go off road on XOR.
(Jeremy)>> Hey guys, welcome back to the shop. Now that the Tacoma is pretty much buttoned up in the back we've got some stuff that we're gonna bring with us because we're getting really close to taking this thing out on the trails. One of the first things that we're gonna take with us is a spare tire, and we don't have it mounted up yet but we'll get to that. We're gonna put that spare tire in the back of the truck and we'll just strap it down so it doesn't go anywhere. That's probably gonna leave a lot of room to bring some other things with us. So we're gonna put together a tool bag here on the floor, spread some tools out, and kind of show you guys what we think we need to bring when we're out on the trails. The very first thing we're gonna do is mount up our spare tire and get that in the back of the truck.
After we get rid of the ring we'll just slam the tire on.
Put a whole bunch of bolts in it.
[ drill spinning ]
(Jeremy)>> Now we'll torque them down.
We'll air this up to about 35 p-s-i. That way if we have to we can just let some air out.
Woo that's heavy.
And awkward. So now that we have the spare tire in the back of the truck we can see that we've got a little more room that we can use. We're gonna go ahead and put together a trail bag, or a couple of trail bags with some parts and some tools just in case something happens when we're out on the trail with the Tacoma cause let's face it. This is a brand new build. We're not quite sure what's gonna happen or how it's gonna act when we're out there. So we're gonna make sure we bring some tools along. Maybe even some parts along just in case something happens we've got everything we need.
[ metal clanging ]
(Jeremy)>> Well now that we have bag number one emptied out let's see what was in the bag so we know what we're gonna bring with us. Obviously we've got a mess of wrenches ranging in all different sizes in standard and in metric. Also not gonna forget to bring some big wrenches because there's specific parts on the suspension we installed that call for some really big wrenches. Got a bunch of bolts, miscellaneous sizes. We'll grab the nuts to go with them. That way if we run into an issue at least we've got those as a backup. Plus they're grade eight. So we know they'll be plenty strong. Hammer, screw drivers, safety glasses, which is always a big deal when you're underneath the truck. You don't want stuff falling on you, especially for you guys that play in the mud, or even for you guys that are out on the dusty trails. If you've got to crawl underneath your truck you don't want anything falling in your eyes. I'll throw the rest of the tools in the bag and then we'll move on to tool bag number two.
Well now that we got bag number one figured out let's move on to bag number two. We're gonna keep this one pretty simple. If you guys go wheeling at night we're gonna bring a flashlight so you can see what you're doing, bring some jumper cables. This may be for you or for somebody else. We're gonna bring some duct tape, got some stuff to patch some tires. We also have a winch on the front of our Tacoma. So we're gonna make sure we bring a snatch block and our tree saver. Now that we've got these bags packed up there is a couple of more things we're gonna bring along, but those are already in the back of the truck.
We are so close to getting ready to hit the trails. Got a couple more things we're bringing with us, and that's our fluids. We're gonna make sure and bring some straight water with us. That way if we blow a lower radiator hose we can at least fill our radiator back up. Bring some power steering fluid and some brake fluid. We'll bring some engine oil. Throw it in this nice, handy tote and we'll strap everything down. That'll get us really, really close to going wheeling. Dustless Blasting has a great saying. Restore your parts, don't replace them, and this machine is capable of blasting so many different things, from wood, to concrete, boats. They even get rid of graffiti and body filler, but what you may not know is that you can buy this whole setup and start your own business. Dustless Blasting makes their trailers right here in the USA, and they can send you a fully equipped trailer or they can just send you a compressor ready tank that's small enough to fit through a doorway. So if you guys are interested in starting your own business go to Dustless Blasting dot com and check them out.
(Narrator)>> Coming up we meet a young couple who needs some help getting started on their restoration project next on XOR.
(Jeremy)>> Hey guys, welcome back to the show. We are on the road today, and I've got Tom from Rock Auto, and we're going on a very special Driveway Rescue of some avid watchers of our show.
(Tom)>> I'm excited about this one. It's a Chevy K-10 1978 pickup. Fun vehicle, we have lots of parts for it, and it's really neat. It's a younger couple who's not only enthused about cars but they're in the repair business themselves.
(Jeremy)>> Yeah the cool thing about Payton and his fiancée Chanler is Peyton does the mechanical work and Chanler, she actually does the paint and the body work.
(Tom)>> Oh cool.
(Peyton)>> So me and my fiancée we really like working on the truck together. She teaches me a little bit about the paint and the body side of it and I teach her more of the mechanical side, and it works out well.
(Jeremy)>> This is their '78 Chevy K-10. It's a little worse for wear but the lovebirds have high hopes for their pickup.
(Chanler)>> Right now we're just working out all the mechanical kinks, and once we get everything running perfect, mechanically sound, it's going back down to the frame and my dad's gonna sand blast it for us. And it's going back to bare metal, and everything's getting 415 and painted, and it's eventually gonna be a show quality truck.
(Jeremy)>> Great it looks like Eliza's already here. Well there it is.
(Eliza)>> Hey guys. Just here talking to Chanler and Peyton about the truck. Tell us a little bit about what you guys want to do to it.
(Peyton)>> Yeah sure, let's take a step around here to the driver's side.
(Jeremy)>> You guys go ahead and do that. I'll go unload the van.
(Peyton)>> Well here's one side that we need a little bit of work on. We've got a front fender that's rusted, a door that needs hung, some handles and some interior pieces on the door. Around back here we have a homemade bumper that came with the vehicle. We'd really like to switch to an o-e-m style, and around here we have a few more things on the front and inside.
(Eliza)>> Okay let's take a look at the inside.
(Peyton)>> Sure.
(Eliza)>> We've got a dash and some door panels for you.
(Peyton)>> That's awesome. This thing could really use a little help in here.
(Eliza)>> This is a great truck, I love it! Hey Chanler, I heard that you work at a restoration and collision center.
(Chanler)>> Yes ma'am, I went school for collision repair and I work at Lovett Sergeants Body Shop now, and after we put in a new grill and a new hood we plan on repainting the entire truck burnt orange.
(Eliza)>> Awesome!
(Tom)>> It's so fun to come out and see one of these new projects Driveway Rescue does. Rock Auto dot com has so many parts for these old Chevys and I think this is gonna look great when it's done. We're so happy to help with this one.
(Jeremy)>> Well we sure do have a ton of parts for your truck, and while all that work doesn't start here it starts over there by taking it apart.
(Peyton)>> Sweet let's get started. How about taking that front fender off.
(Jeremy)>> That sounds like a good idea.
(Eliza)>> Alright Chanler pick your poison. What are we working on?
(Chanler)>> Let's start with the interior.
(Eliza)>> Sounds good.
(Tom)>> You've got the parts, and you've got the plan, and there's something I want to take care of. So I'll see you in a bit.
(Jeremy)>> Sounds good.
To replace the fender on these old square bodies you'll have to remove the hood since the hood hinge attaches to the inside of the fender.
You also have to remove any trim that's attached to the front end. And since we're removing the trim we'll go ahead and replace that beat up grille with one that Peyton and Chanler picked out on Rock Auto dot com.
To finish up our disassembly on the driver's side fender we'll need to remove the headlights and the marker light. Alright Peyton let's get the fender off. [ drill spinning ]
(Jeremy)>> Alright Peyton, let's get this off. You can go take the hood hinge off. I'll stay here and make sure we're ready for the new one.
(Peyton)>> Sounds good.
(Jeremy)>> Got it?
(Peyton)>> Yep.
Here you go.
(Chanler)>> Thanks babe.
(Jeremy)>> Meanwhile if you guys are wondering where Tom from Rock Auto went well he had to take care of some business.
(Narrator)>> Up next we tear out the old to make room for the new. What we find under the carpet coming up on XOR.
(Jeremy)>> We're back on a special Driveway Rescue. We're working fast under the threat of some weather. So Peyton and his fiancée Chanler are putting the front end of their '78 K-10 back together. Chanler it was a good idea to put this on. It might rain a little bit later. You're gonna take the new one into work to paint the underside anyways aren't you?
(Chanler)>> Yes sir, that's right.
(Jeremy)>> As they button up the front end we'll do a quick door swap so they can get started on some much needed upgrades for the interior.
(Eliza)>> As with any upgrade we tear out the old to make room for the new.
(Chanler)>> That's nasty! It's way more than dirty.
(Eliza)>> Alright you ready to get the seat out?
(Chanler)>> Yeah sure, let's go.
(Eliza)>> Let's go.
Ready?
Let's get your carpet out.
(Chanler)>> There you go. Just drag it out and dump it. Ew!
(Eliza)>> Come check this out. There's so many lady bugs. After we get rid of bug city it is time to make this interior look like it just drove off the lot. Rock Auto dot com sent Peyton and Chanler some replacement carpet that fits like a glove. Well it's a whole lot of adjusting, and pulling, and readjusting.
It's gonna look like a brand new truck.
(Jeremy)>> Alright, so the tricky part about doing carpet is you can't exactly use a drill bit when you're drilling into carpet cause it'll actually pull and fray parts of your carpet. So the easiest way to do it is if you can find the hole that the screw's gonna go into and drive that in from the back side. So now we know where the hole is, and we're actually gonna cheat. We're gonna heat up another punch. What that's gonna do is actually singe or melt part of the carpet right around that hole. So when we put the screw in it it's a nice, clean hole and we're not gonna fray anything on the way out. It's a quick, simple way. It may smell a little bit but it works really well. This is actually a trick an old guy taught me restoring cars. It's gonna singe a nice clean hole, and when you're done that's what it looks like.
(Eliza)>> Peyton and Chanler can now drop in their o-e bench seat, and we get their first impression of their faded maroon on a black color scheme.
(Peyton)>> It's sharp, Johnny Cash sharp.
(Chanler)>> It looks really good. It fits perfect.
(Eliza)>> All there is left to do is install the new dash panel and throw on the dash board cover that was shipped from Rock Auto dot com.
(Peyton)>> Looks good.
(Chanler)>> Good job!
(Peyton)>> Thank you, you too.
(Eliza)>> To polish off the interior we added door panels and upgraded their door handles to match.
(Chanler)>> What's taking so long Peyton?
(Peyton)>> Well as you would know, perfection takes time.
(Eliza)>> Perfection is right. All of the parts for this Driveway Rescue came from Rock Auto dot com, and they all came together for one swanky looking interior.
(Tom)>> It's great to see all you've accomplished in such a short time. This great old truck will be around for many more decades.
(Jeremy)>> Yeah thank you guys and thank Rock Auto dot com for all the parts because the truck really has turned out pretty good.
(Tom)>> Yeah happy to help.
(Eliza)>> And if you guys have any questions or you like what you see on today's build visit us at Powernation TV dot com.
(Peyton)>> So babe when you gonna paint it?
(Chanler)>> When you gonna cook me dinner?


