XOR - Xtreme Off-Road Builds

Want more content like this?
Join the PowerNation Email NewsletterParts Used In This Episode
Edwards Ironworkers
10 Ton Bender
Edwards Ironworkers
55 Ton Ironworker
Lincoln Electric
Lincoln Electric is the official welding supplier to XOR
Matco Tools
16v Cordless Infinium 1/4" drive ratchet MCL1614RK26
Matco Tools
Matco Tools are the official tool supplier of XOR
Ruffstuff Specialties
Chassis Tabs
The Industrial Depot
Tools, Hardware, and Shop Supplies
Episode Transcript
(Narrator)>> Today Eliza and Jeremy are building custom headers for their pre-runner Ranger, and they're building shock hoops for their long travel coil overs. Then they're tying the roll cage to the frame. It's all right here on XOR. ♪ ♪
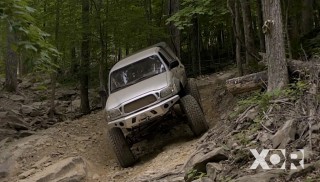
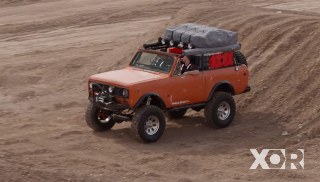
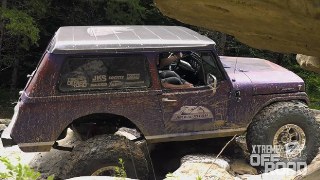
(Eliza)>> Hey guys, welcome to XOR, and that stands for Xtreme Off Road, and that's what we do. We cut, we weld, we grind, and we fabricate some awesome rides for everything and anything off of the pavement. This year we'll be taking our International Scout overlanding into the woods and turning our 1953 Willys Wagon into a 1,000 plus horsepower mudslinging terror.
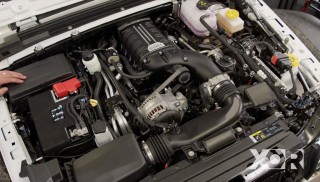
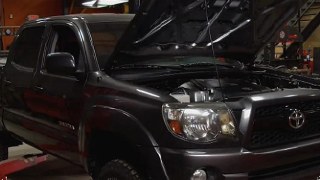
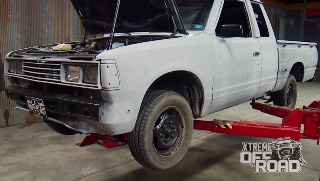
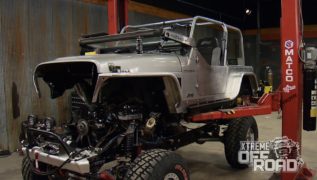
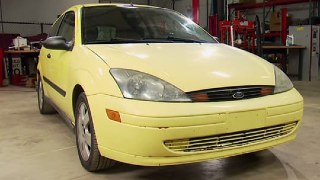
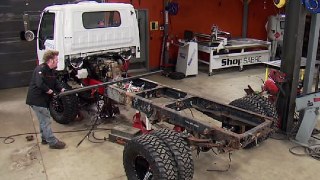
(Jeremy)>> That's right. We're also gonna be working on this first gen Toyota Tacoma. Now we're gonna be doing a solid axle swap on this truck so we can take it out and kind of push it to its limits, but for now we're gonna be working on our 2002 Ford Ranger. Now this thing is going to be a Coyote powered long travel suspension high flying pre-runner. So there's really not much left to do but just get started. Our pre-runner started life as a stock 2002 Ford Ranger XLT with a v-six and an automatic transmission. After we dumped everything except the frame rails and the cab we hit it with a race ready paint job. ♪ ♪ A 63 inch spring swap and a built nine inch got everything started. ♪ ♪ A coyote aluminator got wedged in, followed by a roll cage. ♪ ♪ [ welder crackling ]
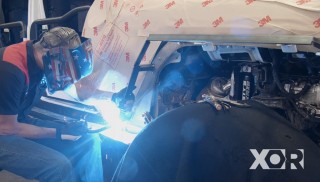
(Jeremy)>> After modifying the chassis it was time for a long travel race suspension to smooth out the ruts while we're running at wide open throttle. ♪ ♪ And with that all done that brings us back out here to the engine. Now this Coyote did not come in between the frame rails of this Ranger. So we can't exactly go buy a set of headers. So we're gonna have to custom make our own.
(Eliza)>> With the headers fabbed up and in place that gives us the opportunity to bring our roll cage out to the front, build up shock hoops, and get our coil overs installed.
(Jeremy)>> Now before we start building our headers, we know from the other side that the shock hoop is gonna come in right about here, while I want my exhaust to exit somewhere in here. So this part of the body is gonna be in the way. So we're just gonna cut it out of the way. [ saw cutting metal ] ♪ ♪
(Jeremy)>> Now that the patch is made I'm just gonna kind of put it into place here. [ welder crackling ] ♪ ♪
(Jeremy)>> And after our patch panel is installed, to ensure everything flows in the right direct we'll install the header gasket and the header flange. [ ratchet twisting ] ♪ ♪
(Jeremy)>> For the actual tubes themselves we're using an inch and seven-eighths header builder kit from Summit Racing. The great thing about Summit's kit is that these are all mandrel bent tubes. So no matter where you cut them across the bend the tube diameter stays the same, meaning the next piece will always line up. Here's a good approach. Install what will be the longest tube first since it will the trickiest one to get into place and will dictate the positioning of the other tubes. [ welder crackling ] ♪ ♪
(Jeremy)>> And here's a perfect example. This tube had to go on the under the side of the motor mount just to get it where it needed to go. ♪ ♪ [ welder crackling ] ♪ ♪
(Jeremy)>> With the longest tube in place it makes things a little bit easier because now it's apparent how much room you have or may not have. And tube number two will be our second longest run. So we're gonna take the same approach. ♪ ♪ This one ends up going on the front side of the motor mount but on the back side of the upper control arm mount. [ welder crackling ] ♪ ♪
(Jeremy)>> Tube three follows suit and barely clears the upper control arm mount. [ saw cutting metal ]
(Jeremy)>> This is where the shape of these tubes come in handy because the last tube is made up of two really short sections. ♪ ♪ [ welder crackling ]
(Jeremy)>> And once you're happy with your result you can commit to your design with several more strong tacks. [ welder crackling ] ♪ ♪
(Jeremy)>> Well there you go. Now we're gonna have to bring our header out here and down out of the way, but I'm gonna have to put the upper control arm on first. But when you're doing your headers just take your time because there's a whole lot of spaghetti going on in here, but if you just stay at it you'll definitely get it all there.
(Narrator)>> Up next we're getting our long travel coil overs mounted, and later we're tying the roll cage to the frame.
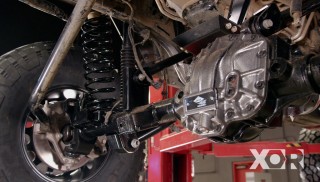
(Eliza)>> Hey guys, welcome to XOR. I thought we'd take a little bit of time to talk about the awesome coil overs that are going onto the pre-runner. After talking to LSK we went to Summit Racing dot com, picked up a 10 inch stroke two and half inch body remote reservoir coil over. Now what do those numbers mean? It's 10 inches of travel and two point five is the diameter of the body. Now it's important to know the diameter of the body to order the correct springs. Example, this is a three inch spring to fit over the two and a half inch body. As far as spring weights you'll need to know the four corner weight of your project before you order springs.
(Jeremy)>> Now to get this big coil over mounted into the Ranger we started by mocking it up on the passenger side. The very first thing we did is start bending the front part of the engine cage. Now the engine cage actually comes back into the cab and gets tied into the roll cage. After we did that we came out and bent our first shock loop. Now once I had the shock loop in place I was able to mount the top of the shock to the shock loop and the bottom of the shock down to the lower control arm. Once all that was in place I was able to tie the shock loop into the engine cage, and when we're all done burning that in that should give us plenty of strength to fly across the dunes. And this whole process starts by prepping the chassis to get rid of the surface rust and the o-e undercoating. So that calls for a three inch sanding disc on our Matco angle grinder. [ grinder spinning ]
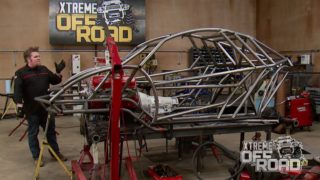
(Jeremy)>> After spending some time on our Edwards tube bender... ♪ ♪ ...the first piece to go in is our engine cage tube. It will tie the interior roll cage and the chassis together. ♪ ♪ [ welder crackling ]
(Jeremy)>> To tie all this together we're using inch and three quarter 120 wall d-o-m tubing. [ welder crackling ] ♪ ♪
(Jeremy)>> The shock hoop itself is up next. It's the overall height of this piece that allows us to install such a long coil over. And notice how it fits perfect around our newly built headers. [ welder crackling ]
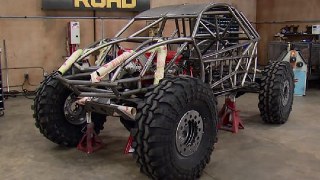
(Jeremy)>> For added strength this bar will serve as a mounting point for a future lateral bar that will tie the driver and passenger sides of our engine cage together. ♪ ♪ [ welder crackling ] ♪ ♪
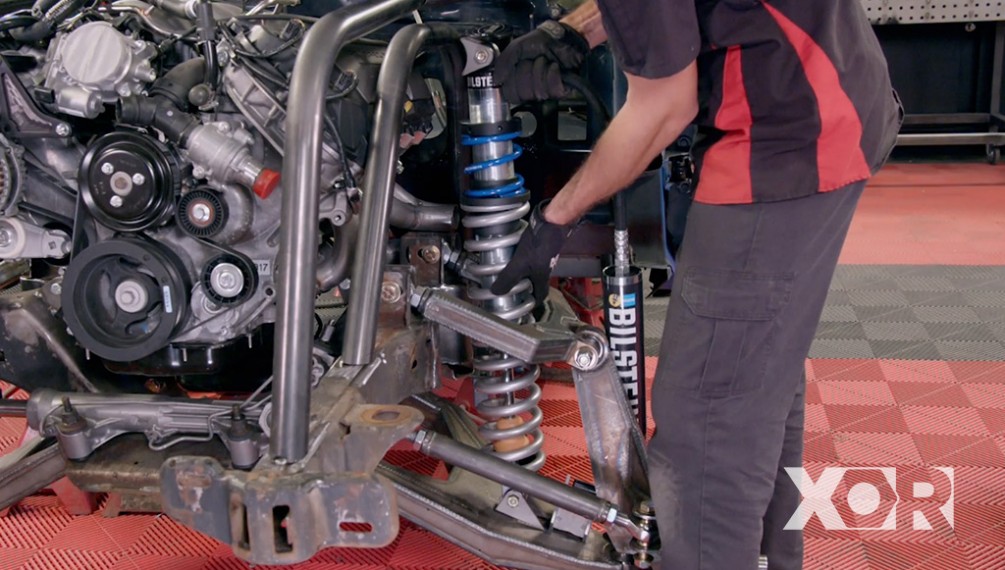
(Jeremy)>> And now for our coil over. We are not gonna weld the tabs on the bottom of the shock to the lower control arm just yet. That's because we will need to adjust the angle of the shock after cycling the suspension fully. To mount our coil overs we're using chassis tabs that we got from Rough Stuff Specialties. After welding the first tab on it's real important to make sure the shock is centered in between the two tabs before you tack the second tab on. ♪ ♪ Now we're gonna add a brace that ties our upper control arm mount into our shock hoop, and we'll follow that up with a brace that ties our shock hoop to our engine cage. [ welder crackling ] ♪ ♪
(Jeremy)>> And with all that tacked together we've just got one thing left to do and that's find a spot for the reservoir, and well this just kind of looks like a good spot. We've got plenty of room on the other side also.
(Eliza)>> If you're working under the hood of your project and want to save some time, then Matco has a cordless ratchet to speed up the process. Their 16 volt quarter inch cordless ratchet kit comes with the ratchet, two lithium ion batteries, and a battery charger so you can keep the ball rolling. It even has a heavy duty carrying case. Matco says that their cordless ratchet has 35 foot pounds of torque and a slim head design so that getting into tight places is not a problem.
(Narrator)>> When we come back Eliza is installing floor plates so she can tie the roll cage to our pre-runner's frame. Stay tuned!
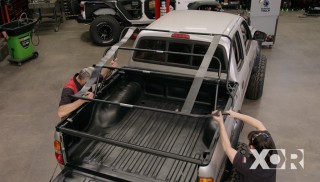
(Eliza)>> Hey guys, welcome back to XOR. Now that we've got the top side of our roll cage completely welded in we can now tie it to the frame, and that begins with some cutting and bending. ♪ ♪ Just like with the shock hoops I'm using the same inch and three quarter 120 wall d-o-m tubing to make my frame tie in. [ saw cutting metal ] ♪ ♪
(Eliza)>> All of our Edwards gear gets a good workout and this is no different. Their 10 ton bender quickly turns this piece of straight tube stock into the "U" shape that we need. ♪ ♪ It can easily bend two inch tube, schedule 40 pipe, two and a half inch tube, and even two inch square tube quickly and accurately. ♪ ♪ I'm cutting the plates that I will use to sandwich the cab floor out of quarter inch steel. ♪ ♪ And this time I'm using the 50 ton Iron Worker's flat bar shear to cleanly make my cuts. ♪ ♪ With all my parts made my next step is to cut off the excess tubing from the bottom of the roll cage that extends past the cab floor. [ saw cutting metal ]
(Eliza)>> I had intentional left these pieces long so that I could maximize the height of the cage. The additional length allowed me to adjust the roll cage once it was fully welded, and we knew the height of our seats and test fit Jeremy and myself. [ saw cutting metal ] ♪ ♪
(Eliza)>> I need to mark where I will punch a bolt hole through both plates of steel at once. So I positioned the plate where it will sit on the cab floor. [ hammer hitting metal ] ♪ ♪
(Eliza)>> Positioned correctly under the roll cage B-pillar tube, a paint pen marks the spot. Now all I have to do is use the Iron Worker's punch to finish the job. ♪ ♪
(Jeremy)>> If you guys have the iconic four liter in your 1997 to 2004 Jeeps, well under hood temperatures may become an issue, especially when you're out on the trails. Well DEI has designed a solution to help protect your fuel rails and fuel injections from all that under hood heat and prevent misfires. Their kit comes with an exhaust manifold heat shield, fuel rail heat cover, six injector covers, and 12 new O-rings. If you're looking to keep your Jeep's fuel cool and reduce vapor lock then check out DEI's Jeep fuel rail and injector cover kit.
(Narrator)>> After the break we finish tying our roll cage to the frame, stick around!
(Eliza)>> Hey guys, welcome back to XOR. We're wrapping up tying in the roll cage to the frame on our pre-runner Ranger. Now with the holes punched through my plates I'll reposition them on the cab floor and drill for my bolts. ♪ ♪ You'll notice that I marked the corners of both top and bottom plates so that I can realign them correctly when I go to bolt them together. ♪ ♪ [ drill spinning ]
(Eliza)>> Like always we're taking our same approach to drilling, starting with the small bit and working our way up to the hole size we need. ♪ ♪ [ drill spinning ] ♪ ♪
(Eliza)>> Another way we keep our builds consistent is our choice of fasteners. Our bolts are grade eight and they come from Industrial Depot. [ drill spinning ] ♪ ♪
(Eliza)>> The idea here is to sandwich the cab floor between the two steel plates and provide a spot to weld both the upper cage and the lower frame tie in too. ♪ ♪ Nylock nuts are put into service here since we have no intention of ever removing these plates. ♪ ♪ You can actually see the floor get pressed between both plates as I tighten the bolts down. [ drill spinning ] ♪ ♪
(Eliza)>> Next the frame tie in gets tacked to the bottom plate, and will eventually be welded directly to the frame once everything is in place. [ welder crackling ]
(Eliza)>> Up top the B-pillar cage tube gets tacked to the top plate. ♪ ♪ All right, all that's left to do is burn her in. For more information about anything you've seen on today's show visit us at Powernation TV dot com. ♪ ♪
(Jeremy)>> Now one of the most important aspects about off roading is vehicle recovery because well you never know what you're gonna run into out on the trail.
(Eliza)>> On our last XOR adventure our buddy Jeff from Team Aries took on a trail called "Power Line", and unfortunately "Power Line" lived up to its reputation and put his JK in a slow downward flop. After it came to a rest we used Jeff's recovery gear, the winch on the front of his rig and the one on our scout, to set him right again.
(Jeremy)>> So here are some essential tools to have in your recovery bag before you hit the trails. First is a good heavy duty tow strap. Now you're gonna want one of these just in case your winch cable isn't long enough or you've got to help your broken down buddy off the trails. And next is a snatch block. Now you're gonna want one of these because if you run your cable through this back to your winch it's gonna increase the pulling force of your winch. Now next is a winch cable dampener. Now this is designed that if you put weight inside it and then lay it over your winch cable, if something happens, like if your winch cable snaps, this is gonna drive the winch cable down to the ground, help protecting you and your vehicle. Now we're all out there to help protect Mother Nature, and this is a tree saver strap. Now this is designed to go around the trunk of the tree so you don't wrap your winch cable around the tree itself. And one of the last things you're gonna want in your recovery bag is a D-ring style clevis. Now these come in pretty handy when you want to hook up your snatch block to your tree saver, or when you've got to hook your tow strap up to your buddy. ♪ ♪ Now if you don't have a winch on your vehicle but still want to carry something to help get you unstuck, well that's where traction mats come into play. Just slide these underneath the wheels that are spinning and as soon as they get sucked under you'll have all the traction you need.
(Eliza)>> This is the actual winch that we used to flip Jeff over. Now there are many options in the winch world and here are some of the differences. First is you choice between synthetic rope and cable. Rope is actually stronger under the right conditions, and does not store any energy so there's no danger of whipping when broken. Cable however is most durable but needs to be used with extra precaution. Next are fairleads. Roller fairleads use rollers in all four directions to reduce chaffing on your cable, especially at severe angles and heavy loads. Next is your basic hoss fairlead. Now these are used with synthetic ropes and are best suited for the occasional user. So there you have it. Recovery tools explained!
Show Full Transcript
(Eliza)>> Hey guys, welcome to XOR, and that stands for Xtreme Off Road, and that's what we do. We cut, we weld, we grind, and we fabricate some awesome rides for everything and anything off of the pavement. This year we'll be taking our International Scout overlanding into the woods and turning our 1953 Willys Wagon into a 1,000 plus horsepower mudslinging terror.
(Jeremy)>> That's right. We're also gonna be working on this first gen Toyota Tacoma. Now we're gonna be doing a solid axle swap on this truck so we can take it out and kind of push it to its limits, but for now we're gonna be working on our 2002 Ford Ranger. Now this thing is going to be a Coyote powered long travel suspension high flying pre-runner. So there's really not much left to do but just get started. Our pre-runner started life as a stock 2002 Ford Ranger XLT with a v-six and an automatic transmission. After we dumped everything except the frame rails and the cab we hit it with a race ready paint job. ♪ ♪ A 63 inch spring swap and a built nine inch got everything started. ♪ ♪ A coyote aluminator got wedged in, followed by a roll cage. ♪ ♪ [ welder crackling ]
(Jeremy)>> After modifying the chassis it was time for a long travel race suspension to smooth out the ruts while we're running at wide open throttle. ♪ ♪ And with that all done that brings us back out here to the engine. Now this Coyote did not come in between the frame rails of this Ranger. So we can't exactly go buy a set of headers. So we're gonna have to custom make our own.
(Eliza)>> With the headers fabbed up and in place that gives us the opportunity to bring our roll cage out to the front, build up shock hoops, and get our coil overs installed.
(Jeremy)>> Now before we start building our headers, we know from the other side that the shock hoop is gonna come in right about here, while I want my exhaust to exit somewhere in here. So this part of the body is gonna be in the way. So we're just gonna cut it out of the way. [ saw cutting metal ] ♪ ♪
(Jeremy)>> Now that the patch is made I'm just gonna kind of put it into place here. [ welder crackling ] ♪ ♪
(Jeremy)>> And after our patch panel is installed, to ensure everything flows in the right direct we'll install the header gasket and the header flange. [ ratchet twisting ] ♪ ♪
(Jeremy)>> For the actual tubes themselves we're using an inch and seven-eighths header builder kit from Summit Racing. The great thing about Summit's kit is that these are all mandrel bent tubes. So no matter where you cut them across the bend the tube diameter stays the same, meaning the next piece will always line up. Here's a good approach. Install what will be the longest tube first since it will the trickiest one to get into place and will dictate the positioning of the other tubes. [ welder crackling ] ♪ ♪
(Jeremy)>> And here's a perfect example. This tube had to go on the under the side of the motor mount just to get it where it needed to go. ♪ ♪ [ welder crackling ] ♪ ♪
(Jeremy)>> With the longest tube in place it makes things a little bit easier because now it's apparent how much room you have or may not have. And tube number two will be our second longest run. So we're gonna take the same approach. ♪ ♪ This one ends up going on the front side of the motor mount but on the back side of the upper control arm mount. [ welder crackling ] ♪ ♪
(Jeremy)>> Tube three follows suit and barely clears the upper control arm mount. [ saw cutting metal ]
(Jeremy)>> This is where the shape of these tubes come in handy because the last tube is made up of two really short sections. ♪ ♪ [ welder crackling ]
(Jeremy)>> And once you're happy with your result you can commit to your design with several more strong tacks. [ welder crackling ] ♪ ♪
(Jeremy)>> Well there you go. Now we're gonna have to bring our header out here and down out of the way, but I'm gonna have to put the upper control arm on first. But when you're doing your headers just take your time because there's a whole lot of spaghetti going on in here, but if you just stay at it you'll definitely get it all there.
(Narrator)>> Up next we're getting our long travel coil overs mounted, and later we're tying the roll cage to the frame.
(Eliza)>> Hey guys, welcome to XOR. I thought we'd take a little bit of time to talk about the awesome coil overs that are going onto the pre-runner. After talking to LSK we went to Summit Racing dot com, picked up a 10 inch stroke two and half inch body remote reservoir coil over. Now what do those numbers mean? It's 10 inches of travel and two point five is the diameter of the body. Now it's important to know the diameter of the body to order the correct springs. Example, this is a three inch spring to fit over the two and a half inch body. As far as spring weights you'll need to know the four corner weight of your project before you order springs.
(Jeremy)>> Now to get this big coil over mounted into the Ranger we started by mocking it up on the passenger side. The very first thing we did is start bending the front part of the engine cage. Now the engine cage actually comes back into the cab and gets tied into the roll cage. After we did that we came out and bent our first shock loop. Now once I had the shock loop in place I was able to mount the top of the shock to the shock loop and the bottom of the shock down to the lower control arm. Once all that was in place I was able to tie the shock loop into the engine cage, and when we're all done burning that in that should give us plenty of strength to fly across the dunes. And this whole process starts by prepping the chassis to get rid of the surface rust and the o-e undercoating. So that calls for a three inch sanding disc on our Matco angle grinder. [ grinder spinning ]
(Jeremy)>> After spending some time on our Edwards tube bender... ♪ ♪ ...the first piece to go in is our engine cage tube. It will tie the interior roll cage and the chassis together. ♪ ♪ [ welder crackling ]
(Jeremy)>> To tie all this together we're using inch and three quarter 120 wall d-o-m tubing. [ welder crackling ] ♪ ♪
(Jeremy)>> The shock hoop itself is up next. It's the overall height of this piece that allows us to install such a long coil over. And notice how it fits perfect around our newly built headers. [ welder crackling ]
(Jeremy)>> For added strength this bar will serve as a mounting point for a future lateral bar that will tie the driver and passenger sides of our engine cage together. ♪ ♪ [ welder crackling ] ♪ ♪
(Jeremy)>> And now for our coil over. We are not gonna weld the tabs on the bottom of the shock to the lower control arm just yet. That's because we will need to adjust the angle of the shock after cycling the suspension fully. To mount our coil overs we're using chassis tabs that we got from Rough Stuff Specialties. After welding the first tab on it's real important to make sure the shock is centered in between the two tabs before you tack the second tab on. ♪ ♪ Now we're gonna add a brace that ties our upper control arm mount into our shock hoop, and we'll follow that up with a brace that ties our shock hoop to our engine cage. [ welder crackling ] ♪ ♪
(Jeremy)>> And with all that tacked together we've just got one thing left to do and that's find a spot for the reservoir, and well this just kind of looks like a good spot. We've got plenty of room on the other side also.
(Eliza)>> If you're working under the hood of your project and want to save some time, then Matco has a cordless ratchet to speed up the process. Their 16 volt quarter inch cordless ratchet kit comes with the ratchet, two lithium ion batteries, and a battery charger so you can keep the ball rolling. It even has a heavy duty carrying case. Matco says that their cordless ratchet has 35 foot pounds of torque and a slim head design so that getting into tight places is not a problem.
(Narrator)>> When we come back Eliza is installing floor plates so she can tie the roll cage to our pre-runner's frame. Stay tuned!
(Eliza)>> Hey guys, welcome back to XOR. Now that we've got the top side of our roll cage completely welded in we can now tie it to the frame, and that begins with some cutting and bending. ♪ ♪ Just like with the shock hoops I'm using the same inch and three quarter 120 wall d-o-m tubing to make my frame tie in. [ saw cutting metal ] ♪ ♪
(Eliza)>> All of our Edwards gear gets a good workout and this is no different. Their 10 ton bender quickly turns this piece of straight tube stock into the "U" shape that we need. ♪ ♪ It can easily bend two inch tube, schedule 40 pipe, two and a half inch tube, and even two inch square tube quickly and accurately. ♪ ♪ I'm cutting the plates that I will use to sandwich the cab floor out of quarter inch steel. ♪ ♪ And this time I'm using the 50 ton Iron Worker's flat bar shear to cleanly make my cuts. ♪ ♪ With all my parts made my next step is to cut off the excess tubing from the bottom of the roll cage that extends past the cab floor. [ saw cutting metal ]
(Eliza)>> I had intentional left these pieces long so that I could maximize the height of the cage. The additional length allowed me to adjust the roll cage once it was fully welded, and we knew the height of our seats and test fit Jeremy and myself. [ saw cutting metal ] ♪ ♪
(Eliza)>> I need to mark where I will punch a bolt hole through both plates of steel at once. So I positioned the plate where it will sit on the cab floor. [ hammer hitting metal ] ♪ ♪
(Eliza)>> Positioned correctly under the roll cage B-pillar tube, a paint pen marks the spot. Now all I have to do is use the Iron Worker's punch to finish the job. ♪ ♪
(Jeremy)>> If you guys have the iconic four liter in your 1997 to 2004 Jeeps, well under hood temperatures may become an issue, especially when you're out on the trails. Well DEI has designed a solution to help protect your fuel rails and fuel injections from all that under hood heat and prevent misfires. Their kit comes with an exhaust manifold heat shield, fuel rail heat cover, six injector covers, and 12 new O-rings. If you're looking to keep your Jeep's fuel cool and reduce vapor lock then check out DEI's Jeep fuel rail and injector cover kit.
(Narrator)>> After the break we finish tying our roll cage to the frame, stick around!
(Eliza)>> Hey guys, welcome back to XOR. We're wrapping up tying in the roll cage to the frame on our pre-runner Ranger. Now with the holes punched through my plates I'll reposition them on the cab floor and drill for my bolts. ♪ ♪ You'll notice that I marked the corners of both top and bottom plates so that I can realign them correctly when I go to bolt them together. ♪ ♪ [ drill spinning ]
(Eliza)>> Like always we're taking our same approach to drilling, starting with the small bit and working our way up to the hole size we need. ♪ ♪ [ drill spinning ] ♪ ♪
(Eliza)>> Another way we keep our builds consistent is our choice of fasteners. Our bolts are grade eight and they come from Industrial Depot. [ drill spinning ] ♪ ♪
(Eliza)>> The idea here is to sandwich the cab floor between the two steel plates and provide a spot to weld both the upper cage and the lower frame tie in too. ♪ ♪ Nylock nuts are put into service here since we have no intention of ever removing these plates. ♪ ♪ You can actually see the floor get pressed between both plates as I tighten the bolts down. [ drill spinning ] ♪ ♪
(Eliza)>> Next the frame tie in gets tacked to the bottom plate, and will eventually be welded directly to the frame once everything is in place. [ welder crackling ]
(Eliza)>> Up top the B-pillar cage tube gets tacked to the top plate. ♪ ♪ All right, all that's left to do is burn her in. For more information about anything you've seen on today's show visit us at Powernation TV dot com. ♪ ♪
(Jeremy)>> Now one of the most important aspects about off roading is vehicle recovery because well you never know what you're gonna run into out on the trail.
(Eliza)>> On our last XOR adventure our buddy Jeff from Team Aries took on a trail called "Power Line", and unfortunately "Power Line" lived up to its reputation and put his JK in a slow downward flop. After it came to a rest we used Jeff's recovery gear, the winch on the front of his rig and the one on our scout, to set him right again.
(Jeremy)>> So here are some essential tools to have in your recovery bag before you hit the trails. First is a good heavy duty tow strap. Now you're gonna want one of these just in case your winch cable isn't long enough or you've got to help your broken down buddy off the trails. And next is a snatch block. Now you're gonna want one of these because if you run your cable through this back to your winch it's gonna increase the pulling force of your winch. Now next is a winch cable dampener. Now this is designed that if you put weight inside it and then lay it over your winch cable, if something happens, like if your winch cable snaps, this is gonna drive the winch cable down to the ground, help protecting you and your vehicle. Now we're all out there to help protect Mother Nature, and this is a tree saver strap. Now this is designed to go around the trunk of the tree so you don't wrap your winch cable around the tree itself. And one of the last things you're gonna want in your recovery bag is a D-ring style clevis. Now these come in pretty handy when you want to hook up your snatch block to your tree saver, or when you've got to hook your tow strap up to your buddy. ♪ ♪ Now if you don't have a winch on your vehicle but still want to carry something to help get you unstuck, well that's where traction mats come into play. Just slide these underneath the wheels that are spinning and as soon as they get sucked under you'll have all the traction you need.
(Eliza)>> This is the actual winch that we used to flip Jeff over. Now there are many options in the winch world and here are some of the differences. First is you choice between synthetic rope and cable. Rope is actually stronger under the right conditions, and does not store any energy so there's no danger of whipping when broken. Cable however is most durable but needs to be used with extra precaution. Next are fairleads. Roller fairleads use rollers in all four directions to reduce chaffing on your cable, especially at severe angles and heavy loads. Next is your basic hoss fairlead. Now these are used with synthetic ropes and are best suited for the occasional user. So there you have it. Recovery tools explained!