
Engine Power Featured Projects


Engine Power Builds


Want more content like this?
Join the PowerNation Email NewsletterParts Used In This Episode

12Bolt.com
Valve Cover
Matco Tools
MATCO Tools are the Official Tool Supplier to PowerNation
Shacklett Automotive Machine
Machine Shop
The Industrial Depot
Tools, Hardware, Shop Supplies
Episode Transcript
(Narrator)>> The guys from Truck Tech are putting together a wicked '65 Chevy and for this project they have a very specific engine in mind. Today on Engine Power Austin and LT wanted us to build them a strong power plant for their pickup and we think this straight six fits the bill. [ engine revving ]
(Mike)>> Hey everybody, welcome to Engine Power. It's time for us to start some new projects and you may be wondering what we're doing over here in the Truck Tech shop. Well we're teaming up with LT and Austin on their '65 Chevy truck project, and like usual our assignment is in the engine department.
(Pat)>> And speaking of the engine this is gonna be powered by something a little bit different. It's not LS based. It's not even a conventional small or big block Chevy. It's something out of the ordinary and we can't wait to build it and get it on the dyno, and Austin and LT are here to tell us what it is and why they picked such an engine.
(Mike)>> What is it?
(Pat)>> I don't know yet.
(Austin)>> Well we really wanted you guys to be a part of this build but something that you'd be excited about. So we got an oddball for you.
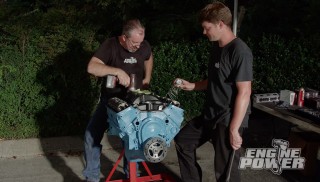
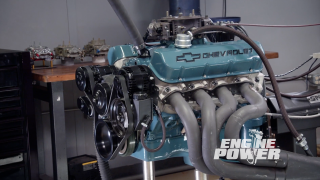
(LT)>> Now you probably haven't seen one of these in a while but it's a 292 Chevy straight six, and if you notice on the passenger's side there's something a little special bolted up.
(Mike)>> Got a little hair dryer.
(LT)>> Absolutely.
(Pat)>> I like it! I like it a lot! Why a six banger?
(LT)>> Well like you said we didn't want to do an LS. We didn't want to do a small block Chevy, and about the only other way we could make this different is to put like a Coyote in there and we just didn't want to do that.
(Austin)>> Create a few enemies you know. We'll stick Chevrolet.
(LT)>> Exactly, and we're really not going after a whole bunch of power. I know you guys probably don't like to hear that but this is a cruiser. We just want something that's spunky, torquey, fun. You pop the hood, you look at it. It's like holy cow this is different, and make something that's reliable. So it's got fuel injection and a turbo.
(Mike)>> I like it so much just because it is different. It's not the normal V-8 we've been doing a lot lately. Kinda figured if it was something you were doing LT it had to have a power adder, turbo obviously.
(LT)>> Well naturally aspirated just means the turbo hasn't shown up yet right?
(Pat)>> I'm gonna pretend I didn't hear that.
(Mike)>> What a cool project, and I know you're excited about it.
(Pat)>> I am excited about it, and surprisingly these will have more power than you think. There's a lot of aftermarket support for these. They are great engines. They have a long stroke, so they'll make a lot of torque. This is something that I've always wanted to do. I like the Ford straight sixes, I like the Chevy straight sixes. This makes me very happy. For what you're doing I think you have a great plan. I love the truck. This is one of my favorited vehicles you've done in here. Don't get me wrong, I like the kerosene burners or whatever the heck that stuff is, but this is something that the stance is right, the interior's awesome, I love it.
(Mike)>> I'm a big fan of where you have the turbo mounted. Is that a kit or did you build everything?
(LT)>> No everything is 100 percent custom fabricated, and really the only reason we put it over there is just kinda o-c-d and visual symmetry.
(Austin)>> Symmetrical.
(Mike)>> Fuel injection, great decision there too. Nice little blow through unit.
(LT)>> You know we really wanted this thing to be drivable right? A guy could hop in it and cruise all day.
(Austin)>> Not worry about it, and at the end of it all this will just be a fun build, and that's the point. If you can't have fun why even do it?
(Pat)>> Being it's on the dyno you guys wouldn't want to come over and run the dyno would you?
(Austin)>> I'll be there.
(LT)>> I would be insulted if you didn't invite us.
(Austin)>> I will take him up on that offer.
(Pat)>> Have you ran the dyno?
(LT)>> One time.
(Austin)>> I have not.
(Pat)>> I can't wait. We've got to get back over to our place.
(Mike)>> Thanks guys.
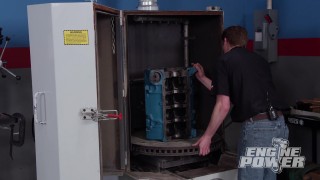
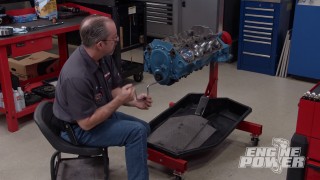
(Pat)>> The 292 currently in the '65 Chevy is just for mock up. This is the actual engine that we're building for Truck Tech. It's a complete power plant that was partially torn apart on arrival, and we wanted to start from scratch. So we finished the teardown. The block had already been align honed and decked, but the bores were not finished to our desired size. We took advantage of our Sunnen SV 15 cylinder hone to finish the job. The hone opens up the cylinder bore slightly, in our case to a finished size of 3.9150. In addition it creates tiny grooves in a cross hatch pattern on the cylinder wall. Engine oil is deposited in these grooves, keeping the piston rings properly lubricated. The cross hatch pattern also makes the piston rings rotate slightly as the engine runs, creating a better seal on both the cylinder wall and the piston's ring lands. Our rings will rotate at about six r-p-m. I've just got the bore finished to within a half thousandths of its final size. Now what that does is set bore geometry and gives a base hone for the finish that goes on top of it, which is called a plateau hone. I use a 220 grit diamond stone to do that. You may have noticed there is no torque plate on the engine, and that is unusual for a high performance build, and there are two reasons for that. One, we simply don't have one. It's not very common to have a 292 torque plate laying around and two, the head bolt holes are far enough away from the bore center that it doesn't distort the bore on the top as much. All cylinders have a little bit of distortion when the cylinder head is torqued down to the block, but this particular engine the bolt centers are far enough away from the cylinder itself that it doesn't effect it as much. Would I rather have a torque plate on it, absolutely. At our power level and at this application will it be okay? I think so. For the second and final pass the 220 grit stones are replaced with 600 grit diamond abrasive. I stopped half way through the hone process to give you a visual between the two cylinder finishes. This is the 220 grit on our roughing stage, which puts it a half thousandths from final bore size. This is the final bore size honed with a 600 grit diamond. Notice how rough this one is and how smooth this one looks, and this is at a 40 degree cross hatch. You can vary your cross hatch angle depending on the application from 30 to 45 degrees. For our application I think this is gonna work great. Our engine is out of the hone, ran through our jet washer, and back on a stand. So I thought it would be interesting to check bore distortion, and we can actually do that by torqueing up the head, torqueing up the mains, and going in through the bottom of the cylinder with a dial bore gauge cause frankly I've just gotta know. [ drill spinning ] [ torque wrench clicking ]
[ drill spinning ]
(Pat)>> Alright this is what I was hoping for and this is what's pretty interesting. The top of the bore is only about half thousandths big and less than a half thousandths out of round. So the bolts did not distort the top of the cylinder very much. The bottom of the bores are the same way. They're about a half thousandths big and less than a half thousandths out of round. The middle of the cylinder is what suffered the most oddly enough. It's about a thousandths out of round, but for this amount of power and this application it's going to be just fine and here is why. The top inch of the cylinder is what has to stay round and true because that is where all the power is made and that's where it has to seal. The rest of the time the piston and rings are just along for the ride on the power stroke. So we're good to move on.
(Narrator)>> Up next, for maximum power the straight six gets a cam shaft with a custom grind.
(Pat)>> We are continuing on the buildup of our 292 cubic inch straight six Chevrolet that's turbocharged from the guys next door at Truck Tech. I've already gone ahead and put in all the ARP main studs, and that's what this block was align honed with. Now when you go from a bolt to a stud you have to re-align hone it and you align hone the block with the stud or fastener that's being used. So now we are ready to check some main bearing clearances. The studs are torqued with ARP Ultra Torque lube to 70 pound feet. Next we'll mic the journal and set the dial bore gauge to zero. The resulting number is the vertical oil clearance for the main bearing. In this case the number one journal has 27 ten thousandths of clearance. We'll repeat this process on all the main bearings. The new rear main seal goes in next. We intentionally offset the parting line from the engine block and the cap. This helps prevent a small oil leak that can occur at the parting line. Permatex Ultra Slick will lubricate the seal preventing damage to the seal on startup. We'll use this assembly lube on all of the main bearings. The crankshaft is installed with the utmost care, making sure it contacts all of the main bearings at the same time to prevent binding. The caps are torqued to 70 pound feet. Now that the crank is torqued in we can turn it. It's very tempted to want to turn the crank before it's actually torqued in, like when you put it on before you put the caps on. That is bad to do because the bearings are not actually round until the caps are torqued on. So after everything's done the crank should turn freely. That is nice.
[ spray can hissing ]
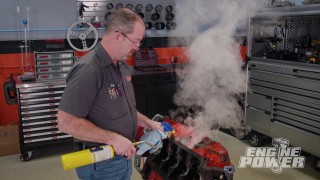
(Mike)>> Here's a little tip and it's actually a little more common sense than anything. When you're painting a block like this go ahead and lay the surface you're painting flat. That way when you're spraying the paint or the primer you resist any chances of it actually running. To shield the block from corrosion and enhance the look we'll prime and paint it with Dupli-Color engine enamel with ceramic. The paint resists intermittent temperatures up to 500 degrees Fahrenheit. It also protects from automotive fluid exposure. Now we're using their aluminum color.
(Pat)>> For a cam shaft in our 292 turbocharged application we went with a custom grind because we couldn't find anything in a catalog that would do what we wanted. So we went through Comp Cams' custom lobe catalog and came up with a solution. The lobes are from their XFI series, which is still a hydraulic flat tappet that's designed around modern valvetrain components. It is 230 degrees at 50 thousandths lift on the intake, 236 on the exhaust, and it's got 112 degrees of lobe separation. It has 589 thousandths lift on the intake, 605 thousandths on the exhaust. Now we've spread the lobe separation out because we want to reduce the amount of overlap. We don't want all that pressurized air rushing out of the exhaust during overlap. So we went with a custom grind. They also sent a set of Pro Magnum hydraulic flat tappet lifters. Now these are the same lifters used in a small or big block Chevy. They have an 842 thousandths diameter and they're recommended pre-load setting is zero to an eighth turn. Just like any other race engine, but before we put the cam shaft in we have to install the cam gear on the cam, and that takes a press to do.
(Mike)>> When you install a spacer ring make sure the chamfered side goes toward the am journal. Otherwise the cam shaft end play won't be correct. Next the cam shaft thrust plate goes on, followed by the Woodruff key. [ metal clanging ]
(Mike)>> Then the brand new aluminum timing gear from Melling is pressed on and the cam shaft assembly is complete.
(Pat)>> After lining up the marks on the timing gears we'll use a little bit of orange Permatex thread locker to secure the thrust plate fasteners to the block. They're torqued to 120 pound inches.
(Mike)>> We've got some impressive equipment in the Engine Power shop, but sometimes there's just no replacement for a trip to a dedicated machine shop. We made the quick little drive north on the interstate to Nashville, where Shacklett Auto Machine is. Now we're gonna upgrade the rod bolts in our 292 build to ARP's, and to do that we have to resize the rods, and that's why we're here. Pat's gonna show you how it's done.
(Pat)>> When upgrading to a new rod bolt, we press them in and torque them down they will actually distort the big end of the rod differently than the stock bolt. So we have to resize them. Now I've resized plenty of connecting rods in my career. So this machine is like an old friend. We'll trim two to three thousandths from the connecting rods and caps using a Sunnen cap grinder. It makes both surfaces perfectly flat and also reduces the inner diameter of the rod. The smaller inner diameter is then honed to the appropriate size. We're using ARP high strength rod bolts, which are torqued to 55 pound feet. With the proper mandrel in the Sunnen MBB 16-60 the rods are precision honed back to their o-e-m spec. We constantly check our progress on Sunnen's precision rod gauge to ensure perfect roundness and no taper. That is one ten thousandths side to side, and perfectly round. Alright with the rods upgraded with bolts and all sized up we're gonna head back to the shop for our six banger turbo build.
(Narrator)>> Up next high tech parts along with an old fashioned port job give our cylinder head excellent air flow.
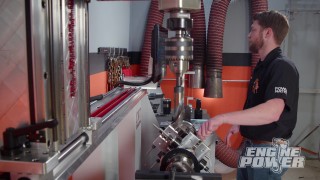
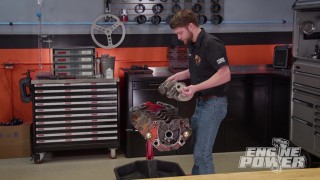
(Mike)>> Before we left Shacklett's Auto Machine Shop John Shacklett helped out with some work on the cylinder head. He final sized the bronze valve guide liners and cut the seats for the oversized valves. To improve air flow we're removing the bolt bosses inside the intake ports. If you're working at home a saw-zall will get the job done, but since we have a Vectrax vertical mill in the shop we're taking advantage of that. [ metal grinding ]
(Pat)>> Once the port is prepped we're installing the high flow lump port kit from 12 bolt dot com. It drastically increases the c-f-m capability of the modified intake port. The bowl area of the intake port still has some sharp edges. So for maximum air flow we're doing an old school bowl blend with a carbide burr. Then finishing it with a cartridge roll. Now that's pretty smooth. For final assembly of the head we'll use a little Permatex Ultra Slick on the valves. Then we'll install the springs, retainers, and locks. With our cylinder head all squared away we're gonna focus our attention back on the short block. We have already hung our new pistons on our reconditioned rods. These are from Silvolite and they are a hyper-eutectic design, which is a little bit more suited for our turbocharged application because they have more silicon content in them resisting scuffs at high engine temps. We have also went ahead and gapped our piston rings a little bit bigger for the boosted application. The tops are at 22, the seconds are at 24. The top is a Mahle faced ring. The second is a tapered scraper type ring, and it has a three sixteenths oil ring at standard tension.
(Mike)>> With the rod bearings and the fresh rods and torqued down we'll confirm our rod bolt stretch is in the correct range of 5.5 to 6 thousandths. Looks good! We mic'ed the journal and set our dial bore gauge, and all of our rods came in between 23 and 25 ten thousandths of clearance. Using a ring compressor we can gently tap the pistons into the bores, install the rod caps, and snug them down. With the engine rotated we can setup the rod bolt stretch gauge and torque the bolt until we are within our stretch range.
Like always our cams are degreed no matter what engine it is. The right stuff from Permatex will seal the timing cover to the block. ARP fasteners will secure it. A Summit Racing SFI approved balancer is installed using an installation tool. Now the oil pump and pickup assembly go on. The depth is checked, which gives us the go ahead to install the pan.
Thread sealant is installed on the head studs before they are screwed into the block. These holes are not blind.
(Pat)>> Now typically you wouldn't do this with an aluminum head because it drags the aluminum down through it. Iron not to worry about. There are three socket head cap screws that will get torqued down in the same sequence as the head studs. ARP lube is being used.
Comp Cams' hydraulic flat tappet lifters are lubed up and dropped into the lifter bores.
Trent Performance custom made these 11 inch 700 thousandths long push rods with a 105 thousandths wall thickness. They will control our 1.75 ratio Harlan Sharp rocker arms. With some extreme pressure lube on the ends they are installed...
...and the rockers are tightened down to one eighth turn past zero lash.
MSD is our choice for the ignition on this engine. Lights out for the valvetrain thanks to 12 Bolt dot com sending us this slick valve cover. It was natural finish. So we added some black and sanded the top to give it a classic look, and that compliments the aluminum side covers they threw in the box.
(Narrator)>> Up next, yep, that's definitely the distinct sound of a straight six.
(Mike)>> Pat and I finally made it to our favorite place with this little 292, the dyno room. Now we added some things like a pulley setup to turn the mechanical water pump. Pat actually had to make some spacers on the lathe, and we took a small block Chevy pulley setup, flipped the water pump pulley in backwards, and it works. Now another thing we added is an exhaust manifold from 12 Bolt dot com and an intake manifold from Offenhauser. Now to run it we're using our trusty 750 c-f-m brawler carburetor.
(Pat)>> Now we went ahead and done the difficult part. We've broken the engine in. Because it's a flat tappet cam shaft you have to do a few different things, like use some specific oil and run the engine very gently between 2,500 and 3,500 for about 20 minutes. Well we've done all that. We've drained the oil and cut apart the filter and it looks great. So now we're ready to see what this turbo specific engine will make naturally aspirated.
(Mike)>> Any time an engine is on the dyno that's gonna go in your project you want to be there. That's why Austin and LT stopped by. We're dyno'ing the six cylinder that's going in project Lo 'n Slo. Now I'm gonna make the first pull from 2,000 to 5,000 r-p-m, and if everything goes as planned these guys are taking over the controls.
(Pat)>> That makes me nervous.
(Mike)>> You ready?
(LT)>> Let's do it. [ high pitched engine revving ]
(LT)>> Yeah that's where it starts to sound good.
(Pat)>> It sounds like an airplane.
(Mike)>> Awesome, oil pressure, everything. Let's see what we got.
(LT)>> You guys will hate me for saying this but that almost sounds like a Skyline motor.
(Pat)>> You shut your trap.
(LT)>> Wow, so these came from the factory with like what, 165?
(Austin)>> 160, 165 is what we looked up.
(Mike)>> This thing has way less compression. It does have better flowing head but other than that you know it's already 60 horse above what it came from the factory.
(Austin)>> Not even eight to one on the compression.
(Mike)>> And that's because of the turbo.
(Pat)>> Calculated it is 7.96 to one. The torque curve is a torque plateau. It's super flat, and it has a very, very nice power curve.
(Mike)>> Alright, all the vitals, everything looks good. You guys have got to rock, paper, and scissor it for the first one to the console.
(LT)>> Darn, I'm out.
(Austin)>> Okay I've never done this before. Mike come back.
(Pat)>> This thing you don't even have to hit the gas pedal. Just hit starter, watch what happens. You've got to hold it. The most important thing on this is oil pressure. Obviously if that goes down at any point you abort the pull.
(Mike)>> When you go to full throttle and you see the r-p-m stabilize at 2,000 you would hit "D", and that starts your sweep. When it gets up to 5,000 you'll hear the break pull the engine down. Just pull out of it. That's all you've got to do.
(Pat)>> Keep going, keep going, keep going, all the way open. Okay "D"! Hold onto it. Now watch this, don't worry about anything else. [ high pitched engine revving ]
(Mike)>> Perfect, nice.
(Pat)>> Nicely done. Scarring the bejusus out of me.
(Mike)>> 220, see you're pulling ahead of mine.
(Austin)>> Dude that's awesome, 220. That's a consistent little dude.
(Mike)>> Alright LT, it's your turn to drive. Less talking, more driving, let's go.
(LT)>> Hey you know the coolest thing about this whole project is we never really set out to make a ton of horsepower. You know we just wanted something that was oddball and I definitely think we got it.
(Mike)>> I think Pat's about to slap you in the back of the head.
(Pat)>> You're messing around, come on!
(LT)>> Come on dad, where's the throttle?
(Pat)>> "S", activate.
(LT)>> Activate.
(Pat)>> Start.
(LT)>> Start.
(Pat)>> Just like an old pro, look at you go.
(Mike)>> Holding it too long like that puts a lot of heat in the combustion chamber and it'll kill power. [ high pitched engine revving ]
(Mike)>> 219, 269, that thing is printing numbers.
(Pat)>> It's very, very consistent.
(Mike)>> For more information about the parts and equipment used in today's episode visit Powernation TV dot com.
Show Full Transcript
(Mike)>> Hey everybody, welcome to Engine Power. It's time for us to start some new projects and you may be wondering what we're doing over here in the Truck Tech shop. Well we're teaming up with LT and Austin on their '65 Chevy truck project, and like usual our assignment is in the engine department.
(Pat)>> And speaking of the engine this is gonna be powered by something a little bit different. It's not LS based. It's not even a conventional small or big block Chevy. It's something out of the ordinary and we can't wait to build it and get it on the dyno, and Austin and LT are here to tell us what it is and why they picked such an engine.
(Mike)>> What is it?
(Pat)>> I don't know yet.
(Austin)>> Well we really wanted you guys to be a part of this build but something that you'd be excited about. So we got an oddball for you.
(LT)>> Now you probably haven't seen one of these in a while but it's a 292 Chevy straight six, and if you notice on the passenger's side there's something a little special bolted up.
(Mike)>> Got a little hair dryer.
(LT)>> Absolutely.
(Pat)>> I like it! I like it a lot! Why a six banger?
(LT)>> Well like you said we didn't want to do an LS. We didn't want to do a small block Chevy, and about the only other way we could make this different is to put like a Coyote in there and we just didn't want to do that.
(Austin)>> Create a few enemies you know. We'll stick Chevrolet.
(LT)>> Exactly, and we're really not going after a whole bunch of power. I know you guys probably don't like to hear that but this is a cruiser. We just want something that's spunky, torquey, fun. You pop the hood, you look at it. It's like holy cow this is different, and make something that's reliable. So it's got fuel injection and a turbo.
(Mike)>> I like it so much just because it is different. It's not the normal V-8 we've been doing a lot lately. Kinda figured if it was something you were doing LT it had to have a power adder, turbo obviously.
(LT)>> Well naturally aspirated just means the turbo hasn't shown up yet right?
(Pat)>> I'm gonna pretend I didn't hear that.
(Mike)>> What a cool project, and I know you're excited about it.
(Pat)>> I am excited about it, and surprisingly these will have more power than you think. There's a lot of aftermarket support for these. They are great engines. They have a long stroke, so they'll make a lot of torque. This is something that I've always wanted to do. I like the Ford straight sixes, I like the Chevy straight sixes. This makes me very happy. For what you're doing I think you have a great plan. I love the truck. This is one of my favorited vehicles you've done in here. Don't get me wrong, I like the kerosene burners or whatever the heck that stuff is, but this is something that the stance is right, the interior's awesome, I love it.
(Mike)>> I'm a big fan of where you have the turbo mounted. Is that a kit or did you build everything?
(LT)>> No everything is 100 percent custom fabricated, and really the only reason we put it over there is just kinda o-c-d and visual symmetry.
(Austin)>> Symmetrical.
(Mike)>> Fuel injection, great decision there too. Nice little blow through unit.
(LT)>> You know we really wanted this thing to be drivable right? A guy could hop in it and cruise all day.
(Austin)>> Not worry about it, and at the end of it all this will just be a fun build, and that's the point. If you can't have fun why even do it?
(Pat)>> Being it's on the dyno you guys wouldn't want to come over and run the dyno would you?
(Austin)>> I'll be there.
(LT)>> I would be insulted if you didn't invite us.
(Austin)>> I will take him up on that offer.
(Pat)>> Have you ran the dyno?
(LT)>> One time.
(Austin)>> I have not.
(Pat)>> I can't wait. We've got to get back over to our place.
(Mike)>> Thanks guys.
(Pat)>> The 292 currently in the '65 Chevy is just for mock up. This is the actual engine that we're building for Truck Tech. It's a complete power plant that was partially torn apart on arrival, and we wanted to start from scratch. So we finished the teardown. The block had already been align honed and decked, but the bores were not finished to our desired size. We took advantage of our Sunnen SV 15 cylinder hone to finish the job. The hone opens up the cylinder bore slightly, in our case to a finished size of 3.9150. In addition it creates tiny grooves in a cross hatch pattern on the cylinder wall. Engine oil is deposited in these grooves, keeping the piston rings properly lubricated. The cross hatch pattern also makes the piston rings rotate slightly as the engine runs, creating a better seal on both the cylinder wall and the piston's ring lands. Our rings will rotate at about six r-p-m. I've just got the bore finished to within a half thousandths of its final size. Now what that does is set bore geometry and gives a base hone for the finish that goes on top of it, which is called a plateau hone. I use a 220 grit diamond stone to do that. You may have noticed there is no torque plate on the engine, and that is unusual for a high performance build, and there are two reasons for that. One, we simply don't have one. It's not very common to have a 292 torque plate laying around and two, the head bolt holes are far enough away from the bore center that it doesn't distort the bore on the top as much. All cylinders have a little bit of distortion when the cylinder head is torqued down to the block, but this particular engine the bolt centers are far enough away from the cylinder itself that it doesn't effect it as much. Would I rather have a torque plate on it, absolutely. At our power level and at this application will it be okay? I think so. For the second and final pass the 220 grit stones are replaced with 600 grit diamond abrasive. I stopped half way through the hone process to give you a visual between the two cylinder finishes. This is the 220 grit on our roughing stage, which puts it a half thousandths from final bore size. This is the final bore size honed with a 600 grit diamond. Notice how rough this one is and how smooth this one looks, and this is at a 40 degree cross hatch. You can vary your cross hatch angle depending on the application from 30 to 45 degrees. For our application I think this is gonna work great. Our engine is out of the hone, ran through our jet washer, and back on a stand. So I thought it would be interesting to check bore distortion, and we can actually do that by torqueing up the head, torqueing up the mains, and going in through the bottom of the cylinder with a dial bore gauge cause frankly I've just gotta know. [ drill spinning ] [ torque wrench clicking ]
[ drill spinning ]
(Pat)>> Alright this is what I was hoping for and this is what's pretty interesting. The top of the bore is only about half thousandths big and less than a half thousandths out of round. So the bolts did not distort the top of the cylinder very much. The bottom of the bores are the same way. They're about a half thousandths big and less than a half thousandths out of round. The middle of the cylinder is what suffered the most oddly enough. It's about a thousandths out of round, but for this amount of power and this application it's going to be just fine and here is why. The top inch of the cylinder is what has to stay round and true because that is where all the power is made and that's where it has to seal. The rest of the time the piston and rings are just along for the ride on the power stroke. So we're good to move on.
(Narrator)>> Up next, for maximum power the straight six gets a cam shaft with a custom grind.
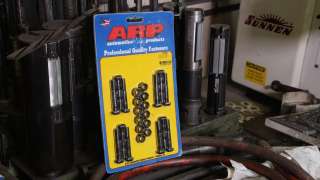
(Pat)>> We are continuing on the buildup of our 292 cubic inch straight six Chevrolet that's turbocharged from the guys next door at Truck Tech. I've already gone ahead and put in all the ARP main studs, and that's what this block was align honed with. Now when you go from a bolt to a stud you have to re-align hone it and you align hone the block with the stud or fastener that's being used. So now we are ready to check some main bearing clearances. The studs are torqued with ARP Ultra Torque lube to 70 pound feet. Next we'll mic the journal and set the dial bore gauge to zero. The resulting number is the vertical oil clearance for the main bearing. In this case the number one journal has 27 ten thousandths of clearance. We'll repeat this process on all the main bearings. The new rear main seal goes in next. We intentionally offset the parting line from the engine block and the cap. This helps prevent a small oil leak that can occur at the parting line. Permatex Ultra Slick will lubricate the seal preventing damage to the seal on startup. We'll use this assembly lube on all of the main bearings. The crankshaft is installed with the utmost care, making sure it contacts all of the main bearings at the same time to prevent binding. The caps are torqued to 70 pound feet. Now that the crank is torqued in we can turn it. It's very tempted to want to turn the crank before it's actually torqued in, like when you put it on before you put the caps on. That is bad to do because the bearings are not actually round until the caps are torqued on. So after everything's done the crank should turn freely. That is nice.
[ spray can hissing ]
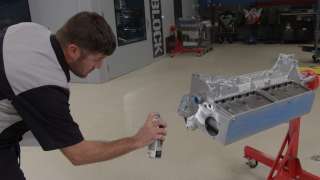
(Mike)>> Here's a little tip and it's actually a little more common sense than anything. When you're painting a block like this go ahead and lay the surface you're painting flat. That way when you're spraying the paint or the primer you resist any chances of it actually running. To shield the block from corrosion and enhance the look we'll prime and paint it with Dupli-Color engine enamel with ceramic. The paint resists intermittent temperatures up to 500 degrees Fahrenheit. It also protects from automotive fluid exposure. Now we're using their aluminum color.
(Pat)>> For a cam shaft in our 292 turbocharged application we went with a custom grind because we couldn't find anything in a catalog that would do what we wanted. So we went through Comp Cams' custom lobe catalog and came up with a solution. The lobes are from their XFI series, which is still a hydraulic flat tappet that's designed around modern valvetrain components. It is 230 degrees at 50 thousandths lift on the intake, 236 on the exhaust, and it's got 112 degrees of lobe separation. It has 589 thousandths lift on the intake, 605 thousandths on the exhaust. Now we've spread the lobe separation out because we want to reduce the amount of overlap. We don't want all that pressurized air rushing out of the exhaust during overlap. So we went with a custom grind. They also sent a set of Pro Magnum hydraulic flat tappet lifters. Now these are the same lifters used in a small or big block Chevy. They have an 842 thousandths diameter and they're recommended pre-load setting is zero to an eighth turn. Just like any other race engine, but before we put the cam shaft in we have to install the cam gear on the cam, and that takes a press to do.
(Mike)>> When you install a spacer ring make sure the chamfered side goes toward the am journal. Otherwise the cam shaft end play won't be correct. Next the cam shaft thrust plate goes on, followed by the Woodruff key. [ metal clanging ]
(Mike)>> Then the brand new aluminum timing gear from Melling is pressed on and the cam shaft assembly is complete.
(Pat)>> After lining up the marks on the timing gears we'll use a little bit of orange Permatex thread locker to secure the thrust plate fasteners to the block. They're torqued to 120 pound inches.
(Mike)>> We've got some impressive equipment in the Engine Power shop, but sometimes there's just no replacement for a trip to a dedicated machine shop. We made the quick little drive north on the interstate to Nashville, where Shacklett Auto Machine is. Now we're gonna upgrade the rod bolts in our 292 build to ARP's, and to do that we have to resize the rods, and that's why we're here. Pat's gonna show you how it's done.
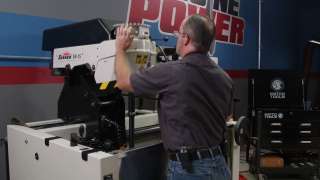
(Pat)>> When upgrading to a new rod bolt, we press them in and torque them down they will actually distort the big end of the rod differently than the stock bolt. So we have to resize them. Now I've resized plenty of connecting rods in my career. So this machine is like an old friend. We'll trim two to three thousandths from the connecting rods and caps using a Sunnen cap grinder. It makes both surfaces perfectly flat and also reduces the inner diameter of the rod. The smaller inner diameter is then honed to the appropriate size. We're using ARP high strength rod bolts, which are torqued to 55 pound feet. With the proper mandrel in the Sunnen MBB 16-60 the rods are precision honed back to their o-e-m spec. We constantly check our progress on Sunnen's precision rod gauge to ensure perfect roundness and no taper. That is one ten thousandths side to side, and perfectly round. Alright with the rods upgraded with bolts and all sized up we're gonna head back to the shop for our six banger turbo build.
(Narrator)>> Up next high tech parts along with an old fashioned port job give our cylinder head excellent air flow.
(Mike)>> Before we left Shacklett's Auto Machine Shop John Shacklett helped out with some work on the cylinder head. He final sized the bronze valve guide liners and cut the seats for the oversized valves. To improve air flow we're removing the bolt bosses inside the intake ports. If you're working at home a saw-zall will get the job done, but since we have a Vectrax vertical mill in the shop we're taking advantage of that. [ metal grinding ]
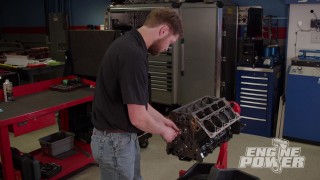
(Pat)>> Once the port is prepped we're installing the high flow lump port kit from 12 bolt dot com. It drastically increases the c-f-m capability of the modified intake port. The bowl area of the intake port still has some sharp edges. So for maximum air flow we're doing an old school bowl blend with a carbide burr. Then finishing it with a cartridge roll. Now that's pretty smooth. For final assembly of the head we'll use a little Permatex Ultra Slick on the valves. Then we'll install the springs, retainers, and locks. With our cylinder head all squared away we're gonna focus our attention back on the short block. We have already hung our new pistons on our reconditioned rods. These are from Silvolite and they are a hyper-eutectic design, which is a little bit more suited for our turbocharged application because they have more silicon content in them resisting scuffs at high engine temps. We have also went ahead and gapped our piston rings a little bit bigger for the boosted application. The tops are at 22, the seconds are at 24. The top is a Mahle faced ring. The second is a tapered scraper type ring, and it has a three sixteenths oil ring at standard tension.
(Mike)>> With the rod bearings and the fresh rods and torqued down we'll confirm our rod bolt stretch is in the correct range of 5.5 to 6 thousandths. Looks good! We mic'ed the journal and set our dial bore gauge, and all of our rods came in between 23 and 25 ten thousandths of clearance. Using a ring compressor we can gently tap the pistons into the bores, install the rod caps, and snug them down. With the engine rotated we can setup the rod bolt stretch gauge and torque the bolt until we are within our stretch range.
Like always our cams are degreed no matter what engine it is. The right stuff from Permatex will seal the timing cover to the block. ARP fasteners will secure it. A Summit Racing SFI approved balancer is installed using an installation tool. Now the oil pump and pickup assembly go on. The depth is checked, which gives us the go ahead to install the pan.
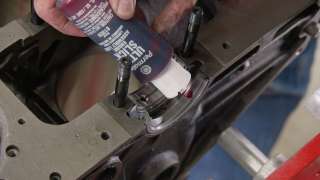
Thread sealant is installed on the head studs before they are screwed into the block. These holes are not blind.
(Pat)>> Now typically you wouldn't do this with an aluminum head because it drags the aluminum down through it. Iron not to worry about. There are three socket head cap screws that will get torqued down in the same sequence as the head studs. ARP lube is being used.
Comp Cams' hydraulic flat tappet lifters are lubed up and dropped into the lifter bores.
Trent Performance custom made these 11 inch 700 thousandths long push rods with a 105 thousandths wall thickness. They will control our 1.75 ratio Harlan Sharp rocker arms. With some extreme pressure lube on the ends they are installed...
...and the rockers are tightened down to one eighth turn past zero lash.
MSD is our choice for the ignition on this engine. Lights out for the valvetrain thanks to 12 Bolt dot com sending us this slick valve cover. It was natural finish. So we added some black and sanded the top to give it a classic look, and that compliments the aluminum side covers they threw in the box.
(Narrator)>> Up next, yep, that's definitely the distinct sound of a straight six.
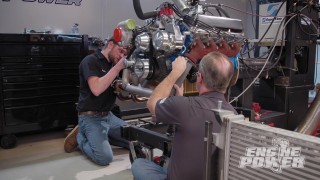
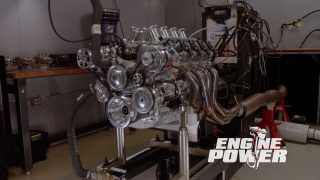
(Mike)>> Pat and I finally made it to our favorite place with this little 292, the dyno room. Now we added some things like a pulley setup to turn the mechanical water pump. Pat actually had to make some spacers on the lathe, and we took a small block Chevy pulley setup, flipped the water pump pulley in backwards, and it works. Now another thing we added is an exhaust manifold from 12 Bolt dot com and an intake manifold from Offenhauser. Now to run it we're using our trusty 750 c-f-m brawler carburetor.
(Pat)>> Now we went ahead and done the difficult part. We've broken the engine in. Because it's a flat tappet cam shaft you have to do a few different things, like use some specific oil and run the engine very gently between 2,500 and 3,500 for about 20 minutes. Well we've done all that. We've drained the oil and cut apart the filter and it looks great. So now we're ready to see what this turbo specific engine will make naturally aspirated.
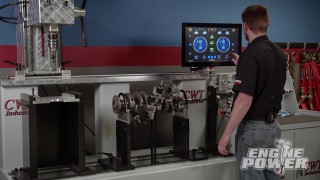
(Mike)>> Any time an engine is on the dyno that's gonna go in your project you want to be there. That's why Austin and LT stopped by. We're dyno'ing the six cylinder that's going in project Lo 'n Slo. Now I'm gonna make the first pull from 2,000 to 5,000 r-p-m, and if everything goes as planned these guys are taking over the controls.
(Pat)>> That makes me nervous.
(Mike)>> You ready?
(LT)>> Let's do it. [ high pitched engine revving ]
(LT)>> Yeah that's where it starts to sound good.
(Pat)>> It sounds like an airplane.
(Mike)>> Awesome, oil pressure, everything. Let's see what we got.
(LT)>> You guys will hate me for saying this but that almost sounds like a Skyline motor.
(Pat)>> You shut your trap.
(LT)>> Wow, so these came from the factory with like what, 165?
(Austin)>> 160, 165 is what we looked up.
(Mike)>> This thing has way less compression. It does have better flowing head but other than that you know it's already 60 horse above what it came from the factory.
(Austin)>> Not even eight to one on the compression.
(Mike)>> And that's because of the turbo.
(Pat)>> Calculated it is 7.96 to one. The torque curve is a torque plateau. It's super flat, and it has a very, very nice power curve.
(Mike)>> Alright, all the vitals, everything looks good. You guys have got to rock, paper, and scissor it for the first one to the console.
(LT)>> Darn, I'm out.
(Austin)>> Okay I've never done this before. Mike come back.
(Pat)>> This thing you don't even have to hit the gas pedal. Just hit starter, watch what happens. You've got to hold it. The most important thing on this is oil pressure. Obviously if that goes down at any point you abort the pull.
(Mike)>> When you go to full throttle and you see the r-p-m stabilize at 2,000 you would hit "D", and that starts your sweep. When it gets up to 5,000 you'll hear the break pull the engine down. Just pull out of it. That's all you've got to do.
(Pat)>> Keep going, keep going, keep going, all the way open. Okay "D"! Hold onto it. Now watch this, don't worry about anything else. [ high pitched engine revving ]
(Mike)>> Perfect, nice.
(Pat)>> Nicely done. Scarring the bejusus out of me.
(Mike)>> 220, see you're pulling ahead of mine.
(Austin)>> Dude that's awesome, 220. That's a consistent little dude.
(Mike)>> Alright LT, it's your turn to drive. Less talking, more driving, let's go.
(LT)>> Hey you know the coolest thing about this whole project is we never really set out to make a ton of horsepower. You know we just wanted something that was oddball and I definitely think we got it.
(Mike)>> I think Pat's about to slap you in the back of the head.
(Pat)>> You're messing around, come on!
(LT)>> Come on dad, where's the throttle?
(Pat)>> "S", activate.
(LT)>> Activate.
(Pat)>> Start.
(LT)>> Start.
(Pat)>> Just like an old pro, look at you go.
(Mike)>> Holding it too long like that puts a lot of heat in the combustion chamber and it'll kill power. [ high pitched engine revving ]
(Mike)>> 219, 269, that thing is printing numbers.
(Pat)>> It's very, very consistent.
(Mike)>> For more information about the parts and equipment used in today's episode visit Powernation TV dot com.